# 1.1. What is Hidemyacc?

Hidemyacc is an antidetect browser that helps you create and manage a large number of browser profiles, each with a completely different set of browser fingerprint parameters. When combined with a proxy to change your IP address, each profile is equivalent to a brand-new computer with a new network connection.

Hidemyacc offers a 7-day free trial with 30 profiles (equivalent to the Starter package). You can download and use the tool here: [**Download link**](https://hidemyacc.com/download)

### &#x20;⚙️ Key features of Hidemyacc

Below are the main features of Hidemyacc that help users create, warm up, and manage a large number of accounts on the same device.

<table><thead><tr><th width="269.00006103515625">Feature</th><th>Description</th></tr></thead><tbody><tr><td>Browser fingerprint customization</td><td>Users can customize browser fingerprint parameters as needed (user-agent, screen size, fonts, memory, browser language, etc.), or let the system randomly select a parameter set, ensuring every profile has its own distinct fingerprint.</td></tr><tr><td>Default profile settings</td><td>Configure default parameters for new profiles. When creating a new profile, if left unchanged, the new profile will inherit the same parameters as the default profile.</td></tr><tr><td>Sub-account creation</td><td>From the Base package upward, the main account can create an unlimited number of sub-accounts and has full management rights over them (add/delete/change password). Sub-accounts share the same resources as the main account.</td></tr><tr><td>Share/transfer profile</td><td>Share or transfer entire profiles to another Hidemyacc account.</td></tr><tr><td>Magic Link</td><td>Move a profile from another browser or antidetect browser into Hidemyacc with an identical working environment.</td></tr><tr><td>Automation</td><td>Create and run large batches of automation scripts to safely warm up accounts. You can build automation scripts in 3 ways: drag-and-drop pre-built commands; import a self-coded script; or record real actions.</td></tr><tr><td>Synchronization</td><td>Synchronize actions across multiple Hidemyacc profiles at once, helping users warm up accounts more efficiently.</td></tr><tr><td>Proxy management</td><td>Add proxies to a shared pool and manage all proxies at once.</td></tr><tr><td>Proxy Store</td><td>Buy proxies at a discount — up to 50% off with exclusive codes from Hidemyacc's partner proxy sellers.</td></tr></tbody></table>

### ⚙️ Who is Hidemyacc for?

You can use Hidemyacc to create and manage multiple accounts on the same device. Each profile has a different configuration, and websites will recognize these profiles as different users.

* **Ecommerce:** Run multiple storefronts and multiple seller accounts across marketplaces at the same time, without risking account linking or bans.
* **Web scraping:** Collect data at scale with a separate browser identity for each session, avoiding blocks or access limits.
* **Web games:** Manage multiple game accounts in parallel for farming, account leveling services, or running a stable multi-account system.
* **Affiliate marketing:** Run multiple ad accounts and test multiple landing pages in parallel without platforms flagging duplicate sources.
* **Cryptocurrency:** Manage multiple wallets, exchange accounts, or airdrop accounts without cross-linking between accounts.
* **Digital marketing:** Manage multiple social media accounts and multiple ad campaigns for multiple clients without data conflicts.


# 1.2. How to download & register an Account

Instructions on how to download, install, and register a new account on Hidemaycc

To register for a Hidemyacc account, follow these steps:

**Step 1:** Download Hidemyacc from the official Hidemyacc website (<https://hidemyacc.com/download>).

<figure><img src="https://eng-hidemyacc.gitbook.io/~gitbook/image?url=https%3A%2F%2F486469059-files.gitbook.io%2F%7E%2Ffiles%2Fv0%2Fb%2Fgitbook-x-prod.appspot.com%2Fo%2Fspaces%252FpGmapgZbRxSGLImUsds2%252Fuploads%252FoYdzDEST8CMhdRq267u3%252Fdownload-hidemyacc.png%3Falt%3Dmedia%26token%3Deccff5a1-e51d-4606-ac2a-645d58a4879b&#x26;width=768&#x26;dpr=4&#x26;quality=100&#x26;sign=b2aa41a&#x26;sv=1" alt=""><figcaption><p>Download the Hidemyacc latest version on official website</p></figcaption></figure>

**Step 2:** Register for an account

On the app, click **"Register here".**&#x20;

<figure><img src="/files/rSEqlVJ80Z9qGkufFOKm" alt=""><figcaption></figcaption></figure>

Fill in the registration information, including email, password, and contact method (phone number, Skype, or Telegram).

<figure><img src="/files/N1oLUo5wwTuF2qUIhUzi" alt=""><figcaption></figcaption></figure>

**Step 3:** Read and accept Hidemyacc’s terms and policies.

**Step 4:** Click the "Register" button to complete the process.

After registering an account, you can access the Hidemyacc application to create new profiles and customize browser fingerprint settings for each profile as needed.&#x20;

{% hint style="info" %}
Hidemyacc currently does not support creating new account and running profiles on web browsers.
{% endhint %}


# 1.3. Notes on the free trial

Some notes about the Hidemyacc trial package.

**For Hidemyacc version 3.0:**

* Hidemyacc offers a 7-day free trial with 30 profiles (equivalent to the Starter package).

**For Hidemyacc version 2.0:**

* A 1-day free trial is supported for accounts registered for the first time on a completely new device.
* The free trial is **not** supported if you use a device that has previously created a Hidemyacc account, or if you log in from an IP address that has already created more than 3 accounts.


# 2.1. Create a new profile

Tutorial on how to create a new profile

In this section, Hidemyacc will guide you on how to create a new profile in Hidemyacc and how to manage these profiles.&#x20;

### ⚙️ Overview tab

In the **Overview tab**, you can set up the **Operating System** and **Browser** configurations of your **New Profile** by following these steps:

1. Enter your profile's name.
2. Choose an operating system (it's best to pick an OS matching your real device for optimal system performance). Hidemyacc currently supports 5 operating systems: Windows, macOS, Linux, Android, and iOS. Android and iOS are supported from the Base package upward.
3. Choose a browser and browser version. Hidemyacc supports 5 browsers: *Chrome, Brave, Opera, Edge, and Yandex.*

<figure><img src="/files/SfkhboeMwGvimZZZHtcX" alt=""><figcaption><p>Create a new profile on Hidemyacc</p></figcaption></figure>

In addition to choosing from the system's built-in options, you can also customize the user-agent yourself.

### ⚙️ Proxy tab

To set up a proxy for your profile, click on Proxy tab.&#x20;

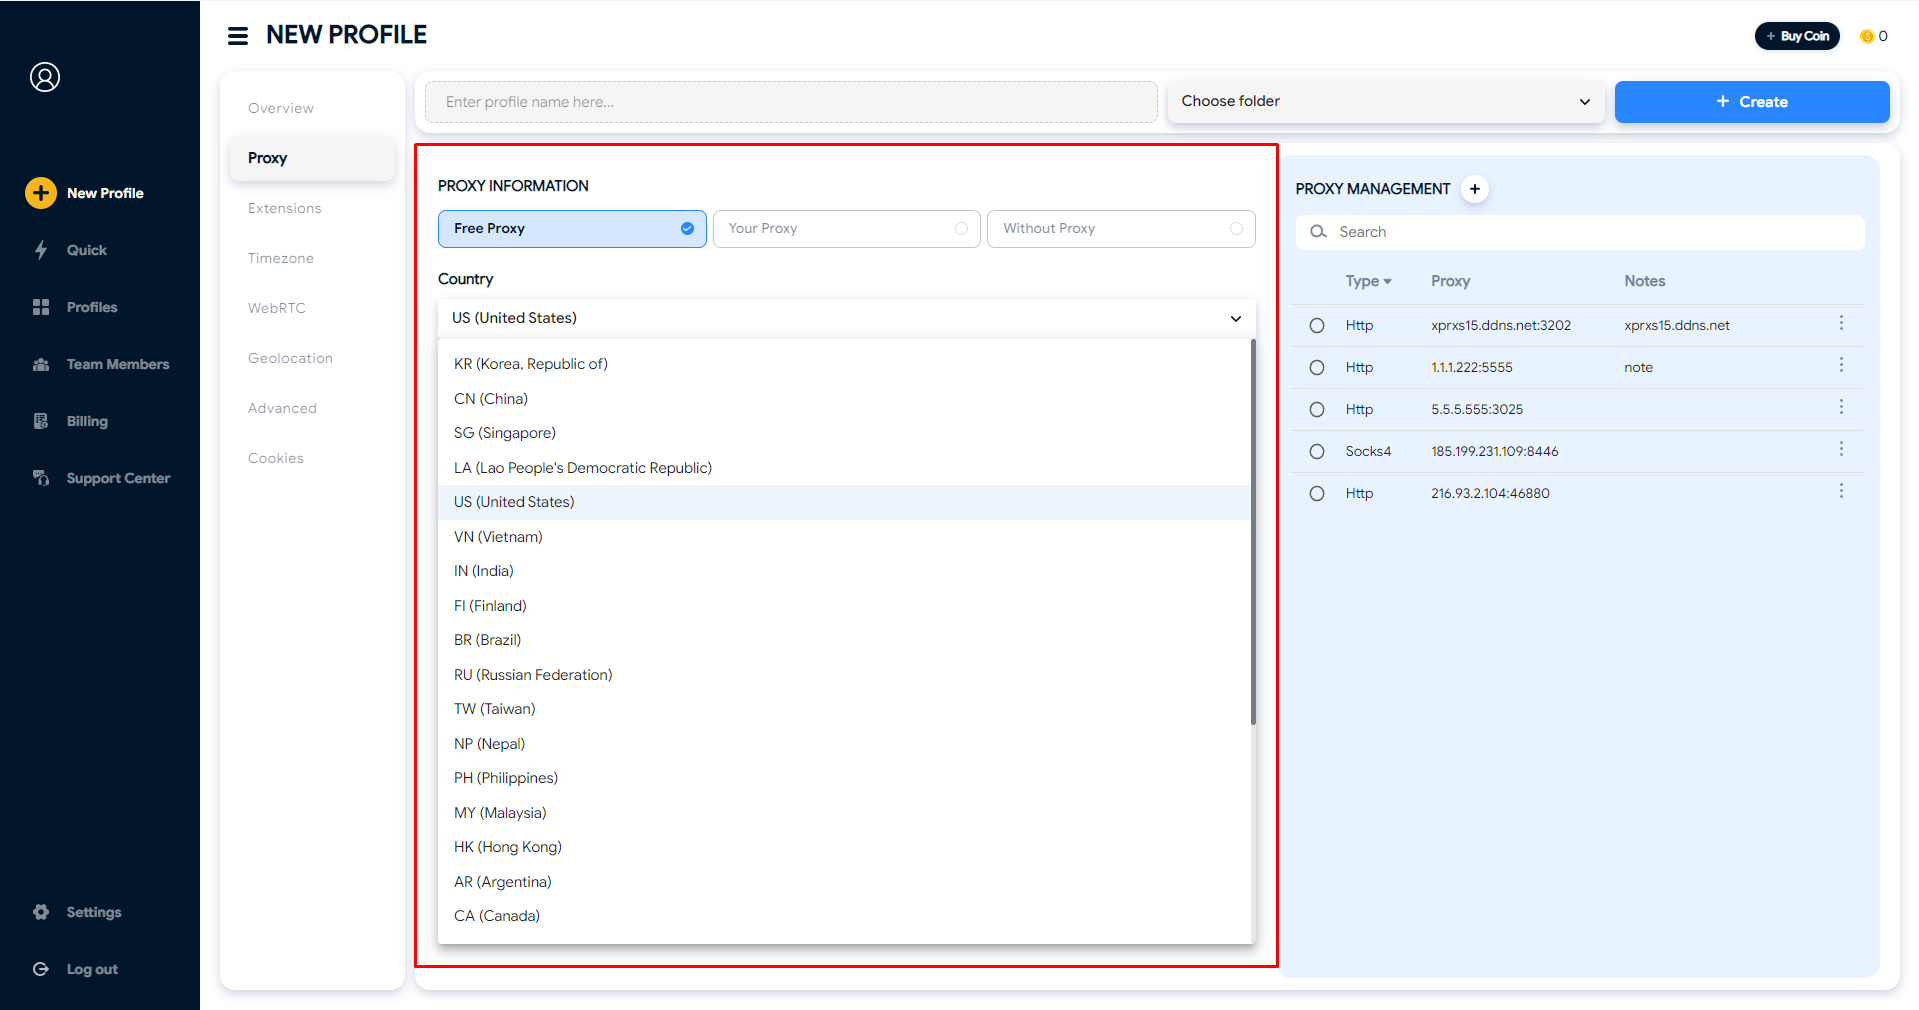
1. **`Free Proxy:`** From the Base package, you can access to about 10 000 free proxies from Hidemyacc. Choose the country then the system will randomly assign a proxy to your profile.

<figure><img src="https://files.gitbook.com/v0/b/gitbook-x-prod.appspot.com/o/spaces%2FltHHlMTT3H4Cd2w1KlTw%2Fuploads%2F6a3k1V9FdqYfNqCtyEH1%2Fproxy.png?alt=media&#x26;token=aec7a6e8-504a-4fd7-ade3-91d86b40ebd7" alt=""><figcaption></figcaption></figure>

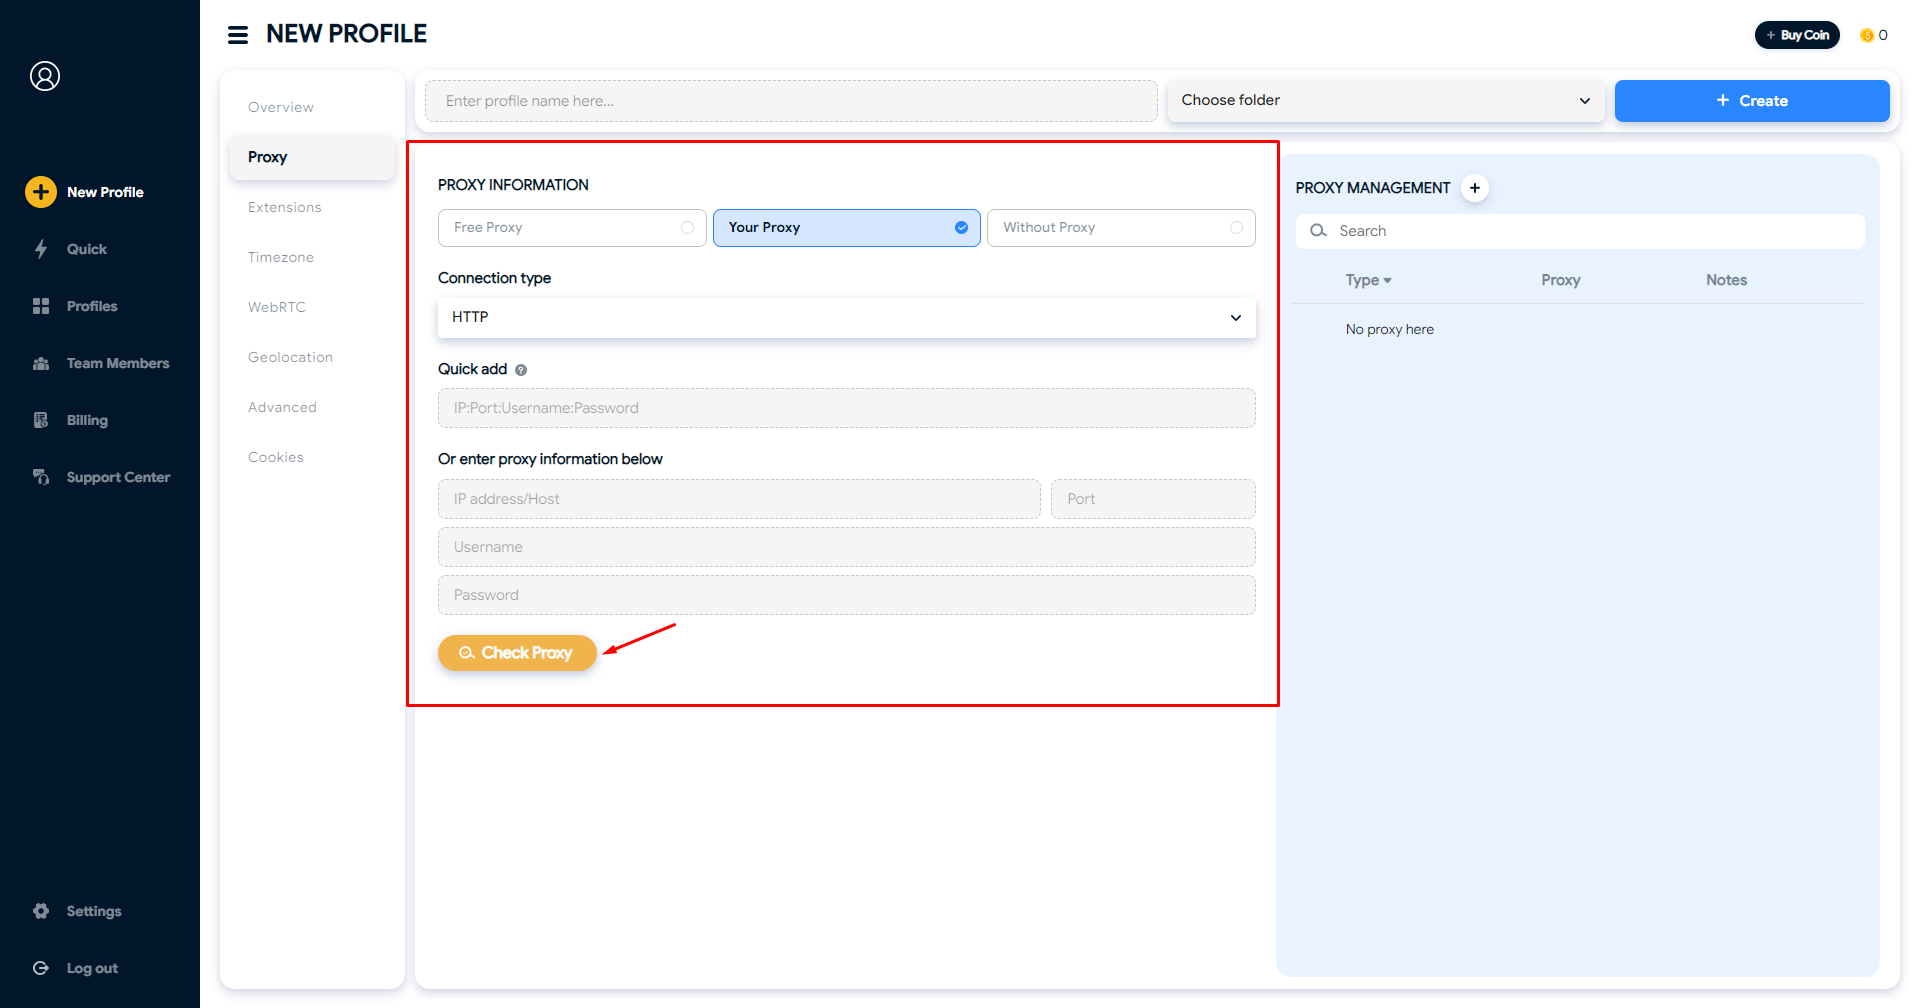
2. **`Your Proxy:`** Use your own proxy.&#x20;

* Choose your Connection type (Hidemyacc supports HTTP, Socks4, Socks5, Tinsoftproxy, and TMproxy).
* Enter your proxy information in the format: ***ip:port:username:password*** &#x20;
* Click on Check Proxy to check proxy's status

<figure><img src="https://files.gitbook.com/v0/b/gitbook-x-prod.appspot.com/o/spaces%2FltHHlMTT3H4Cd2w1KlTw%2Fuploads%2FbNsmBsmErWRq6T79dbrN%2Fhma-3.0-check-proxy.png?alt=media&#x26;token=bcf6892f-3c0d-46b8-883c-2263896a9b46" alt=""><figcaption></figcaption></figure>

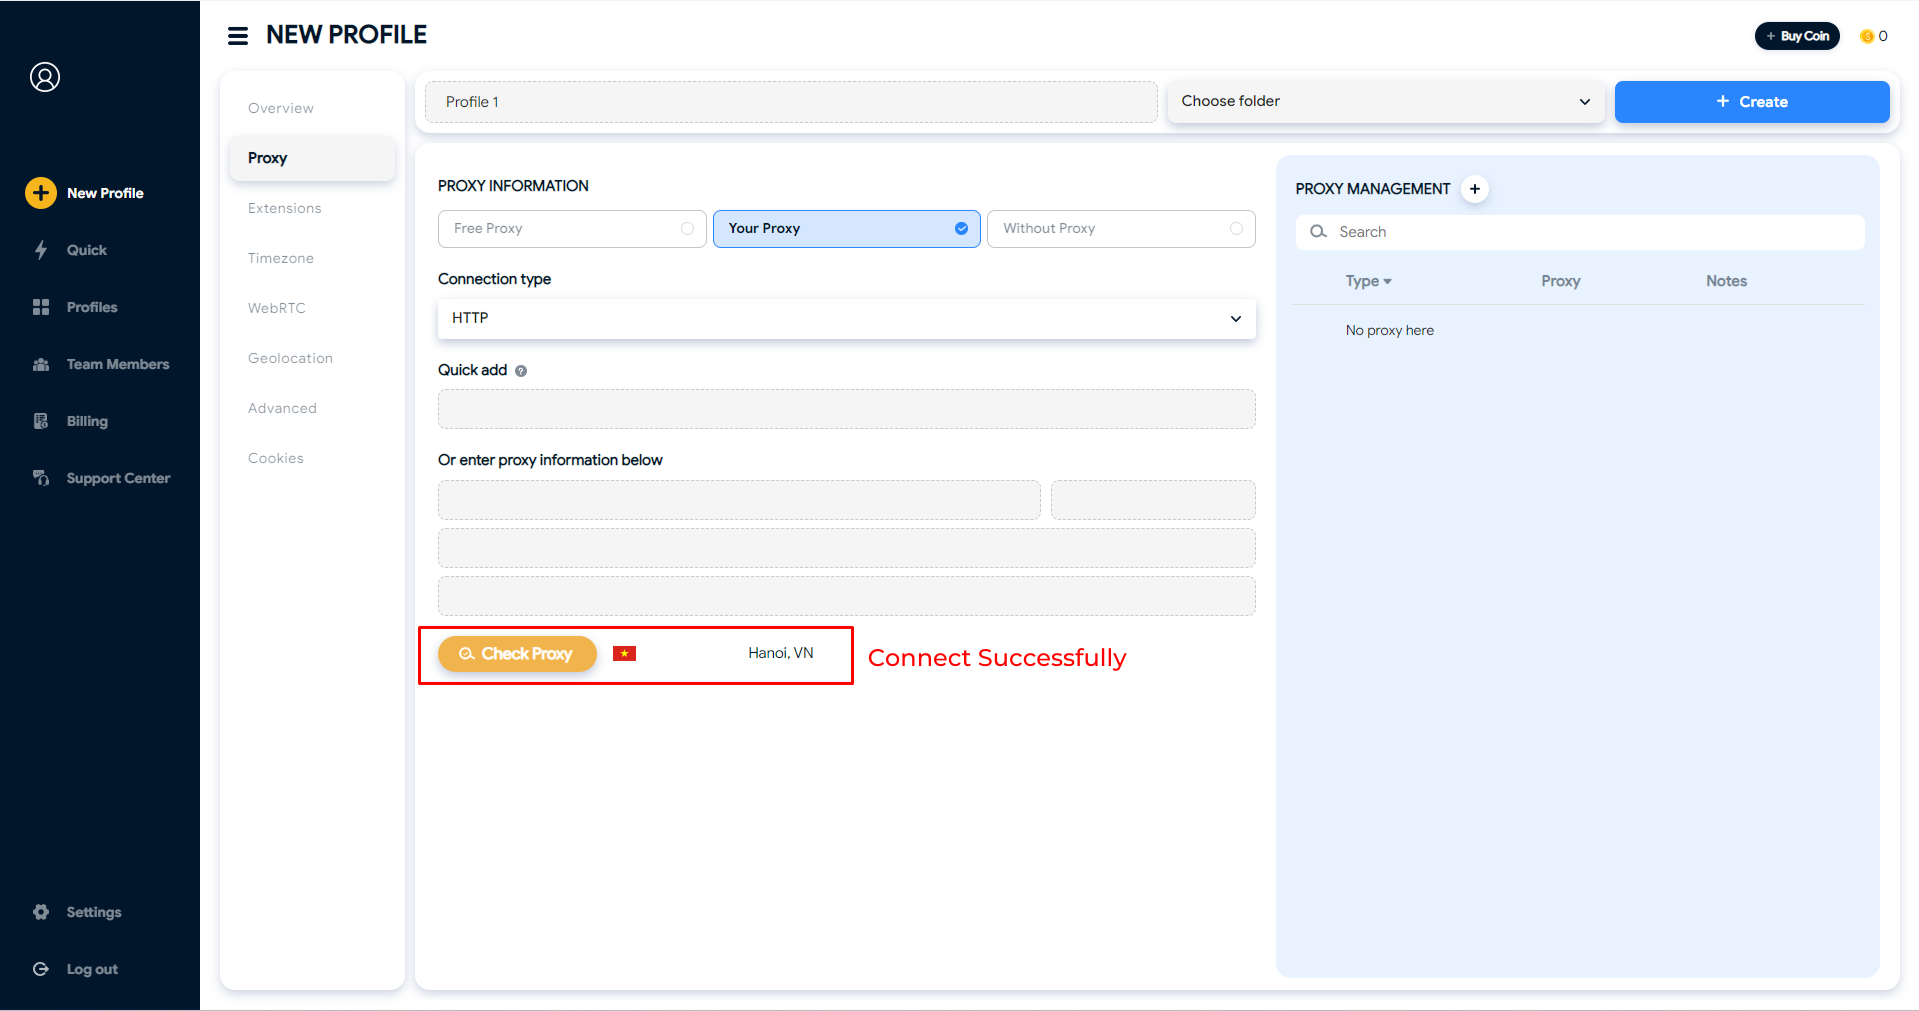
<figure><img src="https://files.gitbook.com/v0/b/gitbook-x-prod.appspot.com/o/spaces%2FltHHlMTT3H4Cd2w1KlTw%2Fuploads%2FJlVOQ4wy52pYxotZT4fg%2Fhidemyacc-document-connect-successfully.png?alt=media&#x26;token=750343f3-6b91-4904-9a38-01795f9b7e02" alt=""><figcaption><p>Proxy connects successfully</p></figcaption></figure>

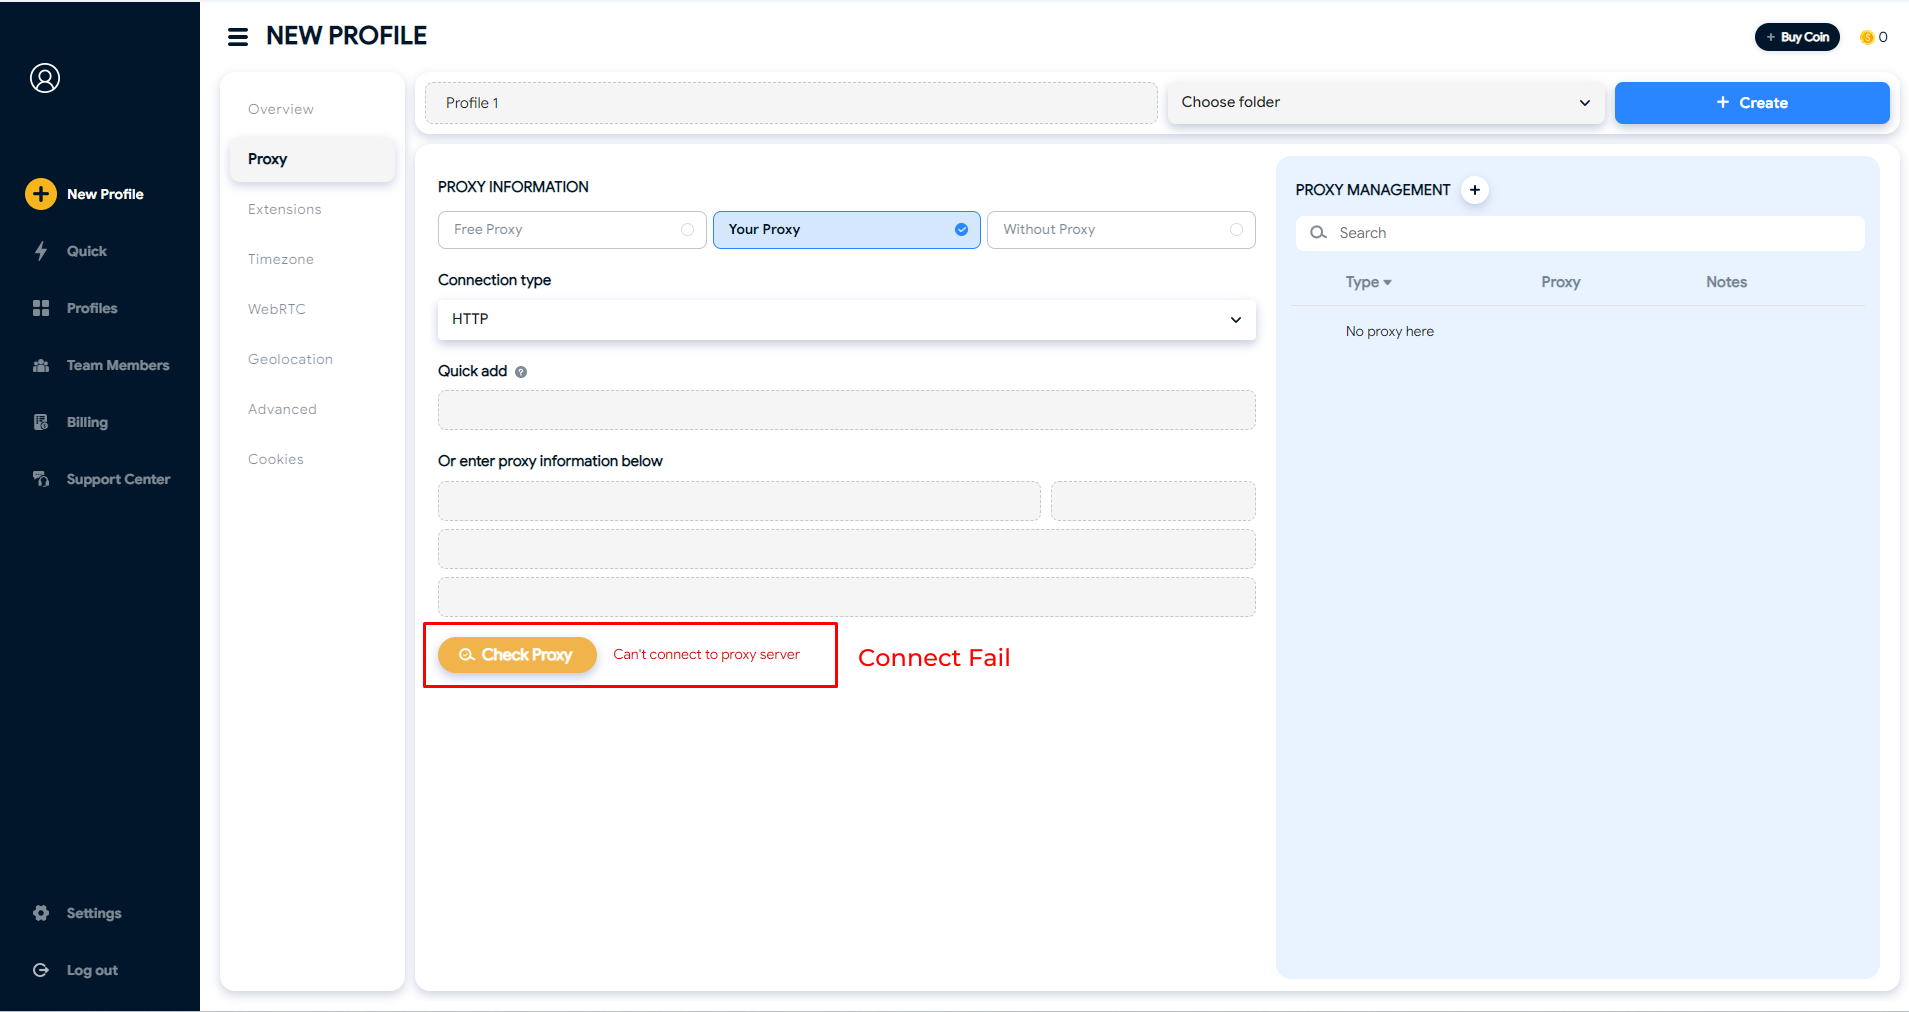
<figure><img src="https://files.gitbook.com/v0/b/gitbook-x-prod.appspot.com/o/spaces%2FltHHlMTT3H4Cd2w1KlTw%2Fuploads%2F8oJZoBDJ4jI9YXqPQWma%2Fhidemyacc-connect-fial.png?alt=media&#x26;token=546810cf-5e1a-40f2-bb34-0f206cb7bb0a" alt=""><figcaption><p>Can't connect to proxy server</p></figcaption></figure>

3. **`Without Proxy:`** Select this option if you prefer not to configure a proxy for your profile. In this case, the profile will use the same IP address as your real device.
4. **`Proxy Manager:`** Get a proxy from the Proxy Manager store to add to your profile without having to re-enter that proxy information.

<figure><img src="https://eng-hidemyacc.gitbook.io/~gitbook/image?url=https%3A%2F%2F486469059-files.gitbook.io%2F%7E%2Ffiles%2Fv0%2Fb%2Fgitbook-x-prod.appspot.com%2Fo%2Fspaces%252FpGmapgZbRxSGLImUsds2%252Fuploads%252FZuIrq84UjnhGSRks163Q%252Ftab-proxy-proxy-manager.png%3Falt%3Dmedia%26token%3D9c5d54d1-9f5c-4479-b8cb-2f6a5e08c3f6&#x26;width=768&#x26;dpr=4&#x26;quality=100&#x26;sign=c66b5f47&#x26;sv=1" alt=""><figcaption></figcaption></figure>

### ⚙️ Extension tab

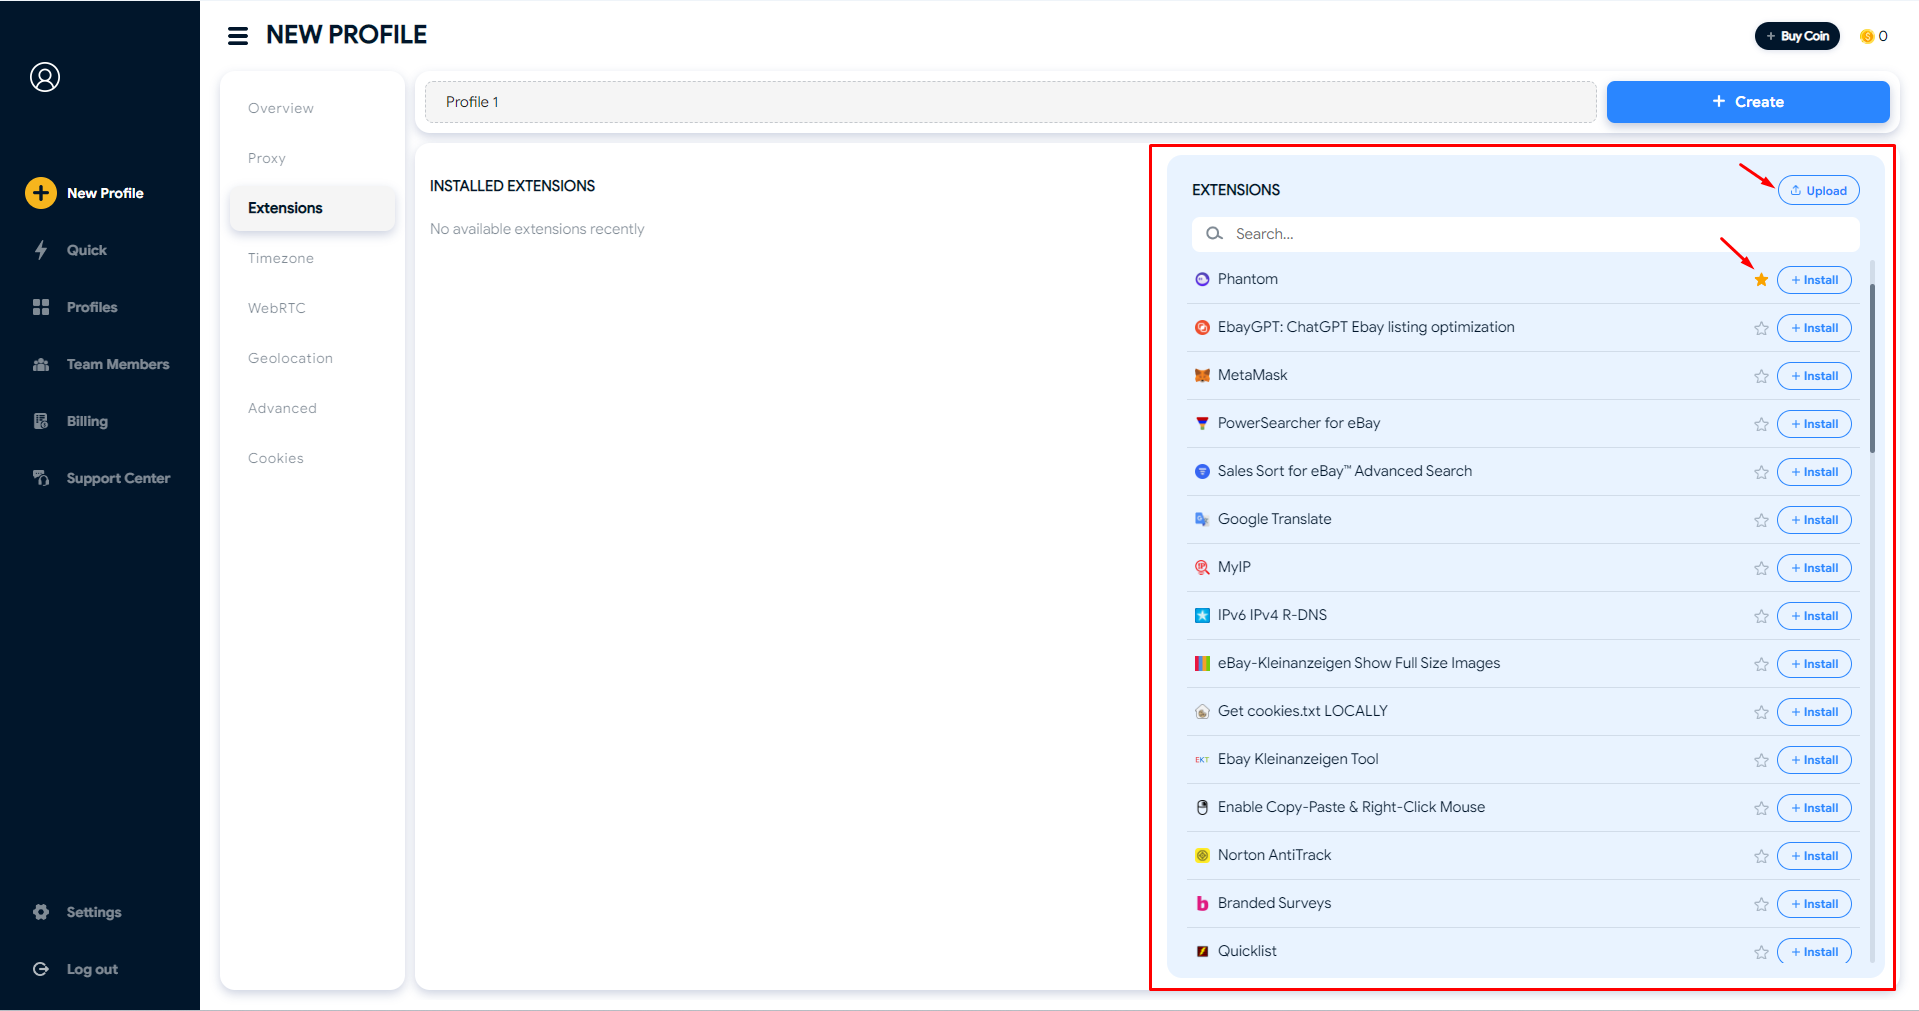
In this tab, you can add extensions to a profile in 3 ways.

#### Method 1: Install available extensions

You can search for extensions you want and **click Install icon** to install it on your profile. To assign extension to all profiles created in the future, click on the star icon.

If you can’t find the needed extension in Hidemyacc, you can upload them from your computer.

<figure><img src="https://files.gitbook.com/v0/b/gitbook-x-prod.appspot.com/o/spaces%2FltHHlMTT3H4Cd2w1KlTw%2Fuploads%2FWvViEABKYNmVfvGPV2nB%2Fhma-extension.png?alt=media&#x26;token=18243670-8db9-40fb-820f-b2171ce8b1e4" alt=""><figcaption></figcaption></figure>

#### Method 2: Upload extensions from your computer

Select **Upload**, drag the folder containing the extensions from your computer. To download an extension from the Chrome Web Store, follow these steps.

* **Step 1:** Add the CRX Extractor extension to your Chrome profile.&#x20;

<figure><img src="/files/Y35WNmzs1FdxRhyq1jJO" alt=""><figcaption></figcaption></figure>

* **Step 2:** Go to the Chrome Web Store and search for the extension you need.&#x20;
* **Step 3:** Click on the CRX extension icon and choose "Download as ZIP".&#x20;

<figure><img src="/files/6j3RdJhvDIc9yzlq7REN" alt=""><figcaption></figcaption></figure>

* **Step 4:** Extract the extension file you just downloaded using CRX Extractor.&#x20;
* **Step 5:** Go to your Hidemyacc profile and upload this file. The system will automatically set up the extension for your Hidemyacc profile.

<figure><img src="/files/pqwP0Dkj1kiskeIBA3Ct" alt=""><figcaption></figcaption></figure>

#### Method 3: Add extensions from Chrome store

This feature allows you to add extensions directly from the Chrome Store without having to download the file to your computer. Simply copy and paste the extension link from the Chrome Store and click **Add Extension** to complete the process.

* If the extension link is valid, the system will let you **Upload Extension**.
* If the link is incorrect, contains syntax errors, missing characters, or extra symbols, the system will display a warning saying that the extension could not be found.

<figure><img src="/files/ACaGTaLpRdr52PaNI2Ep" alt=""><figcaption><p>Copy &#x26; paste the Chrome store URL to import extension</p></figcaption></figure>

#### Note on extension limits per package

Hidemyacc limits the number of extensions you can add based on your subscription plan as follows:

* **Mini Plan:** 5 extensions
* **Starter Plan:** 5 extensions
* **Base Plan:** 10 extensions
* **Team Plan:** 25 extensions
* **Business Plan:** 50 extensions

If you exceed the allowed number of extensions, the system will display an error message.

### ⚙️ Timezone tab

Regarding the Timezone section, you can keep it on the default setting. The information will automatically adjust based on your proxy.&#x20;

<figure><img src="/files/5C718ZEloXYxuvBxmiQs" alt=""><figcaption></figcaption></figure>

If the Timezone information appears incorrect when you check on proxy testing websites, you have the option to manually select the appropriate Timezone.

<figure><img src="/files/1Tb08MWVLCgv1PxoNs3L" alt=""><figcaption></figcaption></figure>

### ⚙️ WebRTC tab

With Hidemyacc, the IP address exposed via WebRTC is detected on each Run of the profile. Therefore, when using a proxy, pay attention to when you need to enable or disable WebRTC:

* **With a static proxy,** you can leave the default configuration as Altered, meaning websites will detect your real IP address as the proxy's IP. Alternatively, you can enter a different IP address here, and that new IP will be the one detected.
* **With a rotating proxy,** since the proxy address is not fixed and changes continuously, while the WebRTC-detected IP address is fixed (based on the first IP detected when the profile is run), the safest option is to select **Disable** when using a rotating proxy, to avoid raising suspicion.
* **With Real,** WebRTC will detect the original IP address of the actual computer you're using.

> ℹ️ Video guide on using WebRTC: <https://youtu.be/uru-c5k1-YE?si=xJ7EgvsY1fcwE5Dm>

<figure><img src="/files/UIIzYzfV3FffkBuQTwYa" alt=""><figcaption><p>WebRTC tab</p></figcaption></figure>

### ⚙️ Geolocation tab

The Geolocation information will automatically adjust based on your proxy. You can change it manually with these 3 following options:

* **`Prompt:`** You can fill your desired location with latitude, longitude, and the accuracy (count on meters).
* **`Allow:`** Choosing this will automatically allow websites to get your geolocation data. Unlike Prompt, you don't have to agree to share your location every time you visit a website.
* **`Block:`** Choosing this will automatically prevent websites from getting your geolocation data.

<figure><img src="/files/zZooYSLLwj6GiFG8MTgh" alt=""><figcaption></figcaption></figure>

### ⚙️ Advanced tab

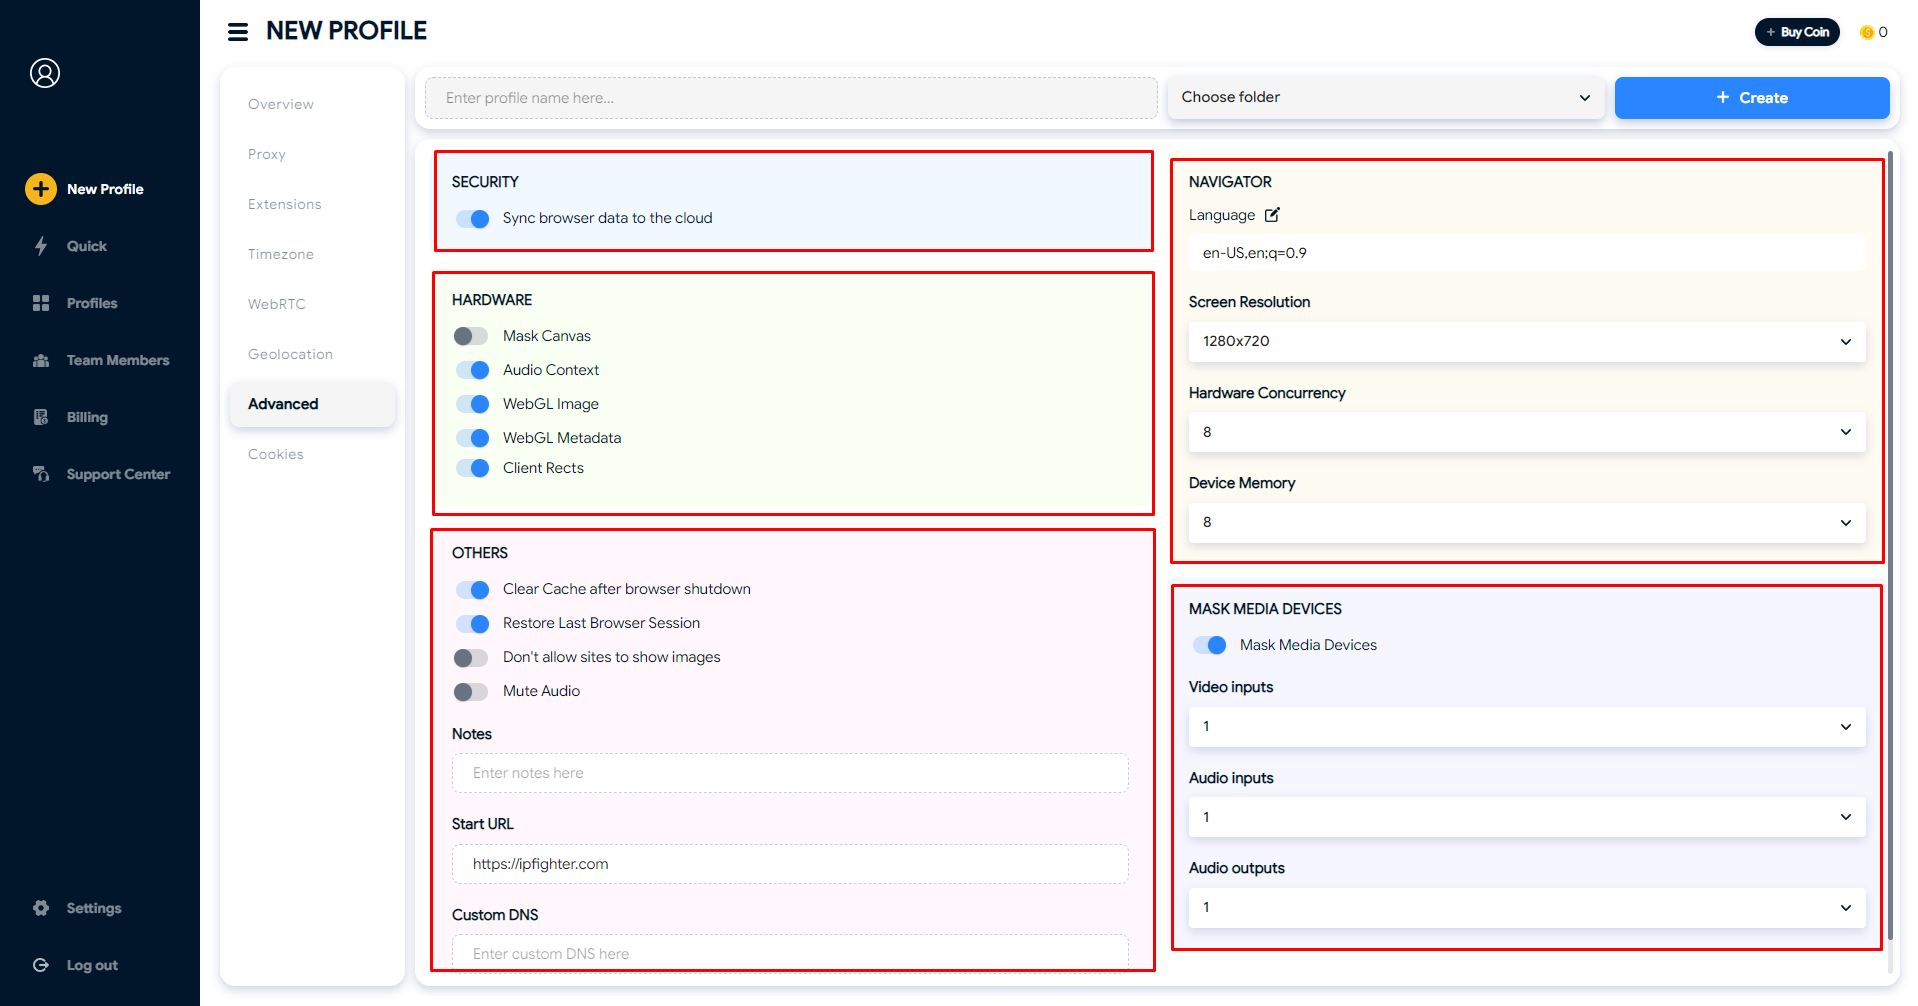
By default, you don't need to adjust the configurations in **Advanced Tab** because we already set up everything you need.

<figure><img src="https://files.gitbook.com/v0/b/gitbook-x-prod.appspot.com/o/spaces%2FltHHlMTT3H4Cd2w1KlTw%2Fuploads%2FL81Pow6MQfoxE2wuIGDu%2Fadvanced.png?alt=media&#x26;token=a46234f5-d07d-42c1-bf7a-a6d0416d6d43" alt=""><figcaption></figcaption></figure>

These are the advanced settings available when creating a new profile on Hidemyacc.

1. <mark style="background-color:orange;">**Security Section:**</mark> If you do not wish to synchronize data with Hidemyacc's server, please disable the Browser Data Synchronization to the Cloud feature.
2. <mark style="background-color:orange;">**Hardware Section**</mark>

* **`Mask Canvas`**: This setting requires the browser to render a hidden Canvas image, which is then converted into a hash string format to assist in the identification of browser fingerprints. This parameter may not be unique since there could be a set of hardware device replicas of yours somewhere in the world.
* **`Audio Context:`** This represents the audio frequency characteristic of the device. The website will request that the browser simulate the playback of audio files based on your audio settings and installed hardware. This parameter may not be unique.
* **`WebGL Image:`** This parameter pertains to web pixel data or how Google Maps and 3D graphics are displayed on websites.
* **`WebGL Metadata:`** This parameter relates to the graphics card. If you are using a virtual machine, there will be no graphics card data available, making it easier for websites to detect that you are not using a genuine device. Conversely, antidetect browsers like Hidemyacc will always provide graphics card data, ensuring websites recognize it as a legitimate device.
* **`Client Rects:`** This information relates to the distance between pixels, allowing websites to gather data about font and screen resolution.

3. <mark style="background-color:orange;">**Others**</mark>

* **`Clear Cache after browser shutdown:`** Clear the cache each time the profile is closed.
* **`Restore last Browser session:`** When the profile is run, it will reopen previously opened tabs.
* **`Don't allow sites to show images:`**&#x49;f enabled, the profile will not display images on visited websites.
* **`Mute Audio:`** If enabled, the profile will not play sound on websites.

4. <mark style="background-color:orange;">**Notes:**</mark> Enter notes for your profile.
5. <mark style="background-color:orange;">**Start URL:**</mark> When the profile is run, the system will automatically open these URLs. You can add as many URLs as you like. If you no longer wish to open these URLs, you can change them to different ones or delete them.
6. <mark style="background-color:orange;">**Navigator Section**</mark>

* **`Language:`** This is the browser language. You can change the browser language according to your needs.
* Parameters such as screen resolution, hardware memory, and device memory can be left as default or customized according to your needs.
* **`MAC Address:`** Change the MAC address as needed.

7. <mark style="background-color:orange;">**Mask Media Device Section**</mark>

These are the parameters regarding peripheral devices connected to your computer. If you turn it off, the system will automatically retrieve information based on your real computer. If you turn it on, Hidemyacc will either randomize or allow you to customize the following parameters:

* **`Video inputs`** (number of cameras): A range from 1 to 5.
* **`Audio inputs`** (number of microphones): A range from 1 to 5.
* **`Audio outputs`** (number of speakers): A range from 1 to 5.

### ⚙️ Cookies tab

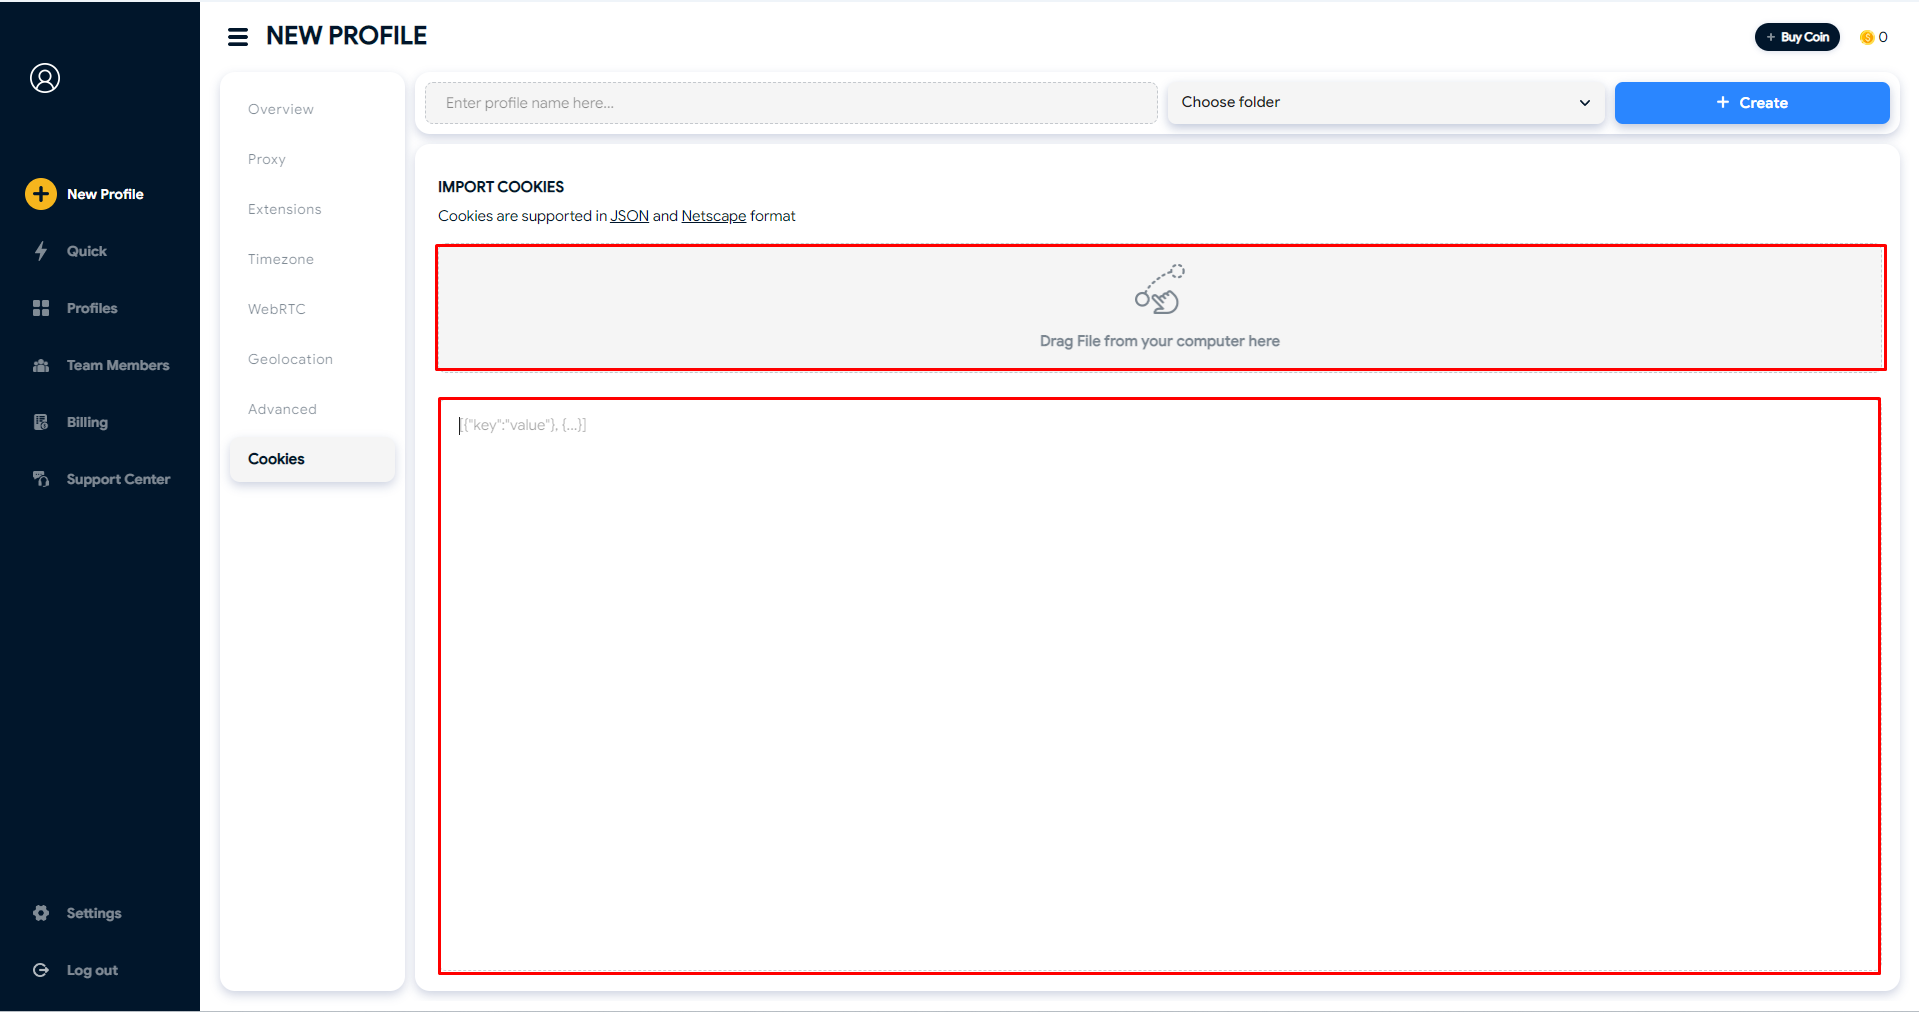
Cookies contain data about user activity on a website, such as login information, cookie preferences, and browsing history. You can easily add cookies to your profile in 2 ways:

* Drag and drop a cookie file from your computer (in JSON format)
* Manually enter cookies

<figure><img src="https://files.gitbook.com/v0/b/gitbook-x-prod.appspot.com/o/spaces%2FltHHlMTT3H4Cd2w1KlTw%2Fuploads%2Fx0yAoe7kY8bnUBmczyUx%2Fcookies.png?alt=media&#x26;token=74ba8933-4ab5-4e46-8542-c295889d7c62" alt=""><figcaption></figcaption></figure>

### ⚙️ Bookmarks tab

Bookmarks are supported in HTML format. You can upload bookmarks from your computer using the following formats:

* Folder::Name::URL
* Name::URL
* URL

<figure><img src="/files/MSATMHollnkQ0zP5H8cM" alt=""><figcaption></figcaption></figure>


# 2.2. Create multiple profiles

Tutorial on how to create multiple profiles on Hidemyacc

In addition to creating profiles one at a time, you can create profiles in bulk using the Multi Profiles feature. The parameters you configure are the same as when creating a single new profile.

### ⚙️ Overview Tab

In the Overview section, configure:

1. The number of profiles to create.
2. The folder to contain the profiles (if needed).
3. Profile names, with the following notes:
   * The number of names must match the number of profiles. If there are fewer or more names than profiles, the system will show an error.
   * You can enter a single name; subsequent profiles will have a sequential number appended. For example, if you enter "Hidemyacc," the profiles will automatically be named Hidemyacc 1, Hidemyacc 2, Hidemyacc 3, etc.
   * If left blank, the system will randomly generate names.

<figure><img src="/files/WDMsz1Sausf1CLfvOJdp" alt=""><figcaption></figcaption></figure>

4. User-agent, with 3 options: General, Custom, and Random.

* **General:** Choose OS and browser the same way as when creating a single new profile.
* **Custom:** Customize the user-agent as needed. One user-agent per line, and the number of user-agents must match the number of profiles.
* **Random:** Choose OS and browser parameters, and the system will randomize the user-agent based on your selections.

The Proxy, Extensions, Timezone, WebRTC, Geolocation, Advanced, Cookies, and Bookmarks tabs are configured the same way as when creating a single new profile.

### ⚙️ Batch import profile&#x20;

In the Create Multiple Profiles section, there's an additional option to import profiles in bulk. Download the sample template and fill in all the required information:

* **Profile name:** Profile name
* **Cookie:** JSON format
* **Proxy type:** http/socks4/socks5/ssh
* **Proxy:** Enter in the format **host:port:username:password** (leave username and password blank if not applicable)
* **User Agent:** If left blank, the system will randomize it automatically
* **Bookmarks:** Enter using one of 2 formats:
  * Folder Name::Bookmark name::url
  * Bookmark name::url
* **Notes** (if any)

<figure><img src="/files/RBhjlfRkrAA5D7LyX4gx" alt=""><figcaption><p>Batch import profiles on Hidemyacc</p></figcaption></figure>

After uploading the file, click **Check data** to review the profile information.

<figure><img src="/files/2ZxzT423NHsZqISOBwrY" alt=""><figcaption></figcaption></figure>

Then click **Save profile**. The system will display the new-profile screen again, where you can adjust the parameters as needed. Finally, click **Create** to create the profiles.

<figure><img src="/files/OH0XelhbZT4XM9u8jyXq" alt=""><figcaption></figcaption></figure>


# 2.3. Quickly create a profile

Tutorial on how to use Quick feature

### ⚙️ Creating a Quick profile

This feature lets you quickly create Hidemyacc profiles without saving the profile's data. You can configure the following information:

* Operating system
* Browser
* Browser language
* Screen size
* Hardware
* Start URL
* Proxy: you can manually add a proxy, choose a free proxy, or pick one from the Proxy Manager pool. Make sure to add the proxy in one of the supported formats:
  * `free://US`
  * `http://123.12.12.12:1268`
  * `socks4://123.12.12.12:1268`
  * `socks5://123.12.12.12:1268`
  * `http://123.12.12.12:1268:username:password`
  * `socks4://123.12.12.12:1268:username:password`
  * `socks5://123.12.12.12:1268:username:password`
  * `ssh://123.12.12.12:1268:username:password`

<figure><img src="/files/Wv5RasqVYPtVEOVvukNc" alt=""><figcaption><p>This feature allows users to create quickly proifles</p></figcaption></figure>

<figure><img src="/files/CPKuc2jRJ9N8JbwD2Q4u" alt=""><figcaption><p>Adding proxy according to supported format</p></figcaption></figure>

### ⚙️ Convert a Quick profile into a regular profile&#x20;

You can also convert a Quick profile into a regular profile for continued use, following these steps:

**Step 1:** After starting a Quick profile, open the Quick Profile Manager.

<figure><img src="/files/6R4FqAHHDKaCO3gu8K5h" alt=""><figcaption></figcaption></figure>

**Step 2:** Rename the profile

* Option 1: Manually rename it in the Rename Profile section (press Enter after typing to save).

<figure><img src="/files/736KiB7hcVQAPaoYfntp" alt=""><figcaption></figcaption></figure>

* Option 2: Rename multiple profiles at once (one name per line).

<figure><img src="/files/TNcSalShmw94jKsAKWOi" alt=""><figcaption></figcaption></figure>

<figure><img src="/files/hPKHqYfx7Jhzs7U5mEAt" alt=""><figcaption></figcaption></figure>

**Step 3:** Click Save to save.

Now the profiles and their data are saved. You can find and use the profile in the Profiles section.

<figure><img src="/files/mm2kSOQCGspgV3VLYM2v" alt=""><figcaption></figcaption></figure>


# 2.4. Import profile

This feature allows you to import a previously exported Hidemyacc profile. After importing, the profiles will appear in your profile list and can be used immediately.

Notes:

* Only **.CSV** files are supported.
* If a profile in the import file already exists in the system, an error will appear and the system will not overwrite it.
* There is no limit to how many profiles a single .CSV file can contain, but the total number of profiles after import must not exceed the limit of your current plan.
* If the .CSV file is incorrectly formatted or corrupted, the system will display an error and block the import.

<figure><img src="/files/N68rBMreWkjn3ZLMXYDj" alt=""><figcaption><p>Upload the <strong>.csv</strong> file containing the previously exported Hidemyacc profile data</p></figcaption></figure>

In the **Import Profiles** section, besides uploading an exported file, you can also use the **Magic Link** feature to add new profiles.


# 3.1. Run/Stop/Force Close profile

Tutorial on how to run, stop and force close on profiles

### ⚙️ Profile status

Hidemaycc profiles will have different statuses depending on the task being performed on them. Below are the profile statuses on Hidemaycc:

<table><thead><tr><th width="196.5">Status</th><th>Description</th></tr></thead><tbody><tr><td>Ready</td><td>Profile is ready to use.</td></tr><tr><td>Running</td><td>Profile is open. If the profile is shared with another account, it will show "Being used" on that account.</td></tr><tr><td>Being used</td><td>Profile is open on another device. One profile cannot be used on multiple devices simultaneously.</td></tr><tr><td>Syncing</td><td>Profile is syncing data (usually appears after closing the profile).</td></tr></tbody></table>

### ⚙️Run profile&#xD;

To open the Hidemyacc profile you created, select the Run button. The profile will change from Ready to Running.

<figure><img src="/files/JcFmRbcRfrMDqgCFrf8Z" alt=""><figcaption></figcaption></figure>

### ⚙️Close a profile

To close a profile, select the Stop button. The profile will change from Running to Sycing and then Ready. If the profile is shared with another Hidemyacc account, after you close the profile, that account can open and use the profile.

The button next to the Stop button allows you to view the currently open profile window, especially if you have multiple profiles open at the same time and need to quickly view the target profile window.

<figure><img src="/files/A5RlIB4A5aBCShK7yw9Q" alt=""><figcaption></figcaption></figure>

### ⚙️ Force close a profile

Force Close is a feature that allows the Owner account to immediately force-stop a shared profile that is currently running on another account, including a sub-account, a share account, or another Hidemyacc account.

* **Owner:** Has the right to force-close a profile running on any Member account within the team.
* **Member (Sub):** Does not have the right to force-close another account's profile; can only be the target affected by a Force Close action.
* **Other accounts:** Includes share accounts and other Hidemyacc accounts (to whom the Owner has shared a profile).

#### **Filtering by Member**

When you click on a Member's email in the team list, the system filters and displays **only the profiles currently running** on that account. Profiles that are not running will not be displayed — the filter only shows active sessions, not the Member's entire profile list.

The email list only displays accounts that belong to the team (Member). Any account not part of the team structure will be grouped under **Others**.

#### **How Force Close works**

1. In the profile list, profiles currently opened by a Member account will display a **Force Close** button.
2. The Owner clicks the **Force Close** button.
3. The system displays a confirmation dialog before executing the action, to prevent accidental operation.
4. Once confirmed, the system sends a close command to the Member's device.
5. The Member receives a notification that the profile has been force-stopped by the Owner.

<figure><img src="/files/VSt3MxilIV7BXMw5WYaM" alt=""><figcaption></figcaption></figure>

#### State synchronization mechanism

**Normal case — Member's device is online:** If the Member's device is logged in and actively connected at the moment Force Close is triggered, the profile on the Member's machine will shut down immediately. The Owner's dashboard switches directly from **Syncing** to **Ready**.

**Second case — Member is logged out at the exact moment the command is issued:** If the Owner clicks Force Close while the Member's session is not connected (for example: the Member's app has logged out, even though the browser profile is technically still running locally on that machine), the command cannot be sent immediately. The Owner's dashboard remains in the **Syncing** state — it does not switch to Ready.

The command will be held in a pending state. Once the Member logs back in and the Hidemyacc system detects that the device is active again, the pending Force Close command will be executed immediately: the profile on the Member's machine shuts down, and the Owner's status switches from Syncing to Ready at that moment.


# 3.2. Share/transfer profile

Tutorial on how to share and transfer profiles to other Hidemyacc users

## ⚙️Share profile

To share your profile with other Hidemyacc users, follow these steps.

**Step 1:** Select a profile

**Step 2:** Click Share profile.

<figure><img src="https://eng-hidemyacc.gitbook.io/~gitbook/image?url=https%3A%2F%2F486469059-files.gitbook.io%2F%7E%2Ffiles%2Fv0%2Fb%2Fgitbook-x-prod.appspot.com%2Fo%2Fspaces%252FpGmapgZbRxSGLImUsds2%252Fuploads%252F2sF3CqmuPoKYfOSPcpIU%252Fshare-profile-11.png%3Falt%3Dmedia%26token%3D16c64a32-5f97-4ffc-ab68-105196080500&#x26;width=400&#x26;dpr=2&#x26;quality=100&#x26;sign=5c38e3d9&#x26;sv=1" alt=""><figcaption></figcaption></figure>

**Step 3:** Enter the email you want to share the profile with. You can also choose the sub account email to share if you want.

**Step 4:** Select the profile permission: View, Edit or Admin.

* **View:** You can open and use the profile, but you cannot edit its browser-fingerprint parameters.\
  Cookies and browsing history are **not** synced to the cloud.\
  In addition, users **cannot**:
  * Share/transfer the profile to another account
  * Add the profile to a folder
  * Add proxies, extensions, or cookies to the profile
* **Edit:** You can open and use the profile. Cookies and browsing history **are** synced to the cloud.\
  You cannot edit the profile’s browser-fingerprint parameters, and you also cannot perform any actions restricted under the “View” permission.
* **Admin:** You can open and use the profile. Cookies and browsing history **are** synced to the cloud.\
  You can edit, share/transfer profiles, add cookies, extensions, proxies, etc.\
  You **cannot** permanently delete profiles.

**Step 5:** Click Send.

<figure><img src="https://eng-hidemyacc.gitbook.io/~gitbook/image?url=https%3A%2F%2F486469059-files.gitbook.io%2F%7E%2Ffiles%2Fv0%2Fb%2Fgitbook-x-prod.appspot.com%2Fo%2Fspaces%252FpGmapgZbRxSGLImUsds2%252Fuploads%252F4V4mvAm00DQiEaPVTafH%252Fshare-profile-21.png%3Falt%3Dmedia%26token%3Dd00bb5d8-6571-4266-a5c9-1778eb93e907&#x26;width=400&#x26;dpr=2&#x26;quality=100&#x26;sign=333e1927&#x26;sv=1" alt=""><figcaption></figcaption></figure>

### ⚙️Transfer profile

To transfer a profile to another Hidemyacc user, follow these steps:

**Step 1:** Select a profile

**Step 2:** Click Transfer profile

<figure><img src="https://eng-hidemyacc.gitbook.io/~gitbook/image?url=https%3A%2F%2F486469059-files.gitbook.io%2F%7E%2Ffiles%2Fv0%2Fb%2Fgitbook-x-prod.appspot.com%2Fo%2Fspaces%252FpGmapgZbRxSGLImUsds2%252Fuploads%252FBOa7oX0WGJUkY7S3TOra%252Ftransfer-profile-1.png%3Falt%3Dmedia%26token%3Dc828b18e-b645-40c8-90e2-cb0d1fea0b69&#x26;width=400&#x26;dpr=2&#x26;quality=100&#x26;sign=b31f4db0&#x26;sv=1" alt=""><figcaption></figcaption></figure>

**Step 3:** Enter your Hidemyacc account password and select Next.

<figure><img src="https://eng-hidemyacc.gitbook.io/~gitbook/image?url=https%3A%2F%2F486469059-files.gitbook.io%2F%7E%2Ffiles%2Fv0%2Fb%2Fgitbook-x-prod.appspot.com%2Fo%2Fspaces%252FpGmapgZbRxSGLImUsds2%252Fuploads%252FptYCQAW6h0Mt16RrKGRL%252Ftransfer-profile-2.png%3Falt%3Dmedia%26token%3D24c76b04-47f1-4f31-8e57-f6840142a829&#x26;width=400&#x26;dpr=2&#x26;quality=100&#x26;sign=b309b4ea&#x26;sv=1" alt=""><figcaption></figcaption></figure>

**Step 4:** Enter the email address of the Hidemyacc account you want to transfer the profile to.

**Step 5:** Click Send.

<figure><img src="https://eng-hidemyacc.gitbook.io/~gitbook/image?url=https%3A%2F%2F486469059-files.gitbook.io%2F%7E%2Ffiles%2Fv0%2Fb%2Fgitbook-x-prod.appspot.com%2Fo%2Fspaces%252FpGmapgZbRxSGLImUsds2%252Fuploads%252FXe1yN89sAG3Ap3X99BiJ%252Ftransfer-profile-3.png%3Falt%3Dmedia%26token%3D929bc948-c6c2-497c-acc1-bc70ed50a073&#x26;width=400&#x26;dpr=2&#x26;quality=100&#x26;sign=f2f5d061&#x26;sv=1" alt=""><figcaption></figcaption></figure>

{% hint style="info" %}
Please note that after successfully transferring your profile, you will no longer have access to these profiles.
{% endhint %}

## <mark style="background-color:orange;">2. Share folder</mark>

To share a folder with another Hidemyacc user, follow these steps:

**Step 1:** Click on the three dots in the folder you want to share (next to the folder name).

<figure><img src="https://eng-hidemyacc.gitbook.io/~gitbook/image?url=https%3A%2F%2F486469059-files.gitbook.io%2F%7E%2Ffiles%2Fv0%2Fb%2Fgitbook-x-prod.appspot.com%2Fo%2Fspaces%252FpGmapgZbRxSGLImUsds2%252Fuploads%252FmTF7TbZBqa9iyEoC2wzN%252Fshare-folder-1.png%3Falt%3Dmedia%26token%3D099e1e90-da85-4a9d-8c02-c141022726c3&#x26;width=400&#x26;dpr=2&#x26;quality=100&#x26;sign=1193bab9&#x26;sv=1" alt=""><figcaption></figcaption></figure>

**Step 2:** Enter another Hidemyacc account email address.

**Step 3:** Select profile permissions: View, Edit or Admin.

* **View:** You can open the folder. Cookies and browsing history are **not** synced to the cloud.
* **Edit:** You can open the folder. Cookies and browsing history **are** synced to the cloud.
* **Admin:** You can open the folder. Cookies and browsing history **are** synced to the cloud. You can edit profiles, share profiles, etc. You **cannot** permanently delete profiles.

**Step 4:** Click Send to complete.

<figure><img src="https://eng-hidemyacc.gitbook.io/~gitbook/image?url=https%3A%2F%2F486469059-files.gitbook.io%2F%7E%2Ffiles%2Fv0%2Fb%2Fgitbook-x-prod.appspot.com%2Fo%2Fspaces%252FpGmapgZbRxSGLImUsds2%252Fuploads%252FXtrqyCFHrmEPVEysp76R%252F.1share-folder-2.1.png%3Falt%3Dmedia%26token%3D860d8a69-ebda-4359-8e79-f7dab213c6fe&#x26;width=400&#x26;dpr=2&#x26;quality=100&#x26;sign=c2764eb5&#x26;sv=1" alt=""><figcaption></figcaption></figure>


# 3.3. Export profile

Tutorial on how to export profile on Hidemyac

This feature allows you to export Hidemyacc profile data, including:

* Cookies
* Browsing history
* Bookmarks
* Local storage

You can export any profile that is currently active, but you cannot export profiles that have been deleted or no longer exist in the system. The exported file can be imported back into Hidemyacc.

<figure><img src="/files/Yo0xUush9c6NET3wX4Xi" alt=""><figcaption><p>Choose profiles you want to export</p></figcaption></figure>

<figure><img src="/files/IANEQE1X6KzdFdLuR6u4" alt=""><figcaption><p>Choose data you wan to export</p></figcaption></figure>


# 3.4. Duplicate profile

{% hint style="info" %}
**Video guide:** <https://youtu.be/Ot4ydRvq2eE?si=4TdhU_rRofQfGuat>
{% endhint %}

Hidemyacc 3.0 **combines the Duplicate Profile and Multi Profile features into one**, letting you create multiple profiles based on an existing profile.

To duplicate a profile, select the profile you want to duplicate, click the **three-dot menu** next to the Run profile button, then select **Duplicate**.

<figure><img src="/files/aWwzHaZ6YMCQO1psfV7k" alt=""><figcaption></figcaption></figure>

1. Enter the **number of profiles** you want to duplicate.

<figure><img src="/files/QoNMdBNG2KnPCoCBk4HI" alt=""><figcaption></figcaption></figure>

2. Select the parameters you want to copy from the original profile:

* **`Fingerprint`:** Your new profile will copy the hardware and software fingerprint of your original profile.
* **`UserAgents`:** Your new profile will copy the UserAgent specifications (Operating System, Browser) of your original profile.
* **`WebRTC, Geolocation`:** Your new profile will use the same WebRTC and Geolocation as your original profile.
* **`Extensions`:** All extensions from the original profile will be added to your new profile.
* **`Proxy`:** Your new profile will use the same proxy as your original profile.

3. Click **Create** to add the profiles.


# 3.5. Transfer profile using Magic Link

The Magic Link feature lets you copy a profile from another browser or antidetect browser into Hidemyacc with an identical set of browser fingerprint parameters.

{% hint style="info" %}
**Video guide:** <https://youtu.be/RSQ_gLK1qyI?si=jA2v4dLd0uWzWja9>
{% endhint %}

#### ⚙️ Create a profile using Magic Link Profile with Magic Link

Users generate a URL link from the Magic Link feature. When this link is pasted into a browser, the system automatically detects that browser's fingerprint information and copies it to create a similar profile in Hidemyacc. Information that can be copied includes:

* Operating system
* Browser (for browser version, Hidemyacc will use its latest available version)
* Screen resolution
* Device memory
* Hardware concurrency
* Graphics card

Users can name the profile, choose a folder, and add a proxy right when creating the profile. Information that is **not** copied includes:

* Cookies
* Bookmarks
* Login information

Users must log in for the first time, and must export cookies/bookmarks from the original browser and then import them into the newly created profile. Once created, the profile is used like a normal profile.

<figure><img src="/files/9gO3XoKztOiMX1rLsxKb" alt=""><figcaption><p><em>Select Import profiles >> select Magic Link to generate a new URL</em></p></figcaption></figure>

<figure><img src="/files/ArbV9D5GwUbi0jZrALHx" alt=""><figcaption></figcaption></figure>

* **Name:** A random name will be generated; you can rename the profile as you like.
* **Folder:** Displays a list of all folders in your account. You may choose to add the profile to a folder or not.
* **Extension:** Displays extensions that help you export the browser's cookies. It's recommended to use the **Cookiebro** extension, which allows exporting all cookies from every website in the browser.

Next, click **"Create"** to finish creating the new profile. After successful creation, the screen will display a success notification.

To export/import cookies from the original profile into the new Hidemyacc profile, you can use the **Get cookies.txt LOCALLY** extension.

Extension download link: <https://chromewebstore.google.com/detail/get-cookiestxt-locally/cclelndahbckbenkjhflpdbgdldlbecc>

### ⚙️ Manage Magic Links

* Each Magic Link can only be used to create **one** profile. If you want to keep copying that browser's fingerprint, you'll need to generate a new link.
* You can copy, delete, or manage the list of Magic Links you've created.


# 3.6. Create & manage folder

Tutorial on how to manage multiple profiles on Hidemyacc using folder

### ⚙️ Create folder

To create new folder, you can follow these steps

**Step 1:** Click on this icon to create new folder

<figure><img src="/files/irL680FxTvdUSGHQIeZk" alt=""><figcaption></figcaption></figure>

**Step 2:** Enter folder name and choose color tags.

**Step 3:** Choose Create to finish.

<figure><img src="/files/CYp7wLBwiqrDABhIjYjy" alt=""><figcaption></figcaption></figure>

### ⚙️ Share folder

To share a folder with another Hidemyacc user, follow these steps:

**Step 1:** Click the three-dot icon on the folder you want to share (next to the folder name).

<figure><img src="/files/XBabKmpRN9FNioubKtK8" alt=""><figcaption></figcaption></figure>

**Step 2:** Enter the other Hidemyacc account's email address.

**Step 3:** Choose the usage permission: View, Edit, or Admin.

* **View:** Can open the folder. Cookies and browsing history are not stored in the shared cloud.
* **Edit:** Can open the folder. Cookies and browsing history are stored in the shared cloud.
* **Admin:** Can open the folder. Cookies and browsing history are stored in the shared cloud. Can edit profiles, share profiles, etc. **Cannot** permanently delete profiles.

**Step 4:** Click Send to finish.

<figure><img src="/files/XQD44bXb4fHhQhcjBvlZ" alt=""><figcaption></figcaption></figure>

### ⚙️ Create profiles inside a folder

Hidemyacc has added a feature that lets users quickly create a profile directly inside a folder. Within the chosen folder, click the "+" icon to add a new profile.

<figure><img src="/files/FxxCdGwst4WYmOmzTZ7S" alt=""><figcaption></figcaption></figure>

**Notes:**

* The profile's parameters will follow the default profile settings.
* The profile name will be randomly generated.
* You need to press Enter after typing the profile name to complete the process.

In addition, you can quickly rename a profile without needing to select Edit. Steps:

**Step 1:** Double-click the profile name.

**Step 2:** Enter the new name.

**Step 3:** Press Enter to finish.

<figure><img src="/files/h2tIodCvML0l2gh7rrFi" alt=""><figcaption></figcaption></figure>


# 3.7. Bulk actions on multiple profiles

### ⚙️ Add proxies in bulk

Hidemyacc allows you to perform bulk actions on profiles. To add proxies in bulk, follow these steps:

**Step 1:** Select the profiles you want to add a proxy to.

**Step 2:** Click the **Add Proxy** button.

<figure><img src="/files/bbIMXZ0owNUN7K2GXqBd" alt=""><figcaption></figcaption></figure>

**Step 3:** Add proxy to this profile

* Hidemyacc supports these proxy types: HTTP, Socks4, Socks5 proxy, SSH proxy, TM Proxy, Tinsoft Proxy.
* You can choose proxy from Proxy Manager to add to these profiles.

<figure><img src="/files/E4x8Pdn1QJTBcRCzGBuH" alt=""><figcaption></figcaption></figure>

#### Export proxy

To export proxy, after choosing the profile, choose "Export profile" button on task bar.

<figure><img src="/files/59HUCNTzze6lnYMQnpdv" alt=""><figcaption></figcaption></figure>

The exported information includes the profile name, proxy type, proxy, location, tags, expiration date, and notes.

<figure><img src="/files/GfeZDdcAoT8jtFQrxtTX" alt=""><figcaption></figcaption></figure>

#### Check proxy

To check proxy status, click on **"Check proxy"** button.

<figure><img src="/files/5vd8LqfPhuiV2sBAXY4V" alt=""><figcaption></figcaption></figure>

### ⚙️ Add extensions in bulk

To add extensions in bulk to multiple profiles, follow these steps:

**Step 1:** Select the profiles you want to add extensions to.

**Step 2:** Click the **Add Extension** button

<figure><img src="/files/gAfDsjYfo3c66e1NRQPS" alt=""><figcaption></figcaption></figure>

**Step 3:** Choose an extension from the Hidemyacc library or upload your own extension. The process is the same as when creating a new profile.

**Step 4:** Click **Save** to complete the process.

<figure><img src="/files/SdYuyHWxrxGx7mBXG7am" alt=""><figcaption></figcaption></figure>

### ⚙️ Import cookies in bulk

Hidemyacc has added a new feature that allows users to import cookies in bulk for multiple profiles.\
Cookies must be provided in **JSON format**, for example: `{"key":"value"}`, `{...}`.

<figure><img src="/files/a71QitkN6ZWh9242TGPL" alt=""><figcaption></figcaption></figure>

You need to upload a **.zip file** containing individual cookie files, with each cookie file corresponding to one profile. When a new cookie file is imported, any existing cookies in that profile will be replaced.

<figure><img src="/files/xBWBQUamvEYoWZAEEQmJ" alt=""><figcaption></figcaption></figure>

### ⚙️Export/Run/Delete/Copy ID profile

After selecting profiles, you can perform bulk actions on them. Click the button corresponding to the action you want to perform.

<figure><img src="/files/Bm9QxIcQ1gtOjD5NhlyR" alt=""><figcaption></figcaption></figure>

Note, the Export feature applies to the Business package. You can export information such as cookies, history, bookmarks, and local storage.

<figure><img src="/files/R43cRJilclYNnxtoV3mw" alt=""><figcaption></figcaption></figure>

### ⚙️ Update browser

You can choose to update manually (select a version from Hidemyacc's list) or enable automatic updates.

Note: the update process may affect compatibility with certain extensions. A currently running profile can have its browser updated without needing to stop the profile.

<figure><img src="/files/BiCITBw6IcWgWWULxHLL" alt=""><figcaption></figcaption></figure>


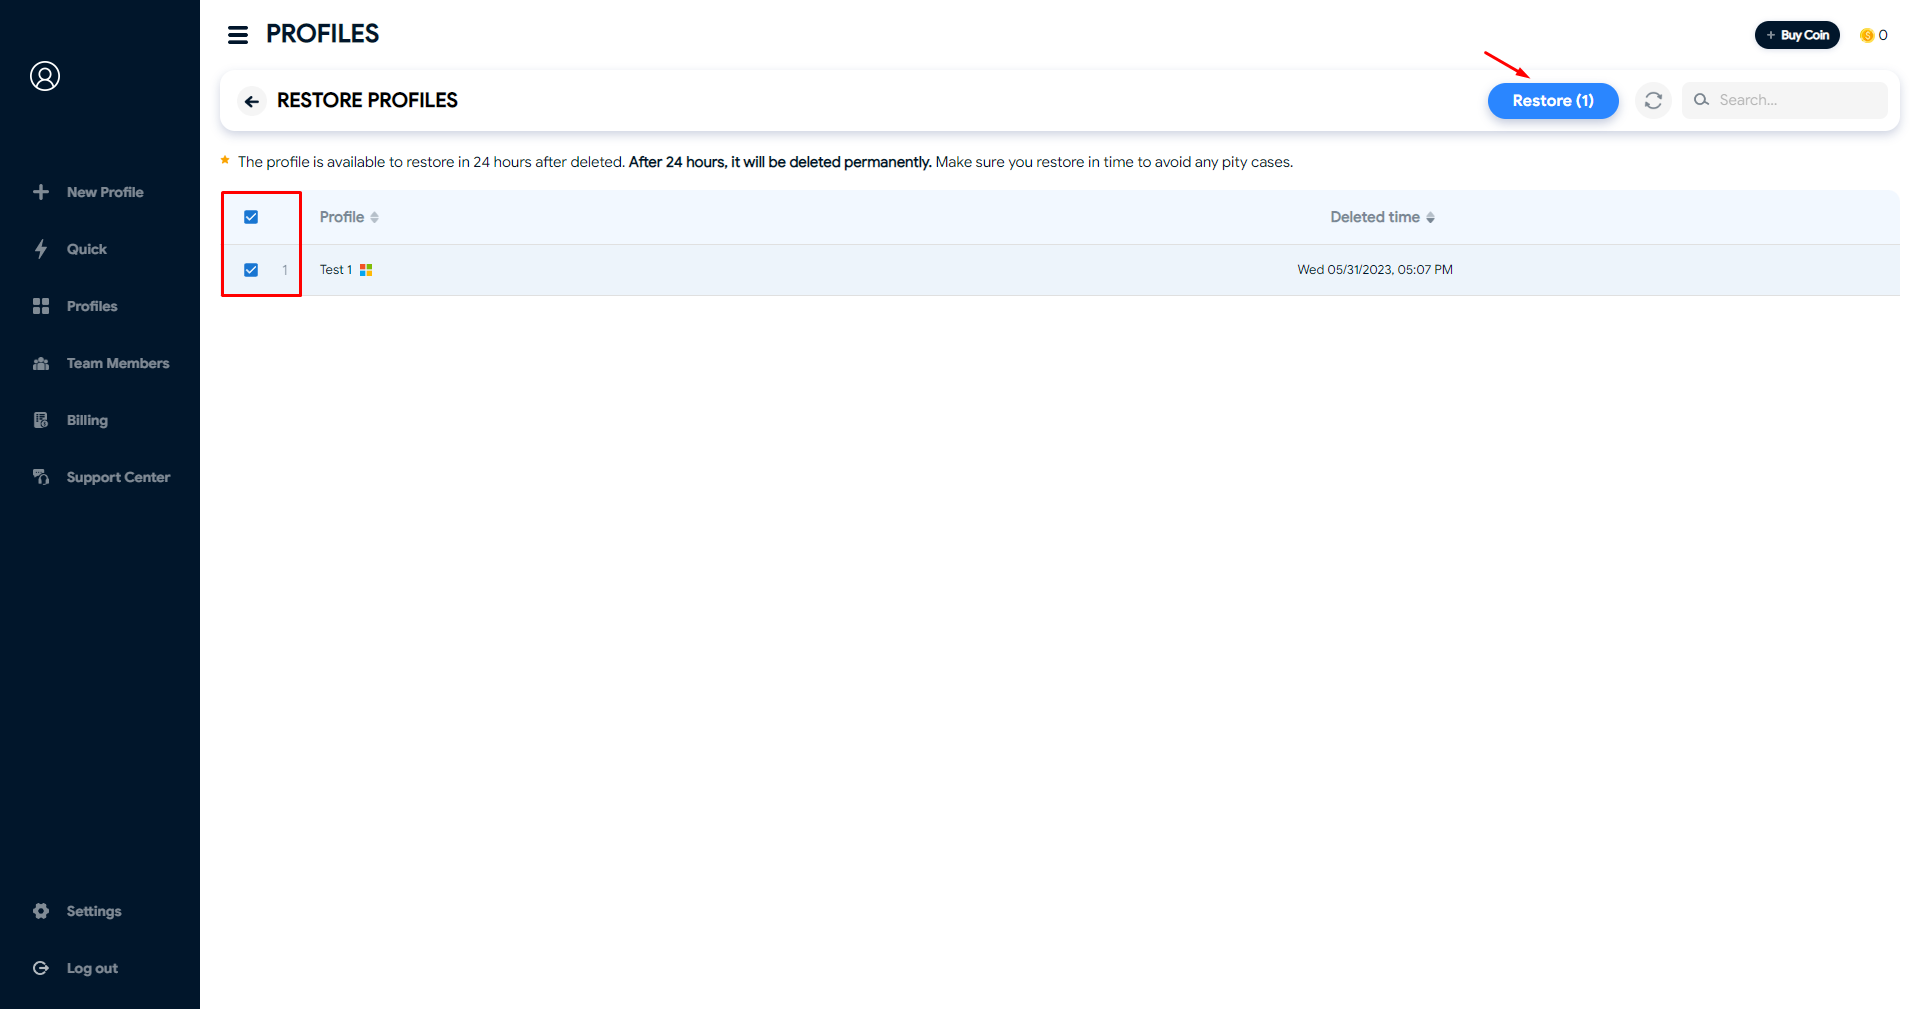
# 3.8. Restore profiles

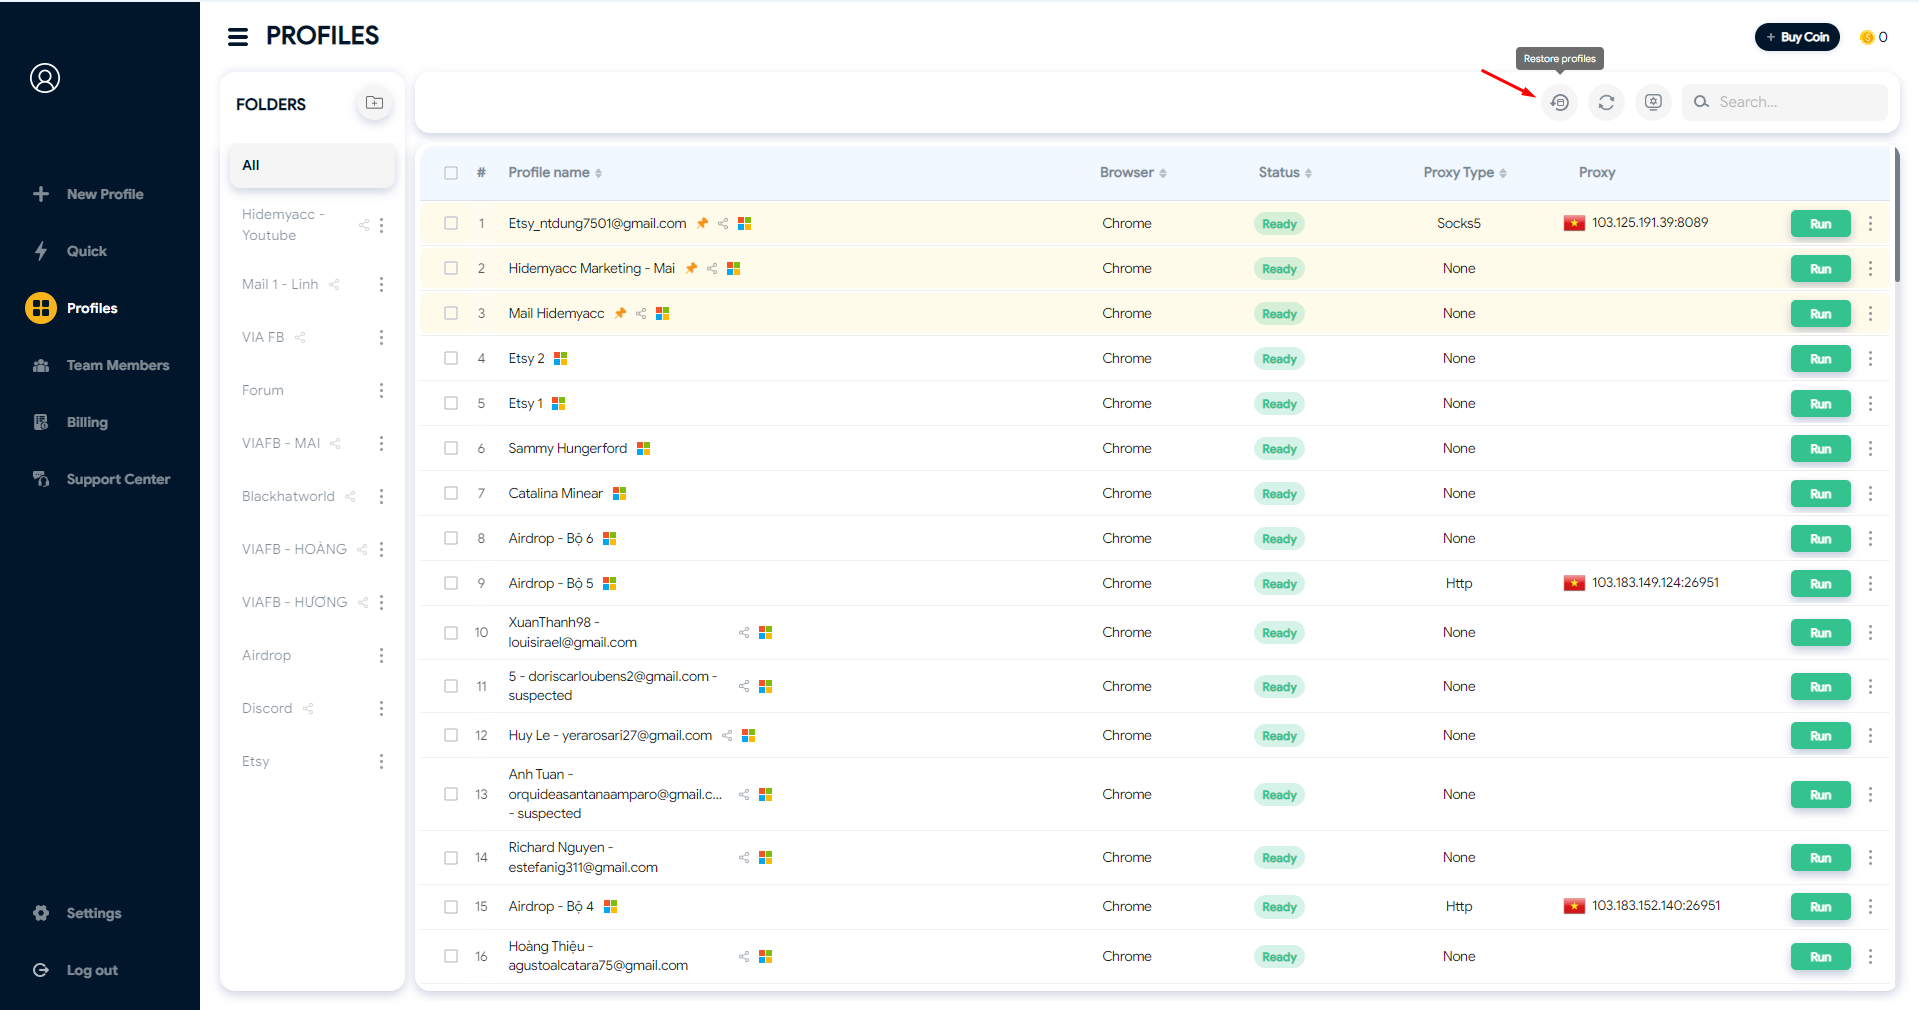
**Since version 2.0.76,** Hidemyacc has released the **Restore Profiles feature** to help users restore deleted profiles.

Because our system will automatically **backup at 24:00 everyday**, so you can only restore profiles that are not created and deleted on the same day.

* Click on the Profile icon on the right corner.&#x20;
* Click Restore Profile icon on the top

<figure><img src="https://files.gitbook.com/v0/b/gitbook-x-prod.appspot.com/o/spaces%2FltHHlMTT3H4Cd2w1KlTw%2Fuploads%2FNuCvAITguZqjg7ELofwM%2Fhma-3.0-restore1.png?alt=media&#x26;token=d4e9bbb1-1084-4e7a-b217-71c5f62360e8" alt=""><figcaption></figcaption></figure>

* Choose the Profiles you want to restore and click Restore

<figure><img src="https://files.gitbook.com/v0/b/gitbook-x-prod.appspot.com/o/spaces%2FltHHlMTT3H4Cd2w1KlTw%2Fuploads%2FVOJRSoafWfxfGkgeLWoA%2Fhma-3.0-restore-2.png?alt=media&#x26;token=eacce4e0-0bad-42ab-8149-982f4c1a312b" alt=""><figcaption></figcaption></figure>


# 3.9 Profile History & Activity History

Tutorial on how to use Profile History and History activity feature

### ⚙️ Profile History

The **Profile History** feature allows you to restore a previous state of a profile, preserving tabs, cookies, and browsing history so you can continue your work without losing data.

Each profile stores up to **10 most recent sessions** (including cookies, browsing history, and bookmarks). When the limit is exceeded, the oldest session is automatically removed. These files are stored **locally on your device** and are **not synced** to the Hidemyacc server.

When restored, the profile will reopen exactly as it was before—browsing history, cookies, tabs, and more. If a profile is deleted, all of its saved sessions are also removed.\
Restoring a session **cannot be undone** — the current session will be replaced by the restored one.

<figure><img src="/files/Xz4M1v8wLhafvl8eCCnr" alt=""><figcaption><p>You can only view Profile History when the profile is in <strong>Ready</strong> status (you cannot view profile history while the profile is running or syncing)</p></figcaption></figure>

When restored, the profile will reopen exactly as it was before, including browsing history, cookies, tabs, etc. If the profile is deleted, all of its saved sessions are also removed. Restoring a session **cannot be undone** — the current session will be replaced by the restored one.

### ⚙️ Activity History

This feature helps users track the activity history of profiles. In the Profile dashboard, click on this icon to access Activity History.&#x20;

<figure><img src="/files/HeOEvmXU15xJFX5kgE3u" alt=""><figcaption></figcaption></figure>

You can filter by time period: Today, Yesterday, 3 days ago, 7 days ago and up to 30 days ago.

<figure><img src="https://eng-hidemyacc.gitbook.io/~gitbook/image?url=https%3A%2F%2F486469059-files.gitbook.io%2F%7E%2Ffiles%2Fv0%2Fb%2Fgitbook-x-prod.appspot.com%2Fo%2Fspaces%252FpGmapgZbRxSGLImUsds2%252Fuploads%252FhEjipUM9DAdxPL2dZOVO%252Fhistory-date.png%3Falt%3Dmedia%26token%3D75cba008-35fc-4352-a843-14a1259b8c2d&#x26;width=400&#x26;dpr=2&#x26;quality=100&#x26;sign=b98a4989&#x26;sv=1" alt=""><figcaption></figcaption></figure>

Filter history by actions performed on that profile such as creating, opening, editing, deleting, restoring, transferring or sharing profiles.

<figure><img src="/files/1QMnmBRhSvQqlxOO31hd" alt=""><figcaption></figcaption></figure>

You can set up the fields to display, including:

* Profile ID
* Profile name
* Action
* Description
* Date
* Account (The Hidemyacc account owns this profile)
* IP address
* Device

<figure><img src="https://eng-hidemyacc.gitbook.io/~gitbook/image?url=https%3A%2F%2F486469059-files.gitbook.io%2F%7E%2Ffiles%2Fv0%2Fb%2Fgitbook-x-prod.appspot.com%2Fo%2Fspaces%252FpGmapgZbRxSGLImUsds2%252Fuploads%252FrjFku2XfzSHl2q73kb3U%252Fhistory-display-setting.png%3Falt%3Dmedia%26token%3D44b2baf2-2c0d-4a13-8798-778451c8426f&#x26;width=768&#x26;dpr=4&#x26;quality=100&#x26;sign=1e43fade&#x26;sv=1" alt=""><figcaption></figcaption></figure>

You can search by profile ID by pasting the profile ID into the search bar or clicking on the displayed profile ID.


# 4.1. Overview

### ⚙️ What is Team Member?

Team Member lets the main account (from the Base package upward) create and manage multiple sub-accounts to work as a team on the same profile system, with different access levels for each sub-account.

### ⚙️ Number of Sub-Accounts per plan

Depending on the package you're using, you'll have different numbers of free slots for creating sub-accounts.

<table><thead><tr><th width="169.00006103515625">Package</th><th width="262.333251953125">Free sub-accounts included</th><th>Additional sub-accounts you can create</th></tr></thead><tbody><tr><td>Base</td><td>1</td><td>Unlimited</td></tr><tr><td>Team</td><td>3</td><td>Unlimited</td></tr><tr><td>Business</td><td>5</td><td>Unlimited</td></tr></tbody></table>

If you need more than the free allotment, the main account can create additional sub-accounts and pay based on the number of days remaining on the main account.

### ⚙️ Owner account's permissions over Sub-Accounts

* Manage login information, and change the sub-account's password and display name.
* **Renewal:** sub-accounts renew along with the main account; if not renewed upon expiration, the sub-account will be locked and requires a renewal payment to unlock.
* Share profiles/folders with sub-accounts so they can work.
* Force-stop a (shared) profile currently open on a sub-account.
* Delete a sub-account from the system (a confirmation warning is shown before deletion; after deletion, the sub-account loses access to the system).
* **Only the owner** has the right to convert a sub-account into a Share account (see 4.2).


# 4.2. Create & manage sub accounts

### ⚙️ Create sub account

A sub-account must be created using an **email that has never been registered** on Hidemyacc. Click the **"Create a new sub-account"** button → fill in the required information (email, account name, password) → click **Create**.

<figure><img src="/files/OUXeXchsffKejqoLLYJk" alt=""><figcaption></figcaption></figure>

The sub-account simply logs in with the created credentials and uses the profiles shared from the main account.

{% hint style="info" %}
**Video guide:** <https://youtu.be/W2Mkt2hyXFc?si=-i88vwwQXibVSF2w>
{% endhint %}

### ⚙️ Edit Sub account

* The main account can change the sub-account's **display name** and **password**.
* The sub-account can be deleted from the system; the system displays a confirmation warning before doing so.

<figure><img src="/files/avwj0Rl9tLFjCDI7qvVH" alt=""><figcaption></figcaption></figure>

### ⚙️ Convert Sub account into Share account

This feature lets the main account convert a Sub-account into a Share account, to be used independently and no longer dependent on the main account.

To do this, click this button. The system will ask you to confirm the information; click Confirm to complete the process.

<figure><img src="/files/yxMS7Ih8kRftR9JIAKa2" alt=""><figcaption></figcaption></figure>

<figure><img src="/files/cfFr1xlx2eBRgVJYnsgy" alt=""><figcaption></figcaption></figure>

**Notes:**

* After conversion, the Sub-account becomes an independent account and loses access to all profiles in the folders that were previously shared with it.
* The Share account must register for its own package to continue using Hidemyacc.
* If the package has not been renewed, the account will receive a notification prompting an upgrade upon login.


# 4.3. Use Sub account

### ⚙️ Use shared profile/folder

The sub account can create new profiles within folders shared by the owner with Admin rights. When the owner shares a folder containing profiles with the sub account, the sub account can interact with the profiles according to the permissions granted:

* **View**:
  * Can open profiles/folders.
  * Cookies and browsing history are not stored in the cloud.
* **Edit**:
  * Can open profiles/folders.
  * Cookies and browsing history are stored in the cloud.
* **Admin**:
  * Can open profiles/folders.
  * Cookies and browsing history are stored in the cloud.
  * Can edit profiles, share profiles, etc., but cannot permanently delete profiles.

### ⚙️ Create profiles inside a shared folder

If a folder is shared with **Admin** permission, the sub-account can **create a new profile** directly inside that folder. This is the only one of the 3 permission levels that allows creating a new profile inside a shared folder (View/Edit permissions only allow opening and interacting with existing profiles, not creating new ones).

<figure><img src="/files/FV7XrwhgZdcuRiCcJ712" alt=""><figcaption></figcaption></figure>

A sub-account can create a profile inside a folder shared with Admin permission in 3 ways:

* Create a new profile normally
* Create profiles in bulk
* Quickly create a profile


# 5.1. Proxy Manager

With Proxy Manager, when creating a new profile in Hidemyacc, you can select a proxy from the managed pool to add to that profile. You can also add proxies in bulk to profiles you've already created.

<figure><img src="/files/nnTUqejmICZl2dlPMLhX" alt=""><figcaption></figcaption></figure>

#### ⚙️ Add proxies to Proxy Manager

To add a proxy to Proxy Manager, follow these steps:

**Step 1:** Select "Add proxy."

**Step 2:** Fill in the proxy's fields.

* **`Proxy type`:** HTTP, Socks4, or Socks5.
* **`Proxy list`:** Add proxies in the format IP:Port:Username:Password. If adding multiple proxies at once, put each proxy on its own line.
* **`Tags`:** You can group these proxies by attaching tags to them, making them easier to find by tag.
* **`Proxy expiration date`:** You can add an expiration date for the proxy as a reminder to renew it.
* **`Add notes`** (if needed) for the proxy.

**Step 3:** Click **"Add"** to finish.

<figure><img src="/files/7Vehz7x2cN77aEGqQmFl" alt=""><figcaption></figcaption></figure>

### ⚙️ Mangae proxies in Proxy Manager

You can check the activity status of proxies by selecting all and clicking **"Check Proxy".** The system will automatically verify their status.

<figure><img src="/files/xM20nhCPMJclgjSOfiuo" alt=""><figcaption></figcaption></figure>

In the **"Edit Proxies"** section, you can quickly modify tags, expiration dates, and notes for proxies.

<figure><img src="/files/ew9zU438Rj2ceRADZwph" alt=""><figcaption><p>Firstly, click om Edit proxies icon</p></figcaption></figure>

<figure><img src="/files/b2jqpzuu2069HX1ohDZY" alt=""><figcaption></figcaption></figure>

Select **"Copy proxy"** to quickly copy all the proxies.

<figure><img src="/files/JrIGgZc1s6FQgfIpBCmj" alt=""><figcaption></figcaption></figure>

You can **delete one or multiple proxies** by choosing them and click on button Delete. Please note that deleted proxies cannot be recovered, so carefully check the proxies before deleting to avoid regrettable situations.

<figure><img src="/files/Us8mYtV8CbGWECFc1Tpt" alt=""><figcaption></figcaption></figure>

### ⚙️ Add proxy from Proxy Manager to profiles

#### **When creating new profiles**

**Step 1**: In Proxy section, choose Proxy Manager icon&#x20;

<figure><img src="/files/Gm94JXwc01yrHdTWMCd3" alt=""><figcaption></figcaption></figure>

**Step 2:** The popup screen will appear showing all the proxies you added in Proxy Manager. Then click on the proxy you want to add in this profile.&#x20;

<figure><img src="/files/Azw1aGKCALJtE9yI13BZ" alt=""><figcaption></figcaption></figure>

#### **Adding to an existing profile**

**Step 1:** Choose the profiles you want to add proxies

**Step 2:** Click on **Add Proxy** button

<figure><img src="/files/z7AdMJtGTsfNvpDQ7DpL" alt=""><figcaption></figcaption></figure>

**Step 3:** Click on Proxy Manager icon

<figure><img src="/files/Qj3xfD5yP5gIwKc9aOhO" alt=""><figcaption></figcaption></figure>

**Step 4:** Choose the proxies you want to add in these profiles. Then click **Add** to complete the process.&#x20;

<figure><img src="/files/6PQombyjnjwijavpSI8N" alt=""><figcaption></figcaption></figure>


# 5.2. Proxy Store

In the Proxy Store, Hidemyacc showcases trustworthy proxy providers in the market, along with promo codes for Hidemyacc users, offering discounts of **up to 50%.**

<figure><img src="/files/NaumHcHw9sb2mNLNaAlH" alt=""><figcaption></figcaption></figure>

Proxy Store will provide information about the proxy service providers, including:

* Proxy provider names
* Proxy type
* Discount code and the percentage of discount you'll receive when buying proxies
* Refferal links

You can utilize filters to search for providers based on proxy type: datacenter, residential, or mobile proxies.


# 6.1. Overview

The Automation feature in Hidemyacc helps you create and run large batches of scripts to automatically warm up accounts, saving time and effort. You can create a script in 3 ways:

* Drag and drop pre-built commands
* Import a self-coded script
* Record real actions

In addition, Hidemyacc provides nearly 30 free scripts across a variety of platforms (eBay, Facebook, Instagram, TikTok, Twitter, Google).

{% hint style="info" %}
**Video guide:** <https://www.youtube.com/playlist?list=PLBBtW4MP4Bf66mPrzu4TVyBiz0v2eygeG>
{% endhint %}

<figure><img src="/files/wjRXkwnY66qcKVFq1dW0" alt=""><figcaption></figcaption></figure>


# 6.2. Create drag-and-drop scripts

Hidemyacc provides 7 different command groups for you to build scripts to fit your needs. Simply drag and drop these commands to create your own automation script without needing to know how to code.

{% hint style="info" %}
**Video guide:** <https://www.youtube.com/playlist?list=PLBBtW4MP4Bf66mPrzu4TVyBiz0v2eygeG>
{% endhint %}

<table data-view="cards"><thead><tr><th></th><th data-type="content-ref"></th><th data-hidden data-card-cover data-type="image">Cover image</th></tr></thead><tbody><tr><td>Variables command group</td><td><a href="/pages/fxyKsT4QxBvC90TfDqje">/pages/fxyKsT4QxBvC90TfDqje</a></td><td><a href="/files/K5IY2iOoF7jzaANFAtUC">/files/K5IY2iOoF7jzaANFAtUC</a></td></tr><tr><td>Browser command group</td><td><a href="/pages/JnHGyP2aS0lgVO6YxCnJ">/pages/JnHGyP2aS0lgVO6YxCnJ</a></td><td><a href="/files/sLnwHPbYaK7wlvcazV2k">/files/sLnwHPbYaK7wlvcazV2k</a></td></tr><tr><td>Interaction command group</td><td><a href="/pages/LRthvKnAfARvnN8iwOPt">/pages/LRthvKnAfARvnN8iwOPt</a></td><td><a href="/files/3tmEooFRQF3tkTqsCWr3">/files/3tmEooFRQF3tkTqsCWr3</a></td></tr><tr><td>Condition command group</td><td><a href="/pages/a6xl4B3P426Aj8Ct8I46">/pages/a6xl4B3P426Aj8Ct8I46</a></td><td><a href="/files/IsLseRXcEfufW0WXoA5m">/files/IsLseRXcEfufW0WXoA5m</a></td></tr><tr><td>Loops command group</td><td><a href="/pages/yTa8fNLx53jXKBBTrp4G">/pages/yTa8fNLx53jXKBBTrp4G</a></td><td><a href="/files/qsCzSPcSHbAhimc4vWnx">/files/qsCzSPcSHbAhimc4vWnx</a></td></tr><tr><td>Facebook group</td><td><a href="/pages/gdVmidI5IGdTRpKXaiUt">/pages/gdVmidI5IGdTRpKXaiUt</a></td><td><a href="/files/KlKVWBwBKh1Hc0T2pjRa">/files/KlKVWBwBKh1Hc0T2pjRa</a></td></tr><tr><td>Files group</td><td><a href="/pages/Ui65HK2ZLJDmdd7882ad">/pages/Ui65HK2ZLJDmdd7882ad</a></td><td><a href="/files/uq6SyUEyHBg5Qno1Lv1U">/files/uq6SyUEyHBg5Qno1Lv1U</a></td></tr></tbody></table>


# Variables command group

### <mark style="background-color:orange;">**Variables**</mark>

With the Variables command, you can add variables of the following data types:

1. **Text:** Alphabetic characters (e.g., ID, Name,...)
2. **Number:** Numeric values, including integers and decimals (e.g., 0, 5, 10, 13, 0.5, 0.8,...)
3. **Boolean:** Logical values, with only two possible states: True and False. True represents the satisfaction of a condition, while False represents the dissatisfaction of a condition.
4. **Object:** Reference data type, capable of storing various data types within a single variable.
5. **Array:** Array data type, where you need to input an array formatted as JSON.
6. **File:** You can add any type of file such as .txt, .docx, .xlsx,...

You must enter a variable name when adding to declare its existence, but it's not necessary to add a value as you can assign a value when creating automation scripts.&#x20;

After adding variables, you can search for them by name or delete them if not in use.

<figure><img src="/files/Hz66QmNIn0NRdk2oSDJ0" alt=""><figcaption></figcaption></figure>

### <mark style="background-color:orange;">**Set variable**</mark>

To assign a value to a variable when creating an automation script, use the Set variable command, including:

1. **Variable:** Select the variable to assign a value to, usually empty variables (without a pre-added value).
2. **Operator:** Choose the operation to perform.

* *Assign "=":* Assign a value to the variable.
* *Number "+,-,\*,/":* Perform addition, subtraction, multiplication, and division on numbers.
* *Other "Concatenate":* Concatenate strings or add elements to an array.

3. **Variable/value/number:** Assign a value, a number, or another variable (previously added using the Variables command) to the variable.

<figure><img src="/files/OpjFS4G4Wx01qJSz7yDO" alt=""><figcaption><p>Click on three dot icon to Edit command</p></figcaption></figure>

<figure><img src="/files/JiDpsR7bNSzM7TW33dSc" alt=""><figcaption><p>Choose your needed operator</p></figcaption></figure>

### <mark style="background-color:orange;">**Slice variable**</mark>

Use the Slice variable command to read and slice strings. For example, if you want to read a file and separate its data into individual variables:

1. **Variable:** Choose the variable containing the string to read or slice.
2. **Object:** Select the type of string read.

* `Any line:` Choose any string per line.

<figure><img src="/files/FGU7c5K7aP8HsjkdRgKv" alt=""><figcaption></figcaption></figure>

* `A line with delimiter`: Choose to read/slice strings within the same line. If you select this object type, you will need to specify:
  * *Any line:* Choose any string within that line.
  * *Delete line after used:* Delete the string after reading.
* `Multiple lines with delimiter`: Choose to read/slice strings across different lines. You need to set additional options as follows:
  * *Any line:* Choose any string within those lines.
  * *Delete line after used:* Delete the string after reading.

3. **Delimiter:** Input the character identifying the string delimiter (e.g., ";", "|",...). If you don't enter a delimiter, the system will take all text in that line.
4. **New variable name:** Assign the sliced string data to new variables.

<figure><img src="/files/YpYLNe5D4MjEycCSktmw" alt=""><figcaption></figcaption></figure>

<figure><img src="/files/IA2nmhY1VYcRNEup9zAz" alt=""><figcaption></figcaption></figure>

### <mark style="background-color:orange;">**Export variable**</mark>

The Export variable command is used to export variable values to a new file. This command is typically used after the Slice variable command to save the data of a sliced file.

1. **Variable:** Choose the variable containing the value to export.
2. **Output:** Select the file to export the value to. You need to create a file on your computer and paste the file path here.
3. **Mode:** Select the type of value writing.

* `Overwrite:` Overwrite the file. This writing type will replace the entire current content of the file with the new data you provide.

<figure><img src="/files/U0l9lpFLdwltFFcNzAIr" alt=""><figcaption></figcaption></figure>

* `Append:` Append data. This writing type will append data line by line or write to the same line of the file, depending on the settings:
  * *New lines:* Write to a new line.
  * *Same lines:* Write to the same line. If writing to the same line, you need to enter a "Delimiter" - the character separating strings.

<figure><img src="/files/GD5ijNpbuZnVUyoyu9ZV" alt=""><figcaption></figcaption></figure>


# Browser command group

### <mark style="background-color:orange;">**New tab**</mark>

Enter the Website URL you want the Script to open. Click on "three dot" icon to edit command.&#x20;

<figure><img src="/files/iVyzLd0KwtraQ7an9dDP" alt=""><figcaption></figcaption></figure>

You can also choose to:

* *Random Google keywords:* Input random Google keywords from the server.&#x20;
* *Random Amazon keywords:* Input random keywords from the Amazon website.
* *Random Etsy keywords:* Input random keywords from the Etsy website.&#x20;
* *Random eBay keywords*: Input random keywords from the eBay website.&#x20;
* **Random line of text:** Randomly select text by lines.

### <mark style="background-color:orange;">**Wait**</mark>

Your profile will **wait** for the specific seconds you chose before continuing to the next action.

<figure><img src="/files/fMuD1ehIZbkHTK2CvRD0" alt=""><figcaption></figcaption></figure>

### <mark style="background-color:orange;">**Wait navigation**</mark>

Wait for the page after navigation

<figure><img src="/files/3kdXac5C6Ify7sDEiGlp" alt=""><figcaption></figcaption></figure>

### <mark style="background-color:orange;">Go back</mark>

This command helps you **return** to the **previous page.**

<figure><img src="/files/MKpkdHZwRptlP2XS3etl" alt=""><figcaption></figcaption></figure>

### <mark style="background-color:orange;">**Go forward**</mark>

Go forward to the next page of the tab.

<figure><img src="/files/olYQL8YC1tZWJxfUtgRC" alt=""><figcaption></figcaption></figure>

### <mark style="background-color:orange;">**Close tab**</mark>

Close the currently open tab.

<figure><img src="/files/A1udyQ4R1YxRfjLXtOSO" alt=""><figcaption></figcaption></figure>

### <mark style="background-color:orange;">**Reload tab**</mark>

Refresh the currently open webpage.

<figure><img src="/files/XgiYcHCMOqyXBGH9D7ZU" alt=""><figcaption></figcaption></figure>

### <mark style="background-color:orange;">**Take screenshot**</mark>

Take a screenshot of current active tab. You can choose to take a screenshot of the current display (Page), capture the entire web page (Full page), or capture any element (An element).

<figure><img src="/files/nzHWnOffBysbRtMXIbtH" alt=""><figcaption></figcaption></figure>

If you don't name the file, the system will randomly generate a name for you. As for the file location, it will be set as the default to save in 'Downloads,' or you can choose a different desired location

<figure><img src="/files/ocsuwMDHtUG3PwDTiqz8" alt=""><figcaption></figcaption></figure>


# Interaction command group

### <mark style="background-color:orange;">**Click element**</mark>

Use this command to make your profile **clicks on a specific selector.** You need to paste the selector you want to click on. You can use either a CSS Selector or an Xpath to obtain the selector.

<figure><img src="/files/v7fYTNdM7KDBEaD5HGYR" alt=""><figcaption></figcaption></figure>

***To get the selector, follow these steps:***

* **Step 1:** Access the website where you want to get the selector and right-click, then select "Inspect."&#x20;

<figure><img src="/files/yIFVHcKgLr51micH4fZz" alt=""><figcaption></figcaption></figure>

* **Step 2:** Choose the element you want to click on.
* **Step 3:** Copy the selector or Xpath (depending on your selector preference).

<figure><img src="/files/9A3dLc8ekKyh2L0i14wY" alt=""><figcaption></figcaption></figure>

Additionally, you can customize some parameters:

* **Click rate:** The success rate of clicking on the selector.
* **Random click:** Randomly click on the selector.
* **Wait navigation:** Wait for the webpage to finish loading.

### <mark style="background-color:orange;">**Type**</mark>

Simulate the behavior of typing text into the selector you choose. You need to **paste the selector** you want to **enter the text in** and enter the text you want. Typing speed will be **randomized between 100ms and 300ms.**

<figure><img src="/files/19c0BZ3hoSI9rPZrQIOa" alt=""><figcaption></figcaption></figure>

You can input text in the following ways:

* Type: Manually input text.&#x20;
* Choose from file: Only upload .txt files. You can choose to select text randomly by lines  or from top to bottom *(Top-down).*

<figure><img src="/files/DPgaigbVPYmSs3lXOJQz" alt=""><figcaption><p>Choose from file</p></figcaption></figure>

<figure><img src="/files/w1owfPEqMjztqO4XWVWJ" alt=""><figcaption><p>Random Google, Amazon, Etsy, eBay keywords</p></figcaption></figure>

You can also choose to:

* *Random Google keywords:* Input random Google keywords from the server.&#x20;
* *Random Amazon keywords:* Input random keywords from the Amazon website.
* *Random Etsy keywords:* Input random keywords from the Etsy website.&#x20;
* *Random eBay keywords*: Input random keywords from the eBay website.&#x20;
* **Random line of text:** Randomly select text by lines.

### <mark style="background-color:orange;">**SwipeUp**</mark>

**Scroll up** the web page in **vertical** with a specified number of pixels. You can randomize the pixel value and the number of scrolls or choose fixed parameters:

* 500 pixels
* Number scroll: 1 (scroll 500 pixels once)
* Break Time (s): 1 (number of seconds to pause between each scroll).

<figure><img src="/files/YYZSll8HlTzMXXGRvSSs" alt=""><figcaption><p>Randomize the parameters</p></figcaption></figure>

<figure><img src="/files/2zOPefuNA6wgEbZJuJH8" alt=""><figcaption><p>Fixed parameters</p></figcaption></figure>

### <mark style="background-color:orange;">**SwipeDown**</mark>

**Scroll down** the web page in **vertical** with a specified number of pixels.&#x20;

You can randomize the pixel value and the number of scrolls or choose fixed parameters:

* 500 pixels
* Number scroll: 1 (scroll 500 pixels once)
* Break Time (s): 1 (number of seconds to pause between each scroll).

<figure><img src="/files/gWgLPGJOyOohUrQcwR9L" alt=""><figcaption><p>Randomize the parameters</p></figcaption></figure>

<figure><img src="/files/AMJ9MUgomhEh6gJFmIuf" alt=""><figcaption><p>Fixed parameters</p></figcaption></figure>

### <mark style="background-color:orange;">**JavaScript code**</mark>

You can either upload a JavaScript file or write your own code.

* Run in page: Execute commands that can be used in the webpage's DevTools.

<figure><img src="/files/X9bA8bl0dsUQhllOAFWS" alt=""><figcaption></figcaption></figure>

### <mark style="background-color:orange;">**Keypress**</mark>

Simulate keyboard keypress actions. Supported keys include: Enter, Shift, Control, Alt, Meta, PageUp, PageDown, ArrowLeft, ArrowUp, Escape, Delete, Home, End, Space, CapsLock. You can also add your desired keys.

<figure><img src="/files/Zi9OtBt5mDnmp8ZK65wq" alt=""><figcaption></figcaption></figure>


# Condition command group

### <mark style="background-color:orange;">**Conditions**</mark>

The Conditions command is used to set conditions for executing commands. Key settings to consider include:

* ***Value:*** Input the value for comparison.
* ***Equals:*** This operator compares two values and returns True if they are equal and False if not.

<figure><img src="/files/bKwYGTLN8ylgWo7CQ9RM" alt=""><figcaption></figcaption></figure>

* ***Equals (case insensitive):*** Similar to the Equals operator, but it does not differentiate between uppercase and lowercase letters, typically used for strings. For example, "Hello" will be considered equal to "hello".
* ***Not equals:*** The opposite of the Equals operator, returns True if two values are not equal and False if they are.
* ***Less than:*** Compares whether one value is less than another. Returns True if the condition is met, False otherwise.
* ***Less than or equal:*** Compares whether one value is less than or equal to another. Returns True if the condition is met, False otherwise.
* ***Greater than or equal:*** Compares whether one value is greater than or equal to another. Returns True if the condition is met, False otherwise.
* ***Greater than:*** Compares whether one value is greater than another. Returns True if the condition is met, False otherwise.
* ***Contains:*** Checks if a string or set contains a specific element. Returns True if it does, False otherwise.
* ***Contains (case insensitive):*** Similar to the Contains operator, but it does not differentiate between uppercase and lowercase letters in strings.
* ***Not contains:*** Checks if a string or set does not contain a specific element. Returns True if it does not, False otherwise.
* ***Not contains (case insensitive):*** Similar to the Not contains operator, but it does not differentiate between uppercase and lowercase letters in strings.
* ***Starts with:*** Checks if a string starts with a specific sequence of characters. Returns True if it does, False otherwise.
* ***Ends with:*** Checks if a string ends with a specific sequence of characters. Returns True if it does, False otherwise.
* ***Match with RegEx:*** Checks if a string matches a regular expression pattern. Returns True if it matches, False otherwise.

<figure><img src="/files/dU4fdDMWAnN6LREcVUoD" alt=""><figcaption></figcaption></figure>

* ***Variable exists:*** Checks if a variable has a valid input value.
* ***Variable not exists:*** Checks if a variable does not have a valid input value.
* ***Element exists:*** Checks if an element has a valid input value.
* ***Element not exists:*** Checks if an element does not have a valid input value.
  * You need to select the element retrieval type (CSS or Xpath) and paste the selector.
  * Waiting time: Time to wait for selector verification.

<figure><img src="/files/pfBnCFiyFVEhxXdwqvI9" alt=""><figcaption></figcaption></figure>

* ***Add:*** Used when multiple conditions need to be satisfied simultaneously.
* ***Or:*** Used when one of the conditions needs to be satisfied.

<figure><img src="/files/8EJmJwsYxMzEaXr6Etvg" alt=""><figcaption></figcaption></figure>

### <mark style="background-color:orange;">**Condition break**</mark>&#x20;

Similar to the Stop loop command, the Condition break command is used to indicate the end of conditions.

Use the Break setting when using the Condition command within a loop (Loop). The loop will end only when the conditions are satisfied. If not using a loop, you don't need to select the "Use Break" setting.

<figure><img src="/files/ppJ9oA8eAVHpoVegP2AJ" alt=""><figcaption></figcaption></figure>


# Loops command group

Loop (or loop) is a command group that helps you perform a task multiple times without duplicating similar commands.

### <mark style="background-color:orange;">**Loop data**</mark>

The Loop data command is used when you know the exact number of iterations, with settings as follows:

* ***Loop through:*** Number
  * *From number:* Enter a numerical value.
  * *To number:* Enter a numerical value.
  * *Note:* Ensure that the To value is always greater than or equal to the From value to satisfy the loop condition.

**Example:** If the "From number" is 1 and the "To number" is 5, it means that the loop will repeate 5 times.

<figure><img src="/files/vXkFq77kvxftShmRpMmL" alt=""><figcaption></figcaption></figure>

* ***Loop through:*** Variable (can be used when the Variable is a list).
  * *Variable:* Choose the variable to use.
  * *Max data to loop:* Maximum number of iterations. If you don't input or set it to 0, the loop won't execute.
  * *Start from index:* Start executing from the specified position.
  * *Element variable:* Select the variable to assign values when looping.

<figure><img src="/files/IQvzRXmTIHOXXRrdC9Yg" alt=""><figcaption></figcaption></figure>

### <mark style="background-color:orange;">**While loop**</mark>

You use the While loop command when you don't know the exact number of iterations. The loop executes only when certain conditions you specify are met. Key settings to note include:

* ***Value:*** Input the value for comparison.
* ***Equals:*** This operator compares two values and returns True if they are equal and False if not.

<figure><img src="/files/bKwYGTLN8ylgWo7CQ9RM" alt=""><figcaption></figcaption></figure>

* ***Equals (case insensitive):*** Similar to the Equals operator, but it does not differentiate between uppercase and lowercase letters, typically used for strings. For example, "Hello" will be considered equal to "hello".
* ***Not equals:*** The opposite of the Equals operator, returns True if two values are not equal and False if they are.
* ***Less than:*** Compares whether one value is less than another. Returns True if the condition is met, False otherwise.
* ***Less than or equal:*** Compares whether one value is less than or equal to another. Returns True if the condition is met, False otherwise.
* ***Greater than or equal:*** Compares whether one value is greater than or equal to another. Returns True if the condition is met, False otherwise.
* ***Greater than:*** Compares whether one value is greater than another. Returns True if the condition is met, False otherwise.
* ***Contains:*** Checks if a string or set contains a specific element. Returns True if it does, False otherwise.
* ***Contains (case insensitive):*** Similar to the Contains operator, but it does not differentiate between uppercase and lowercase letters in strings.
* ***Not contains:*** Checks if a string or set does not contain a specific element. Returns True if it does not, False otherwise.
* ***Not contains (case insensitive):*** Similar to the Not contains operator, but it does not differentiate between uppercase and lowercase letters in strings.
* ***Starts with:*** Checks if a string starts with a specific sequence of characters. Returns True if it does, False otherwise.
* ***Ends with:*** Checks if a string ends with a specific sequence of characters. Returns True if it does, False otherwise.
* ***Match with RegEx:*** Checks if a string matches a regular expression pattern. Returns True if it matches, False otherwise.

<figure><img src="/files/dU4fdDMWAnN6LREcVUoD" alt=""><figcaption></figcaption></figure>

* ***Variable exists:*** Checks if a variable has a valid input value.
* ***Variable not exists:*** Checks if a variable does not have a valid input value.
* ***Element exists:*** Checks if an element has a valid input value.
* ***Element not exists:*** Checks if an element does not have a valid input value.
  * You need to select the element retrieval type (CSS or Xpath) and paste the selector.
  * Waiting time: Time to wait for selector verification.

<figure><img src="/files/pfBnCFiyFVEhxXdwqvI9" alt=""><figcaption></figcaption></figure>

* ***Add:*** Used when multiple conditions need to be satisfied simultaneously.
* ***Or:*** Used when one of the conditions needs to be satisfied.

<figure><img src="/files/8EJmJwsYxMzEaXr6Etvg" alt=""><figcaption></figcaption></figure>

### <mark style="background-color:orange;">**Stop loop**</mark>

The Stop loop command is used to indicate the end of a loop. When using Loop data/While loop commands, you must use the Stop loop command to terminate the loop.

<figure><img src="/files/xwp7baSm9f3KDDtkMuy8" alt=""><figcaption></figcaption></figure>


# Facebook group

CommandS for automated Facebook login support

### <mark style="background-color:orange;">**Login facebook**</mark>

This command allows you to log in to multiple Facebook accounts simultaneously automatically.\
There are two login methods, let's choose one of these options based on your needs

* **Cookie**
* **UID | Password**

<figure><img src="/files/upJCis3xQZPOlkVGpMd8" alt=""><figcaption></figcaption></figure>

#### File input:

* The file should be saved in **CSV format**.
* The file must include columns with the following information:
  * UID
  * Password
  * 2FA
  * Recovery email
  * Recovery email's password
  * Cookie

Depending on the login method you choose, the system will extract the necessary data from the corresponding column.\
**File template:**&#x20;

{% file src="/files/fsJqJ4dpWf3dcU3uuVZa" %}

**File save result:**

You can save the account information after a successful login. Select a new file and save it in CSV format.

**Note:** When creating a login script, you do not need to use the system’s default **New Tab** command.

### <mark style="background-color:orange;">**Logout Facebook**</mark>

Using this command to logout your Facebook account.


# Files group

A collection of commands to help you work with files (Google Sheets, Excel)

These commands allow you to read and retrieve data from Google Sheets or Excel files.

#### 1. Variable

You need to declare a new variable to store data after retrieving it from the file. The retrieved data will be stored as an array. The format of the variable is `googleSheets.variableName`.\
**Note:** The variable name should not contain special characters or spaces.

#### 2. File You can choose between an Excel file or a Google Sheet file.

* For an Excel file, you need to specify the correct file path.
* For a Google Sheet file, you need to enter the correct spreadsheet ID.\
  Example of a link: `https://docs.google.com/spreadsheets/d/24D55JgPbzsrruyddf2TZMPGasreHFkEi5dvskClVVDU/edit?gid=1027084744#gid=1027084744`

In this example, `24D55JgPbzsrruyddf2TZMPGasreHFkEi5dvskClVVDU` is the spreadsheet ID.

#### 3. Range

Enter the sheet name and the columns you want to retrieve data from. If no range is entered, the system will retrieve all data from the first file.\
For example, in the file below, if you want to get data from cell A1 to D7 in Sheet 2, you would enter:\
`Sheet 2!A1:D7`

If the first row in the file contains column headers, you can check the box "Use the first row as keys" so that the system doesn't retrieve data from the first row.\\

#### 4. Description (optional)&#x20;

Enter a description or note for the command. This is optional, and you are not required to fill it in.

#### 5. Preview data

This feature allows you to preview the data retrieved from the file.


# 6.3. Import/Export scripts

### ⚙️ Import self-coded scripts

You can import self-coded scripts in JSON or Puppeteer format to run on Hidemyacc. In the **"Your Scripts"** section, click on the **"Import script"** icon.

<figure><img src="/files/UKEvaZTzttyOO1BPuvKT" alt=""><figcaption></figcaption></figure>

You can import two types of scripts:

* **Text script:** This is a .txt file script exported from the drag-and-drop script created on Hidemyacc. You can use this feature to import scripts exported from other Hidemyacc accounts.
* **Puppeteer script:** You can upload a file or write your own code in the section below.

<figure><img src="/files/MLlD69igp5qnrXVivAQL" alt=""><figcaption><p>Import Text script</p></figcaption></figure>

<figure><img src="/files/gqKAiy5ebrtJHQUeD9D9" alt=""><figcaption><p>Import Puppeteer script</p></figcaption></figure>

### ⚙️Export scripts

To export drag-and-drop scripts, click **"Edit"** script and then select **"Export".**

<figure><img src="/files/CqPcyxO6RW2A7xhD70h1" alt=""><figcaption><p>Edit sctipt</p></figcaption></figure>

<figure><img src="/files/63WrIM9BsZk8xt7WzWjZ" alt=""><figcaption><p>Export scripts</p></figcaption></figure>

The exported script will be encrypted as a **.txt file**. You can import the script to run on other Hidemyacc accounts.

<figure><img src="/files/92JT1EiuasYXorhTPxnd" alt=""><figcaption></figcaption></figure>

{% hint style="info" %}
**Note:** Do not make any edits to the exported file.
{% endhint %}


# 6.4. Record real action

To use the Record feature, navigate to Automation and select the Record icon.

<figure><img src="https://lh7-us.googleusercontent.com/EgEbLHi75aIjsXKib35YzC924ALO8LGK5QLiajgd2S-jxEM8-3zwd0TvChD8ztmtu20djfucJ7n3f8_kyIHgzNplllF2EFvXuPB74O8j-w05YLmS6U3Eu6f_RHX3vJEYPtuv7KOeclRYe2gLw4G563g" alt=""><figcaption></figcaption></figure>

A new Hidemyacc profile will be created with a randomized size. To start recording your actions, click the Record button.

<figure><img src="https://lh7-us.googleusercontent.com/ijH_kAIhZMICYtmL0BMPX9OGP6H0-rtfymzqimiHgrJWFu3NnaJNb_CKEaPhHw2PSkWlGPfOAoJ7e_hmnjXMilzI4RCV3Oe9XuzMZf5cDOMH7r8SV0h0Kk3bj9pLvVo38cGt22K07IK5bJYwCeQwKrc" alt=""><figcaption></figcaption></figure>

{% hint style="info" %}
Please note: The Record feature is applicable only on web pages; actions outside of the page, such as opening new tabs, URLs, clicking bookmarks, etc., will not be recorded.
{% endhint %}

*For instance,* if you want to create an automation script for Google searching a specific keyword, you can access **Google.com >> click Record >> Type the keyword >> Press Enter**. The automation script will be equivalent to the following commands:

1. New tab \<Google.com>
2. Click element \<Search button>
3. Type \<your desired keyword>
4. Keyboard \<Enter>

To initiate script creation, open the desired webpage, click Record, and start performing actions. Hidemyacc will guide you on creating a simple automation script on Twitter using this Record feature.

First, visit the Twitter page and log in to your account. This script involves actions like scrolling through the newsfeed, following users, and interacting with their posts.

Press **Start** to begin recording.

<figure><img src="https://lh7-us.googleusercontent.com/cWjVosfUIrY8VJxcMuE9NpWqjlP-nmu76I4poKR0SQD6K91vTjKC3P8yB9HqvoHsST7o6_2Zdjapw5CRHK4T0EF-fs9Fat6QfetWkO_KicBQGGMYzE8u_CQRI4Oh-Zeq2SOwj1UxB4Xf6z7kMoeXJ-s" alt=""><figcaption></figcaption></figure>

Next, follow the script's actions:

1. Scroll through the newsfeed: Scroll slowly to ensure accurate recording of your actions.
2. Click on Search to find a user by username. Note: Click precisely on the Selector; incorrect selections may lead to random clicks within the selected area.

<figure><img src="https://lh7-us.googleusercontent.com/WxT4J81Ro3rFk-Zh8is7w8K-UuGuFouicqUnrxNYoUA8CTXg3aaAM7LEKJzPVn0x9Tt0fLSPSfvLSOaMdkhYONLOWQ2Bd-JMflX9FX9J0mMwfSAdKnXrn0TnD2TGKvyk79zvnwISwqP54jcqTOSsMe0" alt=""><figcaption><p>Incorrect Selector</p></figcaption></figure>

<figure><img src="https://lh7-us.googleusercontent.com/BKgU2jYn3D_O7s7axVeymfB6YLClrbDnPibD5OzsblW4wsC8cbAsxRgJaHLTd07NPZQrcH8OpmyWDaHj5ICkEFii5-1-4aH2V42Tn7emPI1tKsreIe8ckFJni_acDXtI9boqyQiHCWmWofXHOo1VkO4" alt=""><figcaption><p>Correct Selector</p></figcaption></figure>

3. Enter the username, e.g., @hidemyacc\_com, and press Enter to search. The system will record your typing and Enter key actions.

<figure><img src="https://lh7-us.googleusercontent.com/hUKpWe6AIarbZs2MdwwBTzME2cpEudXgy7z41tucP0Afwum4b-4egIjeOAQBKec-S1I3sb5L0F8TzemRjTJdB_uKUYmGK-2p7c5eAd043QvqA7XhfUKo71fDVO5p4k6BrPbJsGrVCFNQCNQqOjWoDa8" alt=""><figcaption></figcaption></figure>

4. The results will be displayed. Click precisely on the selector (as described in the image).

<figure><img src="https://lh7-us.googleusercontent.com/Smmm6_wSjpt0RxH47DpOPlhKDusOXAXC8xgZ27HCz1zjCxCPbCzeGPSkgLjKzK87jIo_D9stxcWr4acUCnQGRK5FCguM1bpG3uCLLMhn9mIz_CdnynuoKc8S3-mMVcsK1RkTUtSA_Yk7REsqaw6Aep8" alt=""><figcaption><p>Click on the account</p></figcaption></figure>

5. Then, click Follow for that user.

<figure><img src="https://lh7-us.googleusercontent.com/gJ0xlzMlvWokDA-ANwoZIAuswn-rtS6shlib_tgcWKUaYl9IJialx4JOjIJeNg1D26nTgNtS8G9XuCQgQiSFqtfv7RBxAEz3aIeF1cmoKIjmwgaWaZL_KVpTqRjp6kS5XvjE_kiXF3DQnt_s4DseqWo" alt=""><figcaption></figcaption></figure>

6. Afterward, scroll through the user's page and interact with the posts. Ensure precise selection of the selector when clicking on interaction buttons.

<figure><img src="https://lh7-us.googleusercontent.com/fykmd7kdYdNHPh8ZDz7AgPkj4ZnpeNvA8cZsRgg4TsFCK20LqNtBSk9YYwyZESf-qeUiZsn2o9z0QACAedqShrPlvVfipaTuXxSMCeNeHVCUxvDzCMCr7dx7NbitC1JoKSLgE1uKdTcHJtGVeYHzHdY" alt=""><figcaption><p>Incorrect Selector - System may click randomly</p></figcaption></figure>

<figure><img src="https://lh7-us.googleusercontent.com/heaGpyeoYjnKuAFn5Jl9c3XujVvxZAjl6ke7d7IVDIS6KjJ7fB5DeUXdZWqfTMClBcvv1vIBVV3Y__tX7cB81-2Puue_N5YWsXvJDlEWW2ahukc3LbOCb55n8QpIb0CMUDRUCJlOz-LSbVmMk2vNlIw" alt=""><figcaption><p>Incorrect Selector - System may click randomly</p></figcaption></figure>

<figure><img src="https://lh7-us.googleusercontent.com/H7G85sSYW1OJ_7KxO1R72-Bcxo8efAKEPjtcNTIXg3hR1mVYoz5cLrFvOHsI_QvL0kn9wFb1qJNDJKVYyl7LAEVFFMPjL8mlwnMSGUe3FQpR5dv4if6iVEDr5eJVmHa8Fl1z5tzm0-SRQljRs7xUI_Q" alt=""><figcaption><p>Incorrect Selector - System may click randomly</p></figcaption></figure>

<figure><img src="https://lh7-us.googleusercontent.com/l3Xd5-bQPXYtfjCO4u1X4iSp8GYd0kVBl9USDKM4kj9YhGMUlMg9r6d6UAcLBSfXQeMZtWZTxmOsXycmLD7-yAmvVlfIpsTo4C3nFzpAZoWbSVFZZLN_l6q6WZ6wpWFY9w5tzrwvxjEzre6bLAjJt9M" alt=""><figcaption><p>Correct Selector</p></figcaption></figure>

7. Once the script is complete, click Stop, name the script, and save it. If you don't want to save the script, click Cancel.

<figure><img src="https://lh7-us.googleusercontent.com/FQosQdNxRe2Bku8sQxFAt5D1EE4Li39fnz8KmBazx8xQ6pcLNdmBb2YnQ9_0HDy9Pvrk7MmQSeaPUcJTAgEZidDL0T-gfbNhAoT86Ypd5cxqnS8ZONLt-AElNoWxfsH7wmyn3C5RhGaLmNgcn1iPRhE" alt=""><figcaption></figcaption></figure>

8. After saving the script, the system will display a message. If you want to revisit the script on this profile, click Restart; otherwise, click Cancel.

<figure><img src="https://lh7-us.googleusercontent.com/AqYYpM6xqnKWeY2ujcjyhUB--_iYOH84X2GEV7Z2YK_YMrrl_NY91445CyFRS3wf4WVtTRnK6xUfaO1YVKmbzraZAKRX3348sJaXGL3rTFo7l2wM4SMy1ZjRTTzjlKwpL07qccdnFUvxf9hutpkQSvI" alt=""><figcaption></figcaption></figure>

You can review your automation script by clicking the three dots and selecting Edit.

<figure><img src="https://lh7-us.googleusercontent.com/BmmGLger7xUcU_o2Tvu4NBSMuyp9-T1HBc17G16KvYcPa5W4rtUyLA21XI3pyd7X_h04uBcLyt1ozorNLUAqsQBuf3rZdoxG0DnlTKpZY4Kx1eG3y57jFjOiCveof-_nLe0u07N-9LDtBnedovsx-28" alt=""><figcaption></figcaption></figure>

The automation script will be saved in the form of commands. You can edit the script content. The system will use standard selectors from the web; double-check to ensure the correct selector is chosen.

<figure><img src="https://lh7-us.googleusercontent.com/pj4eOPwmpCTwnTKm56f0eRk12eFG6zq_-VSiHUO86GWE4QE5wR0IWZ-xrhd8HeA0E5Y8VP9lG9VArzlwUDfkxu1iyoVk_0YTIMZt4gD659wCgmSJNXj5RtA7v37I5D1dwzJsKLeZDKUufwWVIpGTGPc" alt=""><figcaption></figcaption></figure>

To check if the selector is standard for the web, copy the selector from the automation script, go to Twitter, right-click, select Inspect, click on Element, and press Ctrl+F to paste the selector into the search box. As you can see, this selector is Home button. For other selectors, follow the same process.

<figure><img src="https://lh7-us.googleusercontent.com/3a0H3tXnBBclSGrdzy-OL-Bl-Y6BbH69Bd8sPb8T6LuVmyslgum08Sk2bGwDkSz-JK-BH3EmKubvYZEw1mmaJYx0uMJShivAwAYDP_rsM2V3PaAT3-R7gg-NQvD5wGAUlxj0pb5OJa9PSqj-b8itd1M" alt=""><figcaption></figcaption></figure>

### <mark style="background-color:orange;">Note when using the Record Automation feature</mark>

* It saves time by recording your actions on the website.
* Wait for the website to load fully before starting the next actions.
* Use standard selectors and double-check them after script creation.


# 6.5. Run & schedule automation scripts

### ⚙️ Run test & Debug

After creating the script, click on the sort icon to automatically arrange the commands in the order you've created them. Then, click **"Run test"** to test the script.

<figure><img src="/files/kLzOImm3DZJDT8POWjHv" alt=""><figcaption></figcaption></figure>

Once the script has finished running, click **"Debug"** to check for errors.&#x20;

<figure><img src="/files/V2Kc89jeLS5k0eJPBGSd" alt=""><figcaption></figcaption></figure>

If there are no errors, you can give the script a name, attach tags (optional), and click **"Save"** to save the script.&#x20;

### ⚙️ Run automation scripts

Once created, a script is saved under Your Scripts. To run a saved script, follow these steps:

1. **Select Run** on the script.

<figure><img src="/files/UdylKkYHJ5EjxKKK2cLW" alt=""><figcaption></figcaption></figure>

2. **Select the profiles** you want to run the script on.

<figure><img src="/files/Ecnt4zfxtU9Q9KUKCLsq" alt=""><figcaption></figcaption></figure>

3. **Automation settings:** Here you configure several parameters before running the script on the selected profiles:

* *Number of profiles running simultaneously:* Maximum of 10 profiles.
* *Number of loops:* How many times the script will re-run on the selected profiles.
* *Profile run order:* 2 modes — run profiles sequentially from top to bottom, or randomly.
* *Mute audio:* Mutes sound on the opened website.
* *Don't display images:* Hides images on the opened website.
* *Maximum script run time:* The maximum runtime for one thread; if the script hasn't finished by then, the profile will still be closed.
* *Delay before opening a new process:* You can set the delay before the next profile opens.

<figure><img src="/files/Ni7rxXv2Rric3QibUM75" alt=""><figcaption></figcaption></figure>

4. **Click Run** to start running the script.

The Automation script will now run according to the settings you configured.

### ⚙️ Schedule automation script

This feature lets you schedule a time for a saved Automation script to run. To use it, go to Automation, select the **Schedule** icon, and click the **New schedule** button.

<figure><img src="/files/cOq7O660PFMwN3HCFmjg" alt=""><figcaption></figcaption></figure>

<figure><img src="/files/oWySyosFPR1iQLXvQtCa" alt=""><figcaption></figcaption></figure>

There are 3 sections to configure:

* **Script section:** Displays the Automation scripts you've created. You can choose a system script or one you built yourself. Each schedule can only include 1 script at a time.

<figure><img src="/files/2TPbJgY7wLTK3WWMLcCi" alt=""><figcaption></figcaption></figure>

* **Profile section:** Select the profiles you want to schedule the script to run on. You can search for profiles by name and folder here.

<figure><img src="/files/MVSICuhiPOhgHc3UbyiO" alt=""><figcaption></figcaption></figure>

* **Settings section:**

  You can configure the number of profiles running simultaneously, the number of loops, and the profile run order (sequential from top to bottom, or random). You can also choose to mute audio or hide images for that profile while the Automation script runs. **Note: Hidemyacc limits this to 10 simultaneously running profiles.**

<figure><img src="/files/bjq9TCKvtqrnK5QNcHt2" alt=""><figcaption></figcaption></figure>

*Advanced settings:* You can configure the maximum script run time and the wait time between opening each profile (in seconds).

<figure><img src="/files/0BRdyvVg2j9wfkIHY0dH" alt=""><figcaption></figcaption></figure>

*Schedule settings:* Set a specific date and time.

* **Date format:** Month/Day/Year
* **Time format:** Hour:Minute:AM/PM

If you choose to repeat daily, the system will schedule the script and selected profiles to run every day. **Note: you must have the Automation feature screen open for the scheduled script to run.**

<figure><img src="/files/0Buu4midcFwVzdyIMX1L" alt=""><figcaption></figcaption></figure>

Finally, enter a name for the schedule and click Save. If you don't enter a name, the system will randomly generate one for you.

<figure><img src="/files/LH4hFSZ05BTKqsuqbeyu" alt=""><figcaption></figcaption></figure>

You can edit a saved automation schedule here. By clicking the three-dot icon, you can also choose to Duplicate or delete that automation schedule.

<figure><img src="/files/ksRftk3SoRuqC6EGFKpp" alt=""><figcaption></figcaption></figure>


# 7.1. Overview

The Synchronization feature in Hidemyacc lets you manage multiple profiles at once and synchronize actions across all selected profiles. With this feature, you can quickly replicate an action performed in one profile across other profiles, saving time and effort.

{% hint style="info" %}
**Video guide:** <https://youtu.be/TkRblMR6NEo?si=K1EkGvDP3lEL0zqa>
{% endhint %}

When synchronizing actions between profiles, you need to understand 2 types of profiles:

* **Main profile:** The primary profile. Any action you perform in this profile's window will be simultaneously replicated across the other profiles.
* **Controlled profile:** A controlled profile synchronizes all actions performed in the main profile's window.

The first profile you select becomes the Main profile. Subsequently selected profiles become controlled profiles. Pay attention to the order in which you select profiles, as it affects subsequent actions.

To switch which profile is "Main," click this icon on the profile you want to promote to the main profile. Clicking this icon will bring that profile's window to the front.

<figure><img src="/files/IU6hlVSQA9lm5qklcuqt" alt=""><figcaption></figcaption></figure>


# 7.2. How to synchronize action

After selecting the profiles you want to synchronize, you need to configure the settings in the Console panel.

### ⚙️ Windows

First is the Windows tab. The Window Manager lets you set the size of the open windows and arrange their layout when running. The arrangement depends on your screen size.

<table><thead><tr><th width="179.00006103515625">Setting</th><th>Description</th><th>Note</th></tr></thead><tbody><tr><td>Uniform size</td><td>Makes all profile windows the same size as the main profile</td><td>After resizing the main window, click Uniform size to make all controlled profile windows match</td></tr><tr><td>Custom size</td><td>Customize the size of each profile's window as needed</td><td>After selecting your desired size in the Monitor section, click Custom size to change the window size of the profiles (including the main profile)</td></tr><tr><td>Scale profile (%)</td><td>Zoom the window size in/out</td><td>If your screen is small but you still want to display all profiles on the same screen, you can scale down the profile windows to fit them all on screen</td></tr><tr><td>Window layout</td><td>Arrange the profile windows' layout when running</td><td><strong>Custom:</strong> Manually arrange the window layout by choosing the number of rows and columns displayed. <strong>Adaptive:</strong> The system automatically arranges the windows based on your screen size.</td></tr></tbody></table>

### ⚙️ Text

The Text Manager lets you set and control the text entered in each window. Clicking **"Clear text"** clears the entered text in all windows at once.

**1. Enter a random number:** Enters any number within a range you set.

* Set the number range you want.
* Click Enter randomly to input a random number for these profiles.

<figure><img src="/files/T6x304DJ9ZH4UvxuAQSy" alt=""><figcaption></figcaption></figure>

**2. Same text:** This setting lets you enter identical text across all profiles.

* Enter your desired text in the setting field.
* Click Type as human so the system automatically types the text.

<figure><img src="/files/Sy4tOlzTLuJN9M0xqL3m" alt=""><figcaption></figcaption></figure>

You can customize typing speed in the **Settings** section.

<figure><img src="/files/WNQuWmVfXMAQcaR8SfDu" alt=""><figcaption></figcaption></figure>

**3. Designated text:** Enter different text for each profile.

You can create Text Groups and fill in content for each group. There are 2 options: Designated and Enter randomly.

* **Designated:** Enters text from top to bottom, following the order the profiles were selected. For example, if this is the text content you want to enter:

```
antidetect browser Hidemyacc
the best antidetect browser
multiple accounts
```

And the order of selected profiles is:

1. Profile 1 (Main)
2. Profile 2 (Controlled)
3. Profile 3 (Controlled)

When you choose **Designated**, the text corresponding to each profile will be:

```
antidetect browser Hidemyacc - Profile 1
the best antidetect browser - Profile 2
multiple accounts - Profile 3
```

* **Enter randomly:** Enters random text for each profile.

<figure><img src="/files/ZFOeYdrG1ja6OlCMEcij" alt=""><figcaption></figcaption></figure>

### ⚙️ Tabs

This setting lets you manage the tabs in the open windows.

* **Same tabs:** When you click Same tabs, the tabs open in the main profile will be synced to the controlled profiles. **Example:** The main profile has 3 tabs open — Facebook, Google, and YouTube — while 2 other controlled profiles only have Google open. When you use Same Tabs, all of the main profile's tabs will be opened in the other 2 controlled profiles, in the exact order: Facebook, Google, YouTube.
* **Close other tabs:** Closes all tabs except the current tab, across all profiles.
* **Close current tabs:** Closes the current tab in each window.
* **Close blank tabs:** Closes all blank tabs in each profile.

<figure><img src="/files/XpQ5BIAKi2M37HLn2Xyc" alt=""><figcaption></figcaption></figure>

* **Visit website:** To open the same website in each window, enter a URL and click Open. If you select **Open link in current tab**, the URL will open in each window's currently active tab.

<figure><img src="/files/JYdMjWJmu7AajmEjv8mF" alt=""><figcaption></figcaption></figure>

### ⚙️ Widget

A pop-up Console window is displayed, letting you operate more conveniently without needing to reopen the Hidemyacc app.

<figure><img src="/files/DfNC78O2GeOOFI8m6f1Q" alt=""><figcaption></figcaption></figure>

### ⚙️ Setting

Here you can configure synchronization for other actions such as keyboard shortcuts, mouse actions, and typing speed.

* **Keyboard:** Option for typing simultaneously (Type at once).
* **Mouse:** Configure synchronized mouse actions:
  * Click at once
  * Scroll at once
  * Move at once
* **Typing speed:** Set a random typing speed between ***x*** and ***y*** ms.

<figure><img src="/files/TfMIQjHMX4doxgSn8rJa" alt=""><figcaption></figcaption></figure>


# 8.1. How to purchase a Hidemyacc plan

### ⚙️ Pricing

Hidemyacc offers 5 different packages, divided by profile count, suitable for everything from individuals to large teams. For detailed pricing and feature comparisons, visit the Hidemyacc website: <https://hidemyacc.com/pricing>

<table><thead><tr><th width="139.83331298828125">Package</th><th>Best for</th><th>Number of profiles</th><th>Monthly price</th><th>Annual price</th></tr></thead><tbody><tr><td>Mini</td><td>Individual use</td><td>5</td><td>$10/month</td><td>$5/month</td></tr><tr><td>Starter</td><td>Small teams</td><td>30</td><td>$29/month</td><td>$15/month</td></tr><tr><td>Base</td><td>Growing teams</td><td>100</td><td>$49/month</td><td>$25/month</td></tr><tr><td>Team</td><td>Mid-sized teams</td><td>300</td><td>$99/month</td><td>$49/month</td></tr><tr><td>Business</td><td>Large teams</td><td>1,000</td><td>$199/month</td><td>$99/month</td></tr></tbody></table>

Hidemyacc can also customize the number of profiles based on a user's specific needs. Please contact Hidemyacc's support team for help customizing a profile count to fit your needs.

### ⚙️ Supported payment methods

Hidemyacc supports the following payment methods:

* Appota: QR code + Visa/Mastercard
* Cryptomus
* Hidemyacc Coin
* PayPal (for international customers and monthly plan payments)

Simply choose the method that suits your needs and proceed with payment.

### ⚙️ How to sign up for a plan

If you're currently on the free trial, go to the payment section and click **"Pay Now"** to purchase a package.

**Activation time:** A package is activated **immediately after registration and payment.** The system has an Automatic Payment Checking mechanism, so you can pay and start using it right away. If your account hasn't been renewed/activated after **5 minutes**, please contact support.

{% hint style="info" %}
**Video guide:** <https://youtu.be/WMMi4Rdc35U?si=IIyxJMuxco8epcjP>
{% endhint %}


# 8.2. How to renew a plan

An expired account will have its profile data retained for 3 months from the package's expiration date. Hidemyacc does **not** automatically renew packages — to continue using the service, you need to make a payment.

**Step 1:** Choose a package that fits your needs. If you want to downgrade to a smaller package, you'll need to delete profiles so your profile count matches the limit of the package you want to switch to.

<figure><img src="/files/BRXmSrxbkPkFLKLAVtIJ" alt=""><figcaption></figcaption></figure>

**Step 2:** Choose a suitable payment method.

<figure><img src="/files/7dOFs9VTSRDkAqmNyfBb" alt=""><figcaption></figcaption></figure>

**Step 3:** Continue using Hidemyacc. Once payment is complete, the system will automatically activate the package, and you can continue using Hidemyacc as normal.


# 9.1. Account

The "Account" section allows you to change some account information, such as the account name and password.&#x20;

<figure><img src="https://eng-hidemyacc.gitbook.io/~gitbook/image?url=https%3A%2F%2F486469059-files.gitbook.io%2F%7E%2Ffiles%2Fv0%2Fb%2Fgitbook-x-prod.appspot.com%2Fo%2Fspaces%252FpGmapgZbRxSGLImUsds2%252Fuploads%252Fk2IVZNNvbC56VVbRbsUE%252Fsetting-account-1.png%3Falt%3Dmedia%26token%3D0ba4e47b-953a-4194-b5f9-7961d25c6b42&#x26;width=400&#x26;dpr=2&#x26;quality=100&#x26;sign=bea6030c&#x26;sv=1" alt=""><figcaption></figcaption></figure>

To change your password, you need to enter your current password, new password, and confirm the new password. Additionally, the "Account" section will display information about your current plan.&#x20;


# 9.2. New profile default

This feature allows you to set default parameters when creating a new profile, such as the operating system, browser (type and version), hardware, language, screen resolution, bookmarks, and start URLs. If you do not make any changes, the new profiles will have these same parameters.

Go to Settings >> New profiles default to change it,&#x20;

<figure><img src="/files/2OJUGrNuejQgMR3488nD" alt=""><figcaption></figcaption></figure>


# 9.3. Hidemyacc server

You can choose server 1 or server 2 in case the transmission speed of the remaining server is affected due to fiber optic cable breakage.

<figure><img src="https://eng-hidemyacc.gitbook.io/~gitbook/image?url=https%3A%2F%2F486469059-files.gitbook.io%2F%7E%2Ffiles%2Fv0%2Fb%2Fgitbook-x-prod.appspot.com%2Fo%2Fspaces%252FpGmapgZbRxSGLImUsds2%252Fuploads%252FIYXXn3bHvrmSX1ZBsovi%252Fhidemyacc%2520server.png%3Falt%3Dmedia%26token%3Dea02d2bf-0ad8-48e3-ab76-4d9cd7f712b6&#x26;width=768&#x26;dpr=4&#x26;quality=100&#x26;sign=b978f181&#x26;sv=1" alt=""><figcaption></figcaption></figure>


# 9.4. Languages

Set the application language and the language for the Marco browser source

### **⚙️ Hidemyacc language**

Hidemyacc will display the default language based on the IP address you used to register your account. Currently, the Hidemyacc app supports 3 languages: English, Vietnamese, and Chinese.

<figure><img src="https://eng-hidemyacc.gitbook.io/~gitbook/image?url=https%3A%2F%2F486469059-files.gitbook.io%2F%7E%2Ffiles%2Fv0%2Fb%2Fgitbook-x-prod.appspot.com%2Fo%2Fspaces%252FpGmapgZbRxSGLImUsds2%252Fuploads%252Fnbvt0DkPgqt6zHF3sW0J%252Fhidemyacc%2520language.png%3Falt%3Dmedia%26token%3De0d09ccb-9b23-4024-9be2-c57fc00012c1&#x26;width=768&#x26;dpr=4&#x26;quality=100&#x26;sign=bc051b22&#x26;sv=1" alt=""><figcaption></figcaption></figure>

## **⚙️ Marco translation**

The Marco browser will default to English as the primary language when translating a webpage. You can set other languages in this section, such as Chinese, French, German, Russian, Spanish, and Vietnamese.&#x20;

<figure><img src="https://eng-hidemyacc.gitbook.io/~gitbook/image?url=https%3A%2F%2F486469059-files.gitbook.io%2F%7E%2Ffiles%2Fv0%2Fb%2Fgitbook-x-prod.appspot.com%2Fo%2Fspaces%252FpGmapgZbRxSGLImUsds2%252Fuploads%252FfhJEgNKbmdagriGtY8uM%252Fmarco%2520translation.png%3Falt%3Dmedia%26token%3D61965cb4-619f-450b-82b6-6b761f574d8b&#x26;width=768&#x26;dpr=4&#x26;quality=100&#x26;sign=42ae425b&#x26;sv=1" alt=""><figcaption></figcaption></figure>


# 9.5. Updates

You can enable/disable automatic updates for Hidemyacc and extension versions. When you disable automatic updates for the Hidemyacc version, you can choose other versions to use.&#x20;

<figure><img src="/files/oUGO6z5F40O9iMLuEtgh" alt=""><figcaption></figcaption></figure>

Be sure to click **"Change"** to save your settings.


# 9.6. Timezone

You can select a server to check the timezone. Hidemyacc has two different servers. The system defaults to server 1 as the main server, but you can change it according to your needs.

<figure><img src="https://eng-hidemyacc.gitbook.io/~gitbook/image?url=https%3A%2F%2F486469059-files.gitbook.io%2F%7E%2Ffiles%2Fv0%2Fb%2Fgitbook-x-prod.appspot.com%2Fo%2Fspaces%252FpGmapgZbRxSGLImUsds2%252Fuploads%252FLpmnMnH079dFhGYqBFnF%252Ftimezone%2520update.png%3Falt%3Dmedia%26token%3D4c6ad531-5b3c-4501-a38e-8936b26ae8da&#x26;width=768&#x26;dpr=4&#x26;quality=100&#x26;sign=db92c791&#x26;sv=1" alt=""><figcaption></figcaption></figure>


# 9.7. Security

Enhance security with 2-Factor Authentication

### ⚙️ 2FA

From version 3.0, Hidemyacc introduces an additional 2FA feature to bolster the security of your account. Once you turn on 2FA in version 3.0, this feature will also be enabled when you log in to your Hidemyacc 2.0 account.

{% hint style="info" %}
**Note:** You can only activate the 2FA feature on Hidemyacc 3.0.
{% endhint %}

Upon enabling the 2FA feature in Hidemyacc 3.0, you can choose one of the following apps to scan the QR code:

* Authy iPhone | Android | Chrome | Linux | OS X | BlackBerry
* Google Authenticator iPhone | Android
* Microsoft Authenticator Windows Phone | Android
* Hidemyacc Authenticator <https://gauth.hidemyacc.com/> (you need to enter the secret key which Hidemyacc provides)

<figure><img src="/files/7S2cQf2Fs5ZU09tw4Anb" alt=""><figcaption></figcaption></figure>

After enabling, every time you log in, delete a profile, or transfer a profile, you need to enter 2FA code to proceed with the operation.

### ⚙️ LOGIN SESSIONS <a href="#login-sessions" id="login-sessions"></a>

Display time, device and location (location taken by IP address).<br>

<figure><img src="https://eng-hidemyacc.gitbook.io/~gitbook/image?url=https%3A%2F%2F486469059-files.gitbook.io%2F%7E%2Ffiles%2Fv0%2Fb%2Fgitbook-x-prod.appspot.com%2Fo%2Fspaces%252FpGmapgZbRxSGLImUsds2%252Fuploads%252FGCibRaahL4zVeaEvdQI4%252Flogin%2520sessions.png%3Falt%3Dmedia%26token%3Ddb01fed7-4086-473e-b221-f01557bd30bc&#x26;width=400&#x26;dpr=2&#x26;quality=100&#x26;sign=75c54daf&#x26;sv=1" alt=""><figcaption></figcaption></figure>


# 9.8. Storage

### ⚙️ Storage

By default, Hidemyacc will save profile data at C:/Users/.hidemyacc/profiles. You can click the "Select folder" button to change the folder where profile data is saved according to your own needs.

### ⚙️ Clear cache

To free up memory space, you can choose to clear the cache (delete data stored in the browser's temporary storage).

<figure><img src="https://eng-hidemyacc.gitbook.io/~gitbook/image?url=https%3A%2F%2F486469059-files.gitbook.io%2F%7E%2Ffiles%2Fv0%2Fb%2Fgitbook-x-prod.appspot.com%2Fo%2Fspaces%252FpGmapgZbRxSGLImUsds2%252Fuploads%252FZyCOlSZo0GRtBwqEEqJG%252Fhidemyacc-storagew.png%3Falt%3Dmedia%26token%3Df8e614b7-6f4e-4218-89b8-b85adf5fee8b&#x26;width=768&#x26;dpr=4&#x26;quality=100&#x26;sign=5565b024&#x26;sv=1" alt=""><figcaption></figcaption></figure>

### ⚙️ Clean unused profiles

Every time you create a profile on Hidemyacc, the software creates a folder on drive C to store that profile's data (cookies, cache, history, local storage, etc.). When you delete a Hidemyacc profile in the app, the system also deletes the corresponding folder on drive C. However, if the profile has been opened on multiple devices, deleting it on Device A only deletes the local folder on Device A — the folders on Device B, Device C, Device D, etc. remain untouched and can cause drive C to fill up over time.

This feature lets you scan and delete the data folders of profiles that no longer exist on the Hidemyacc server, freeing up storage space on drive C.

To use this feature, follow these steps:

1. Open Hidemyacc, go to **Setting**, then select **Storage**.
2. Under **CLEAN UNUSED PROFILES**, click the **Scan** button so the system scans and checks for profiles that no longer exist on the server.
3. Click **Delete** to remove these folders and free up drive C storage space.

<figure><img src="/files/IuP6YmbhomnFczsOoBfw" alt=""><figcaption></figcaption></figure>


# 10.1. Overview

Hidemyacc's Affiliate Program allows users to earn commissions by referring new customers through their own personal referral link. This is a **lifetime commission** — as long as the person you referred continues to use Hidemyacc and renews their package, you will continue to receive commission payments.

You can check all the relevant information on a single screen, including:

* Total earnings, amount withdrawn, and remaining balance
* Number of clicks, installs, and earnings per affiliate link

<figure><img src="/files/ei8qoHQnt0p7fanMd6qO" alt=""><figcaption></figcaption></figure>


# 10.2. How to join

### ⚙️ Registration steps

To join Hidemyacc's Affiliate Program, you just need to follow 4 steps:

* **Step 1:** Download Hidemyacc and log in to your account.
* **Step 2:** Go to the Affiliate section.
* **Step 3:** Create a referral link.
* **Step 4:** Create content and attach your referral link. When a user clicks your referral link and purchases a package, you will receive a commission.

<figure><img src="/files/nvpnVZRzuuiBUXoOIBGS" alt=""><figcaption></figcaption></figure>

### ⚙️ Tracking your earnings

On the Affiliate dashboard, users can view important information related to earnings and payments:

* **Total earning:** Total accumulated earnings from the program.
* **Total Withdraw:** Total amount withdrawn.
* **Balance:** Current available balance on your referral link.

This is a convenient way to track progress and measure the effectiveness of your referrals.

#### ⚙️ Commission payments

You need to add a method for receiving your commission payments. You can choose from several different payment methods depending on your needs. Hidemyacc currently supports the following methods:

* Bank transfer
* PayPal
* Ping Pong
* Payoneer
* A selection of supported cryptocurrencies

**Minimum automatic payment threshold:** $50. Balances below this threshold will not be paid out automatically.

**Payment information update deadline:** you need to update your payment information before the 10th of each month to ensure you receive your payment on time.


# 10.3. Program rules

Participants in the Affiliate Program must comply with the following rules:

* Do not use automated software or tools to search for and click on Hidemyacc's content in order to generate fake traffic or referrals.
* Do not use the brand keyword "Hidemyacc" when running paid advertising — the keyword "Hidemyacc" must be added to the negative keyword list in your ad campaigns.
* Do not share your affiliate link within Hidemyacc's own official content (for example: you may not attach your affiliate link to articles or videos published by Hidemyacc).


# Hidemyacc's loyalty customer program

## Hidemyacc's loyalty customer program

Hidemyacc's Loyalty Customer Program is a program aimed at appreciating Hidemyacc's customers. Upon participation, you will receive benefits based on the achieved ranking. Ranking is calculated based on the accumulated payment level of customers when purchasing Hidemyacc packages.

## Customer loyalty class

Based on the accumulated package payment level, customer ranks will be divided into 6 classes. Customers will ascend in class once they meet the payment threshold as follows:

| Class    | Total accumulated amount |
| -------- | ------------------------ |
| Diamond  | > $2175                  |
| Platinum | > $1085 to $2175         |
| Gold     | > $435 to $1085          |
| Silver   | > $175 to $435           |
| Member   | <= $175                  |
| Newbie   | No payment has been made |

## Benefits for each customer loyalty class

Based on the customer loyalty class, customers can enjoy various attractive benefits including:

* Direct 24/7 1-1 support
* Receive free proxies from the system
* Participate in discount programs, receive extra usage days.
* Receive premium automation scripts, custom tailored.

The program will vary depending on each campaign, customers are advised to follow our Facebook fanpage or Twitter for updates on the latest offers.

## How to check customer loyalty class

You can easily check your current customer loyalty class on Hidemyacc. Simply click on the Profile icon located at the top left corner of the app.

## How to check payment progress

In the Billing section under Payments, you can review your package payment history and track your payment accumulation progress.


# 11.1. Download and Install Hidemyacc

{% hint style="info" %}
The first thing to do if you want to use Hidemyacc is to [**DOWNLOAD** ](https://hidemyacc.com/download)**and INSTALL** Hidemyacc software
{% endhint %}

**First**, go to <https://hidemyacc.com/download> and download the latest version of Hidemyacc.

![Download Hidemyacc](/files/isVsSInmWImS0NtIcYCB)

Then Extract your downloaded files and Run your <mark style="color:blue;">**Hidemyacc Setup**</mark> file.&#x20;

Wait until Hidemyacc successfully installed.

![Run Hidemyacc Setup](/files/Wvtu79J3XQRBfLtajmbm)

![Wait until Hidemyacc successfully installed](/files/J7VCTinsdGwZFKPZhSOn)


# 11.2. Create Hidemyacc account

After successfully installed Hidemyacc software, you will need to **create** a Hidemyacc account<br>

**First**, **click** on **Create Account.**

![Create Account](/files/4LFjPipCv216sExW8OTG)

**Next**, **enter** your register information then click **SIGN UP.**

![Enter your information](/files/YDfYUqC2Aq6TSfq96UDK)

You will need to **verify** your account by enter confirmation code.

![Confirmation](/files/6423B60GiVxvgzFpsTrc)

Get your confirmation code on your email.

![Confirmation code](/files/sHpWWxiCktldmvISP4iC)

After submitted your confirmation code, you will get a congratulation dialog. And you can sign in with your account now!

![Successful Sign Up](/files/sLejDIETKYCndGmMP73F)


# 11.3. Purchase Hidemyacc Plans

{% hint style="info" %}
You will have **7 days free trial** of Hidemyacc. If your account trial or your plan expires, your data still be stored on our server for 7 days.
{% endhint %}

* If you are using **trial version**, click on **Pay Now** to begin purchase Hidemyacc Plans.

![Trial version](/files/qURW4KpbY4xhTXYoUrTC)

* If you already purchased a Plan and you want to **renew** or **upgrade your Plan**, go to **Profile Setting** on the top right corner and choose **Upgrade**.

![Go to Profile Setting](/files/XLJjkp5t9xRR0S574iau)

![Choose Upgrade](/files/yaCr1ddo3Fd2mfr53nuF)

{% hint style="warning" %}

* You can choose to purchase in **Monthly** or **Yearly**

* If you want a **customized Plan**, please contact our support for more details!\
  Details about our Plans: [<mark style="color:$primary;">**Hidemyacc Plans**</mark>](https://hidemyacc.com/pricing)
  {% endhint %}

* **Monthly Price**

![Monthly Price](/files/fG3LYCLOZx2mdlsSyehy)

* **Yearly Price**

![Yearly Price](/files/r0VrzTNhUYMtIHj2fV3z)

**Next**, choose your needed Plan and click **Choose.**

{% hint style="info" %}
**Currently we only support payment via USDT**
{% endhint %}

After clicking **Choose Plan**, please **follow these steps** to complete a successful transaction:

1. Carefully check your **selected Plan.**
2. Select **Monthly Pricing** or **Yearly Pricing** based on your need.
3. Send the corresponding amount of **money** to the **Metamask** **wallet** appear on the screen.
4. Click **Confirm** and wait for few minutes.

![Payment Instructions](/files/deIiXDG26lEmPofPdLeB)

{% hint style="warning" %}
If your account hasn't been activated after a few minutes, please contact our support to manually activate.
{% endhint %}


# 11.4. Create Hidemyacc Profile

To **create** a new **Hidemyacc Profile,** click on **New Profiles.**&#x20;

![New Profiles](/files/IXxl2DsiG1jqPVsMCx6h)

Each profile will have different computer information, geographic location, IP address,...as a new user.

#### <mark style="background-color:orange;">OVERVIEW TAB</mark>

In the **Overview** tab, you can set up the **Operating System** and **Browser** configurations of your **New Profile** by following these steps:

1. **Enter** your **profile's name.**
2. **Choose Operating System** for your profile.
3. **Choose Browser** for your profile.

{% hint style="info" %}
For Hidemyacc to be **most effective**, we suggest you select the Operating System that matches your computer's operating system.
{% endhint %}

![Overview](/files/7UQwpp1Eo3G583o8FSyO)

####

#### <mark style="background-color:orange;">PROXY TAB</mark>

**Next**, let's set up a proxy for your Profile in **Proxy** tab:&#x20;

1. &#x20;Choose your **Connection Type** (Hidemyacc supports HTTP, Socks4, Socks5, tinsoftproxy, and tmproxy).
2. **Enter** your **proxy info** in the form: <mark style="background-color:yellow;">**ip:port:username:password**</mark> <mark style="background-color:yellow;"></mark> then **click** **Import.**
3. Click on **Check Proxy.**

![Proxy Set up](/files/78xGl1HDEr5D16pOsulX)

* If Hidemyacc connects **successfully**:&#x20;

![Connect Succesfully](/files/YJXmdzM16IuNbCWomjPz)

* If Hidemyacc **can't connect** to Proxy:

![Connect Fail](/files/FewjwgVtGqK75gSoiwm9)

####

#### <mark style="background-color:orange;">TIMEZONE, WEBRTC, GEOLOCATION TABS</mark>

![](/files/G5ALD4FAlmYZMnRpDsEI)

By default, **Timezone** and **WebRTC** and **Geolocation** are automatically filled based on your Proxy.

#### <mark style="background-color:orange;">EXTENSIONS TAB</mark>

You can install extensions directly on Browser or you can add through Hidemyacc by click on **Choose Folder**

![Extensions](/files/diRPVHWyQQfjRhS7HSaR)

**Next**, choose the Folder that containing the Extensions you want to add and click **Select Folder.** Hidemyacc will automatically adds the Extensions you chose to your Profile's Browser.

#### <mark style="background-color:orange;">ADVANCED TAB</mark>

{% hint style="info" %}
By default, you don't need to adjust the configurations in **Advanced Tab** because we already set up everything you need.
{% endhint %}

![Advanced Tab](/files/LajjUBLNLzSvQu0rlDlF)

In **Security** section:

* &#x20;If you intend to use Hidemyacc on high security websites like eBay, Amazon, Walmart... you should turn <mark style="background-color:green;">**Enhanced Protection**</mark> on.
* If you don't want to sync your data to our server, turn <mark style="background-color:green;">**Sync browser data to the cloud**</mark> off.

![Security](/files/4obUPHqOfPoHaJYRJe27)

In **Navigator** section: you can change the **Languages** of your Browser. Click on **Edit** and choose the **Languages** you want and click on **Save.**

![Navigator](/files/ZagRsxcoNZDWoloYMvfX)

In **Mask Media Devices** section, if you want to keep using your computer's canvas, turn **Mask Canvas** off. Because many computers have the same canvas nowadays, so it is safe to use your real computer's canvas.

![Canvas](/files/YmnGYR5M5W4TepzAIU50)

In **Other** section: you can choose to turn on the settings you want

* <mark style="background-color:green;">**Clear Cache after browser shutdown**</mark> will helps reduce storage space of Hidemyacc on your computer.
* <mark style="background-color:green;">**Restore Last Browser Session**</mark> will lets you open every page of your last session.
* <mark style="background-color:green;">**Don't allow sites to show images**</mark> is suitable for anyone using a low quality Internet.
* <mark style="background-color:green;">**Mute Audio**</mark> will mute your profile's audio.
* <mark style="background-color:green;">**Start URL**</mark> is the start page whenever you open the profile.

![Others](/files/9L8EbwdGwwhJNv9T7stX)


# 11.5. Manage your profiles

After creating a Profile, you can **Edit**, **Sharing**, **Manage in Folder**, **Duplicate**, or **Delete** it.

![Manage Profile](/files/yEYKw5IqxVcHYcRgjTM9)

#### <mark style="background-color:orange;">**EDIT**</mark>

&#x20;You can change all the settings of that profile based on your needed.&#x20;

Details instructions about **Edit** a **Profile** has been documented in **Create Hidemyacc Profile.**

![Edit Profile](/files/8lYt8PDsPGkSpkJOm2P2)

#### <mark style="background-color:orange;">SHARING</mark>

You can **Share** your Profiles with anyone having a Hidemyacc account by follow these steps:

![Sharing Profile](/files/4FjUEioYgKUqcPDknmQw)

1. Enter **email address** of the account you want to share with.
2. Choose the permission:\
   \- **View:** profile's receiver can only use the profile to access the Internet. They can not edit the profile's configurations or delete the profile. Cookies, History, and Bookmarks are not saved on the server after being used.\
   \- **Edit:** Cookies, History, and Bookmarks are saved on the server after being used. Profile's receiver can only use the profile to access the Internet. They can not edit the profile's configurations or delete the profile. \
   \- **Admin:** profile's receiver have the same permission as the owner. They can edit or delete the profile. Cookies, History, and Bookmarks are saved on the server after being used.
3. Click **Send Invite.**

**Video Instructions:** [**https://youtu.be/21IP0puN\_iQ**](https://youtu.be/21IP0puN_iQ)

#### <mark style="background-color:orange;">**MANAGE IN FOLDER**</mark>

The **Folders** feature will help you manage and share Profiles in large quantities easier.

**First**, you will need to create a Folder:&#x20;

![Create Folder](/files/11ItG9BjPmFkcPXbDTOQ)

1. Click on **Folder**
2. Enter your Folder's name.
3. Click **Create.**

You can **Rename**, **Share**, or **Delete** Folder.

{% hint style="info" %}
**Sharing Folder** will use the **same permission** as **Sharing Profile.**
{% endhint %}

After creating a Folder, if you want to add a profile to that Folder, click on **Manage in Folder,** and click on the Folder you want to add your profile to.

![Add Profile to Folder](/files/ZQhIKtfEggf54VazH2jm)

#### <mark style="background-color:orange;">DUPLICATE</mark>

Duplicate is the fastest way to create a Profile based on the profile you already create. You only need 3 steps to duplicate a Profile:

1. Enter your new profile name.
2. Choose which configurations you want to duplicate from the original profile.
3. Click **Create**.

![Duplicate Profile](/files/hfgiiRUzBoHM8h8wIKad)

* **Fingerprint**: your new profile will duplicate hardware and software fingerprint of your original profile.
* **UserAgents**: your new profile will duplicate UserAgents specifications (OS, Browser) of your original profile.
* **WebRTC, Geolocation**: your new profile will use the same WebRTC and Geolocation of your original profile.
* **Extensions**: all of your original computer's extensions will be added to your new profile.
* **Proxy**: your new profile will use the same proxy as your original profile.


# 11.6. Restore deleted profiles

Since 2.0.76, Hidemyacc has released the Restore Profiles feature to help users restore deleted profiles.

Because our system will automatically backup at 24:00 everyday, so you can **only restore profiles** that are not **created and deleted on the same day**.

![Restore profile feature](/files/6sl6XWmrivfCAXjy9mBV)

1. **Hover** on **Profile icon** on the top right corner.
2. **Click Restore profile**.
3. **Choose** the **Profiles** you want to restore and **click Restore.**


# 11.7. Check hardware fingerprints and browser fingerprints

**Every time you create a new profile, your profile’s hardware fingerprints are automatically changed in the Advanced tab.**

**Video Instructions:** [**https://youtu.be/FtaDUNwsBMQ**](https://youtu.be/FtaDUNwsBMQ)<br>

**First,** Run a Profile and check your hardware and browser fingerprints on [**getip.pro**](https://getip.pro) (This is the website we highly recommend you check your profile’s fingerprint on)

{% hint style="info" %}
In this example, we will use the Profile with:\
\- Operating System: Android Samsung Galaxy S9+ (SM-G9650). Firmware version: 10\
\- Browser: Chrome version 97.0.4692.70\
\- Location: Hong Kong (HK)
{% endhint %}

In [<mark style="color:blue;">**getip.pro**</mark>](https://getip.pro/), you can check your **LOCATION** details

![Location](/files/WXUc8z9euJ0iMj0TigGf)

**Second**, on the **BROWSER** section, we are using a Profile with: \
\- Operating System: Android Samsung Galaxy S9+ (SM-G9650), Firmware version: 10.\
\- Browser: Chrome version 97.0.4692.70.

![Browser](/files/zZnpCLo9lmU2ekNjgmtu)

**Next**, on the **EXTENDED** section, you can compare the different between your Real Computer's fingerprints and Hidemyacc Profiles' fingerprints.

![Compare Fingerprint](/files/RMWYnJmhW7UyGCdJdOJS)

In **NAVIGATOR** section, pay attention at **AppVersion, Platform,** and **UserAgent**

![Navigator ](/files/rPFVELNsYNdTPBkvBQy8)

**Lastly**, on **SCREEN** section, you can check the different between Hidemyacc Profile and Real Computer screen specifications

![](/files/DKUkFIcoa3v50VPvXkgW)


# 11.8. Create automation scripts

**Automation** is the premium feature that saves your **time**, **effort**, **money** for repetitive tasks such as cookie bots, account creation, surfing the web,... All you need is to write some simple code on the **Automation** tab for **Hidemyacc** to automatically run profiles and do repetitive tasks according to your request.

**Video Instructions**: [**https://youtu.be/mIxq7PYg5Us**](https://youtu.be/mIxq7PYg5Us)

![Automation feature](/files/r5HqbmO12vQP0z9qbkDT)

<mark style="background-color:orange;">**AUTOMATION INSTRUCTIONS**</mark>

1. **Add Scripts: Choose** the Scripts you want to use then click **Add to Script.** You can only **Edit 1 Script** at a time.
2. **Choose how** your Profiles/Folders will Run the Script.
3. **Choose Profiles/Folders** you want to Run.
4. Click **Run Profiles.**

![Automation Instructions](/files/bpRKCzqWedxb5ROHFmh4)

####

#### <mark style="background-color:orange;">CREATE NEW SCRIPT</mark>

**To create a new script, please follow these steps:**

1. **Click** on **(+)** button:

![Create New Script - 1 ](/files/ffugpo56R03YmZ0Q4E63)

2\. **Enter** your **Script's name**

3\. **Enter** your **Script**

4\. **Click Test** if you want to run a demo of your Script.

5\. **Click Save** if you've finished entering the Script.

![Create New Script - 2](/files/ClL1TzDoVdUewcyDnxmF)

**2 ways to enter your Script:**

1. **Add our available templates**: we already added many available templates for you to use directly or as an example to write your own script.

   You only need to **choose** a **Script** and **click Add.**

![Choose Templates](/files/YGKnam2XjCjk0NORpSok)

2\. **Add each commands one by one:** You can add each commands one by one based on our available commands.\
You only need to **choose** a **Command**, enter the needed information and **click Add.**

![Choose Command](/files/t4ePuKb5mal3V2kcT3HK)

* <mark style="background-color:purple;">**OpenURL(url)**</mark>: Enter the Website URL you want the Script to open.&#x20;

![OpenURL](/files/OrBUQu3YAUGOUZ0eOwBw)

* <mark style="background-color:purple;">**Type(selector, text)**</mark>: Simulate the behavior of typing text into the selector you choose.\
  You need to **paste** the **selector** you want to enter the text in and **enter** the **text** you want then **click Add.**

{% hint style="info" %}
**Instruction video on how to get the selector:** [**https://youtu.be/mIxq7PYg5Us**](https://youtu.be/mIxq7PYg5Us)
{% endhint %}

![](/files/mURbPI1mwufMmG5ssaIE)

* <mark style="background-color:purple;">**Click(selector)**</mark>: Use this command to make your profile clicks on a specific selector.\
  You need to **paste** the **selector** you want to click on then **click Add.**

![Click](/files/0wxeG9NDoF4W2BaQRiIw)

* <mark style="background-color:purple;">**Keypress(Enter)**</mark>: Simulate the behavior of **pressing Enter** button on the keyboard.

![Keypress(Enter)](/files/xiwY8Yszw95QTcM4HXBa)

* <mark style="background-color:purple;">**Back()**</mark>**:** This command helps you **return** to the **previous page**

![Back](/files/c0bZr2cdCcv6m3IDkdK0)

* <mark style="background-color:purple;">**Wait(seconds)**</mark>: Your profile will **wait** for the **specific seconds** you chose before continuing to the next action.

![Wait](/files/rLuOB6NKz08i9OXDOI31)

* <mark style="background-color:purple;">**WaitRandom(x,y)**</mark>: Your profile will **wait randomly** between x and y second.&#x20;

![WaitRandom](/files/Cbfuy16GbqZVUQIJ7RAZ)

* <mark style="background-color:purple;">**SwipeUp(y)**</mark>: **Scroll up** the web page in **vertical** with a specified number of pixels. y is the pixel value that you want to scroll.

![SwipeUp](/files/59906P9A7dcnOIgGbXwj)

* <mark style="background-color:purple;">**SwipeDown(y)**</mark>: **Scroll down** the web page in **vertical** with a specified number of pixels. y is the pixel value that you want to scroll.

![SwipeDown](/files/6YrPlm8qozuvM2OefOZF)

* <mark style="background-color:purple;">**RandomFromFile(selector,file)**</mark>: **Randomly enter** text from a .txt file into a specific selector your choose. You need to **paste** the **selector** you want to enter the text in and **choose** the **txt file** then **click Add.**

![RandomFromFile](/files/PQpF34ryKyP0zvr4raHT)

* <mark style="background-color:purple;">**RandomAmazonKeyword(selector)**</mark>: **Randomly enter Amazon Keyword** from our server into a specific selector you choose, normally is the search bar. You need to **paste** the **selector** you want to enter the keyword in then **click Add.**

![RandomAmazonKeyword](/files/hIIguXP5CCwGerCi6FxX)

* <mark style="background-color:purple;">**RandomEbayKeyword(selector)**</mark>: **Randomly enter eBay Keyword** from our server into a specific selector you choose, normally is the search bar. You need to **paste** the **selector** you want to enter the keyword in then **click Add.**

![RandomEbayKeyword](/files/uW4k3hMuYDH0EHLMbsxQ)

* <mark style="background-color:purple;">**RandomEtsyKeyword(selector)**</mark>: **Randomly enter Etsy Keyword** from our server into a specific selector you choose, normally is the search bar. You need to **paste** the **selector** you want to enter the keyword in then **click Add.**

![RandomEtsyKeyword](/files/JZ77Omd3pVZlDfEhm05s)


# 11.9. Hidemyacc 2.0 API

Hidemyacc's API User Instructions

{% content-ref url="/pages/rPxyGgngTge9lAtpYPgY" %}
[Profile](/11.-hidemyacc-2.0-instructions/11.9.-hidemyacc-2.0-api/profile)
{% endcontent-ref %}

{% content-ref url="/pages/9tPHPnjEtstVvmm0BPk8" %}
[User](/11.-hidemyacc-2.0-instructions/11.9.-hidemyacc-2.0-api/user)
{% endcontent-ref %}

{% content-ref url="/pages/DvX8wb2N3EfnZSumUpIn" %}
[Examples](/11.-hidemyacc-2.0-instructions/11.9.-hidemyacc-2.0-api/examples)
{% endcontent-ref %}


# Profile

{% content-ref url="/pages/YAnVyKMHMBp35Bnz7PKd" %}
[1. Profile List](/11.-hidemyacc-2.0-instructions/11.9.-hidemyacc-2.0-api/profile/1.-profile-list)
{% endcontent-ref %}

{% content-ref url="/pages/3mND2zXCH7Tw3oYL3FrZ" %}
[2. Create Profile](/11.-hidemyacc-2.0-instructions/11.9.-hidemyacc-2.0-api/profile/2.-create-profile)
{% endcontent-ref %}

{% content-ref url="/pages/qhzl5Q6dk1CxvChNO0iV" %}
[3. Run Profile](/11.-hidemyacc-2.0-instructions/11.9.-hidemyacc-2.0-api/profile/3.-run-profile)
{% endcontent-ref %}

{% content-ref url="/pages/QbXNtGKy5CpRuX3KcptF" %}
[4. Stop Profile](/11.-hidemyacc-2.0-instructions/11.9.-hidemyacc-2.0-api/profile/4.-stop-profile)
{% endcontent-ref %}

{% content-ref url="/pages/EMbp0dhHUyKrcKzqHjMR" %}
[5. Delete Profile](/11.-hidemyacc-2.0-instructions/11.9.-hidemyacc-2.0-api/profile/5.-delete-profile)
{% endcontent-ref %}


# 1. Profile List

### <mark style="background-color:yellow;">**Get User's Profile List**</mark>

```
GET http://127.0.0.1:12368/profiles
```

###

### <mark style="background-color:yellow;">Examples</mark>

* Curl example

```
curl http://127.0.0.1:12368/profiles
```

* Javascript example

```
const hidemyacc = new Hidemyacc();
const user = await hidemyacc.profiles();
```

### <mark style="background-color:yellow;">Success response</mark>

**Success response - `Success 200`**

| Name | Type       | Description           |
| ---- | ---------- | --------------------- |
| data | `Object[]` | profiles List of user |

###

### <mark style="background-color:yellow;">**Success response example**</mark>

**Success response example - `Success-Example`**

```
    HTTP/1.1 200 OK
 {
    "code": 1,
    "data":
    [
        {
            "id": "615d0c642a151505fe6a3a1a",
            "name": "Eleanore Paysinger",
            "notes": "",
            "browserType": "chrome",
            "os": "mac",
            "platform": "MacIntel",
            "proxy":
            {
                "autoProxyPassword": "",
                "autoProxyRegion": "us",
                "autoProxyServer": "",
                "autoProxyUsername": "",
                "host": "",
                "mode": "none",
                "password": "",
                "port": null,
                "proxyEnabled": false,
                "torProxyRegion": "us",
                "username": ""
            },
            "role": "owner",
            "createdAt": "2021-10-06T02:39:32.840Z",
            "updatedAt": "2021-10-06T03:10:10.060Z"
        },
        {
            "id": "615d066a2a151505fe6a24ad",
            "name": "Antonetta Blan",
            "notes": "",
            "browserType": "chrome",
            "os": "mac",
            "platform": "MacIntel",
            "proxy":
            {
                "autoProxyPassword": "",
                "autoProxyRegion": "us",
                "autoProxyServer": "",
                "autoProxyUsername": "",
                "host": "",
                "mode": "none",
                "password": "",
                "port": null,
                "proxyEnabled": false,
                "torProxyRegion": "us",
                "username": ""
            },
            "role": "owner",
            "createdAt": "2021-10-06T02:14:02.691Z",
            "updatedAt": "2021-10-06T02:14:02.691Z"
        }
    ]
}
```

###

### <mark style="background-color:yellow;">Error response</mark>

**Error response - `Error 4xx`**

<br>

| Name | Type | Description             |
| ---- | ---- | ----------------------- |
| 401  |      | Not logged into account |

###

### <mark style="background-color:yellow;">Error response example</mark>

**Error response example - `Response (example):`**

```
HTTP/1.1 401 Not Authenticated
{
  "code": 0,
  "message": "Unauthorized",
  "data": {}
}
```


# 2. Create Profile

### <mark style="background-color:yellow;">Create Profile</mark>

```
POST http://127.0.0.1:12368/profiles
```

###

### <mark style="background-color:yellow;">Parameters -</mark> `Parameter`

<table><thead><tr><th width="150">Name</th><th width="150">Type</th><th width="445.2">Description</th></tr></thead><tbody><tr><td>os</td><td><code>String</code></td><td>Operating system. List of supported operating systems: (win, mac, linux, android, ios)</td></tr><tr><td>name</td><td><code>String</code></td><td>Optional profile's name</td></tr><tr><td>notes</td><td><code>String</code></td><td>Optional Note</td></tr><tr><td>browser</td><td><code>String</code></td><td>Optional Browser. List of supported browsers: (chrome, opera, edge, firefox)</td></tr><tr><td>proxy</td><td><code>String</code></td><td>Optional Proxy. Use in the following format: "{"host":"103.171.112.245","mode":"http","password":"1ee93edba5c911c33","port":19099,"username":"nguyenmanhtien.bh"}"</td></tr></tbody></table>

###

### <mark style="background-color:yellow;">Examples</mark>

* Curl example

```
curl -X POST http://127.0.0.1:12368/profiles -i -d "os=mac&name=test&notes=example&browser=chrome"
```

* Javascript example

```
const hidemyacc = new Hidemyacc();
const proxy = {
  host: "103.171.112.245",
  mode: "http",
  password: "1ee93edba5c911c33",
  port: 19099,
  username: "nguyenmanhtien.bh",
};
const user = await hidemyacc.create(os, name, notes, browser, proxy);
```

###

### <mark style="background-color:yellow;">Success response</mark>

**Success response - `Success 200`**

| Name | Type     | Description          |
| ---- | -------- | -------------------- |
| data | `Object` | Profile information. |

###

### <mark style="background-color:yellow;">Success response example</mark>

**Success response example - `Success-Example`**

```
HTTP/1.1 200 OK
    {
        "code": 1,
        "data":
        {
            "browserType": "chrome",
            "createdAt": "2021-10-06T09:28:43.178Z",
            "id": "615d6c4b2a151505fe6ba060",
            "name": "test",
            "notes": "example",
            "os": "mac",
            "platform": "MacIntel",
            "proxy":
            {
                "autoProxyPassword": "",
                "autoProxyRegion": "us",
                "autoProxyServer": "",
                "autoProxyUsername": "",
                "host": "",
                "mode": "none",
                "password": "",
                "port": 80,
                "proxyEnabled": false,
                "torProxyRegion": "us",
                "username": ""
            },
            "role": "owner",
            "updatedAt": "2021-10-06T09:28:43.178Z"
        }
    }
```

###

### <mark style="background-color:yellow;">Error response</mark>

**Error response - `Error 4xx`**

<table><thead><tr><th width="150">Name</th><th width="184.4">Type</th><th>Description</th></tr></thead><tbody><tr><td>401</td><td></td><td>Not logged into account</td></tr></tbody></table>

### <mark style="background-color:yellow;">Error response example</mark>

**Error response example - `Response (example):`**

```
HTTP/1.1 401 Not Authenticated
{
  "code": 0,
  "message": "Unauthorized",
  "data": {}
}
```


# 3. Run Profile

### <mark style="background-color:yellow;">Open</mark> <mark style="background-color:yellow;"></mark><mark style="background-color:yellow;">**Profile**</mark>

```
POST http://127.0.0.1:12368/profiles/start/:id
```

### <mark style="background-color:yellow;">Examples</mark>

* Curl example

```
curl -X POST http://127.0.0.1:12368/profiles/start/615d6c4b2a151505fe6ba060
```

* Javascript example

```
const hidemyacc = new Hidemyacc();
const user = await hidemyacc.start("615d6c4b2a151505fe6ba060");
```

### <mark style="background-color:yellow;">Success response</mark>

**Success response - `Success 200`**

| Name  | Type     | Description                 |
| ----- | -------- | --------------------------- |
| port  | `Number` | PORT auto                   |
| wsUrl | `String` | Used to integrate Puppeteer |

### <mark style="background-color:yellow;">Success response example</mark>

**Success response example - `Success-Example`**

```
HTTP/1.1 200 OK
    {
    "code": 1,
    "data": {
            "port": 22881,
            "wsUrl": "ws://127.0.0.1:22881/devtools/browser/bb79645f-eb15-441e-811d-c38b36a13111"
        }
    }
```

### <mark style="background-color:yellow;">Error response</mark>

**Error response - `Error 4xx`**

| Name | Type | Description             |
| ---- | ---- | ----------------------- |
| 401  |      | Not logged into account |

### <mark style="background-color:yellow;">Error response example</mark>

**Error response example - `Response (example):`**

```
HTTP/1.1 401 Not Authenticated
{
  "code": 0,
  "message": "Unauthorized",
  "data": {}
}
```


# 4. Stop Profile

### <mark style="background-color:yellow;">Open Profile</mark>

```
POST http://127.0.0.1:12368/profiles/stop/:id
```

### <mark style="background-color:yellow;">Examples</mark>

* Curl example

```
curl -X POST http://127.0.0.1:12368/profiles/stop/615d6c4b2a151505fe6ba060
```

* Javascript example

```
const hidemyacc = new Hidemyacc();
const user = await hidemyacc.stop("615d6c4b2a151505fe6ba060");
```

### <mark style="background-color:yellow;">Success response</mark>

**Success response - `Success 200`**

<table><thead><tr><th width="150">Name</th><th width="190.2931158410064">Type</th><th>Description</th></tr></thead><tbody><tr><td>port</td><td><code>Number</code></td><td>PORT auto</td></tr><tr><td>wsUrl</td><td><code>String</code></td><td>Used to integrate Puppeteer</td></tr></tbody></table>

### <mark style="background-color:yellow;">Success response example</mark>

**Success response example - `Success-Example`**

```
HTTP/1.1 200 OK
    {
        "code": 1
    }
```

### <mark style="background-color:yellow;">Error response</mark>

**Error response - `Error 4xx`**

| Name | Type | Description             |
| ---- | ---- | ----------------------- |
| 401  |      | Not logged into account |

### <mark style="background-color:yellow;">Error response example</mark>

**Error response example - `Response (example):`**

```
HTTP/1.1 401 Not Authenticated
{
  "code": 0,
  "message": "Unauthorized",
  "data": {}
}
```


# 5. Delete Profile

### <mark style="background-color:yellow;">Delete Profile</mark>

```
POST http://127.0.0.1:12368/profiles/delete/:id
```

### <mark style="background-color:yellow;">Examples</mark>

* Curl example

```
curl -X POST http://127.0.0.1:12368/profiles/delete/615d6c4b2a151505fe6ba060
```

* Javascript example

```
const hidemyacc = new Hidemyacc();
const user = await hidemyacc.delete("615d6c4b2a151505fe6ba060");
```

### <mark style="background-color:yellow;">Success response example</mark>

**Success response example - `Success-Example`**

```
HTTP/1.1 200 OK
    {
        "code": 1
    }
```

### <mark style="background-color:yellow;">Error response</mark>

**Error response - `Error 4xx`**

| Name | Type | Description             |
| ---- | ---- | ----------------------- |
| 401  |      | Not logged into account |

### <mark style="background-color:yellow;">Error response example</mark>

**Error response example - `Response (example):`**

```
HTTP/1.1 401 Not Authenticated
{
  "code": 0,
  "message": "Unauthorized",
  "data": {}
}
```


# User

{% content-ref url="/pages/btzzanLMcnMD8sSR99sf" %}
[Query account information (v2.0)](/11.-hidemyacc-2.0-instructions/11.9.-hidemyacc-2.0-api/user/query-account-information-v2.0)
{% endcontent-ref %}


# Query account information (v2.0)

### <mark style="background-color:yellow;">Query Account Information</mark>

```
GET http://127.0.0.1:12368/me
```

### <mark style="background-color:yellow;">Examples</mark>

* Curl example

```
curl http://127.0.0.1:12368/me
```

* Javascript example

```
const hidemyacc = new Hidemyacc();
const user = await hidemyacc.me();
```

### <mark style="background-color:yellow;">Success response</mark>

**Success response - `Success 200`**

<table><thead><tr><th width="170.45295729537966">Name</th><th width="162.58144386971296">Type</th><th>Description</th></tr></thead><tbody><tr><td>data</td><td><code>Object</code></td><td>User information</td></tr><tr><td>data.affiliate</td><td><code>Number</code></td><td>Percentage for partners to join affiliate</td></tr><tr><td>data.createdAt</td><td><code>Date</code></td><td>Account creation date</td></tr><tr><td>data.email</td><td><code>email</code></td><td>Email Address</td></tr><tr><td>data.expireDate</td><td><code>Date</code></td><td>Expiration date</td></tr><tr><td>data.id</td><td><code>String</code></td><td>Id Account</td></tr><tr><td>data.lockEnabled</td><td><code>Boolean</code></td><td>Is the account locked or not?</td></tr><tr><td>data.plan</td><td><code>Object</code></td><td>Information about the subscription plan that the account is using</td></tr><tr><td>data.profiles</td><td><code>Number</code></td><td>Number of current profiles of the user</td></tr><tr><td>data.plan.maxProfiles</td><td><code>Number</code></td><td>Number of profiles that the subscription plan supports</td></tr><tr><td>data.plan.name</td><td><code>Number</code></td><td>Subcription plan's name</td></tr></tbody></table>

### <mark style="background-color:yellow;">Success response example</mark>

**Success response example - `Success-Example`**

```
HTTP/1.1 200 OK
{
    "code": 1,
    "data":
    {
        "affiliate": 10,
        "createdAt": "2021-03-11T10:47:58.666Z",
        "email": "test@hidemyacc.com",
        "expireDate": "2022-11-03T07:24:58.408Z",
        "id": "613c895e92097a1b0ea30b7b",
        "lockEnabled": false,
        "plan":
        {
            "maxProfiles": 1000,
            "name": "Business"
        },
        "profiles": 25
    }
}
```

### <mark style="background-color:yellow;">Error response</mark>

**Error response - `Error 4xx`**

| Name | Type | Description             |
| ---- | ---- | ----------------------- |
| 401  |      | Not logged into account |

### <mark style="background-color:yellow;">Error response example</mark>

**Error response example - `Response (example):`**

```
HTTP/1.1 401 Not Authenticated
{
  "code": 0,
  "message": "Unauthorized",
  "data": {}
}
```


# Examples

Here are the examples of Hidemyacc API

Hidemyacc API Examples for Puppeteer/Nodejs, Selenium (C#, Python)

{% embed url="<https://github.com/hidemyacc/hidemyacc>" %}
Hidemyacc API Examples
{% endembed %}


# 12.1. Profile API

{% content-ref url="/pages/dq0jPvIQ7Cup6bUd3Nas" %}
[Start Profile](/12.-hidemyacc-3.0-api/12.1.-profile-api/start-profile)
{% endcontent-ref %}

{% content-ref url="/pages/yeMVfbNYfju2zfvvstZn" %}
[Stop Profile](/12.-hidemyacc-3.0-api/12.1.-profile-api/stop-profile)
{% endcontent-ref %}

{% content-ref url="/pages/u3boUWoZgC4sYLFFgqrH" %}
[Profile List](/12.-hidemyacc-3.0-api/12.1.-profile-api/profile-list)
{% endcontent-ref %}

{% content-ref url="/pages/eXE1RiEnYMIplZf3DTuX" %}
[Folder List](/12.-hidemyacc-3.0-api/12.1.-profile-api/folder-list)
{% endcontent-ref %}

{% content-ref url="/pages/ahXHUTkBl4MA1xFDDX7p" %}
[Create Marco Profile](/12.-hidemyacc-3.0-api/12.1.-profile-api/create-marco-profile)
{% endcontent-ref %}

{% content-ref url="/pages/yA2cxj3g8ctqcWGWRBsa" %}
[Create Ghosty Profile](/12.-hidemyacc-3.0-api/12.1.-profile-api/create-ghosty-profile)
{% endcontent-ref %}

{% content-ref url="/pages/fcrAKHvturMa59PqMFQG" %}
[Update Marco Profile](/12.-hidemyacc-3.0-api/12.1.-profile-api/update-marco-profile)
{% endcontent-ref %}

{% content-ref url="/pages/T0PF8KTi3KIlFXZsq9hf" %}
[Update Ghosty Profile](/12.-hidemyacc-3.0-api/12.1.-profile-api/update-ghosty-profile)
{% endcontent-ref %}

{% content-ref url="/pages/Agyo8QAaVZ2bGd93LMPj" %}
[Delete Profile](/12.-hidemyacc-3.0-api/12.1.-profile-api/delete-profile)
{% endcontent-ref %}


# Start Profile

### **Start Profile**

```
POST http://127.0.0.1:2268/profiles/start/:profileID
```

### Example

* Curl example

```
curl -X POST http://127.0.0.1:2268/profiles/start/:profileID
```

* Javascript example

```
const hidemyacc = new Hidemyacc();
const response= await hidemyacc.start("652e8e982293bc496ec38ecb");
```

**Note:** In Hidemyacc 3.0 you can adjust proxy when starting profiles.&#x20;

```json
{
    "proxy": "{\"host\":\"127.0.0.1\",\"mode\":\"http\",\"password\":\"d92913ab\",\"port\":26951,\"username\":\"nguyenmanhtien.bh\"}",
    "params": "--disable-gpu --window-size=800,600 --window-position=100,100"
}
```

* Get params here: <https://peter.sh/experiments/chromium-command-line-switches/>

### <mark style="background-color:yellow;">Success response</mark>

**Success response - `Success 200`**

| Name  | Type     | Description                 |
| ----- | -------- | --------------------------- |
| port  | `Number` | PORT auto                   |
| wsUrl | `String` | Used to integrate Puppeteer |

### <mark style="background-color:yellow;">Success response example</mark>

**Success response example - `Success-Example`**

```
Status code: 200 OK
{
    "code": 1,
    "data": {
        "success": true,
        "port": 27999,
        "wsUrl": "ws://127.0.0.1:27999/devtools/browser/23b9ca53-5e90-4977-99a9-30a95b0c03f5",
        "userAgent": "Mozilla/5.0 (Windows NT 10.0; Win64; x64) AppleWebKit/537.36 (KHTML, like Gecko) Chrome/113.0.0.0 Safari/537.36",
        "majorVersion": 113
    }
}
```

### <mark style="background-color:yellow;">Error response</mark>

**Error response - `Error 4xx`**

<table><thead><tr><th width="206.33333333333331">Name</th><th width="197">Type</th><th>Description</th></tr></thead><tbody><tr><td>402</td><td></td><td>API supported from Team plan</td></tr></tbody></table>

### <mark style="background-color:yellow;">Error response example</mark>

**Error response example - `Response (example):`**

```
Status code 402: Payment required
{
    "code": 0
}
```


# Stop Profile

### **Stop Profile**

```
POST http://127.0.0.1:2268/profiles/stop/:profileID
```

### Example

* Curl example

```
curl -X POST http://127.0.0.1:2268/profiles/stop/:profileID
```

* Javascript example

```
const hidemyacc = new Hidemyacc();
const response = await hidemyacc.stop("652e8e982293bc496ec38ecb");
```

### <mark style="background-color:yellow;">Success response</mark>

**Success response - `Success 200`**

| Name  | Type     | Description                 |
| ----- | -------- | --------------------------- |
| port  | `Number` | PORT auto                   |
| wsUrl | `String` | Used to integrate Puppeteer |

### <mark style="background-color:yellow;">Success response example</mark>

**Success response example - `Success-Example`**

```
Status code: 200 OK
{
    "code": 1
}

```

### <mark style="background-color:yellow;">Error response</mark>

**Error response - `Error 4xx`**

<table><thead><tr><th width="212.33333333333331">Name</th><th width="213">Type</th><th>Description</th></tr></thead><tbody><tr><td>402</td><td></td><td>API supported from Team plan</td></tr></tbody></table>

### <mark style="background-color:yellow;">Error response example</mark>

**Error response example - `Response (example):`**

```
Status code 402: Payment required
{
    "code": 0
}
```


# Profile List

### <mark style="background-color:yellow;">**Get User's Profile List**</mark>

<pre><code><strong>GET http://127.0.0.1:2268/profiles
</strong></code></pre>

### Querry Params

| Name   | Type      | Describtion             |
| ------ | --------- | ----------------------- |
| q      | `String`  | Search for profile name |
| full   | `Boolean` | default: true           |
| folder | `String`  | Search by folder ID     |

### Example

* Curl example

```
curl GET http://127.0.0.1:2268/profiles
```

* Javascript example

```
const hidemyacc = new Hidemyacc();
const response = await hidemyacc.profiles();
```

### <mark style="background-color:yellow;">Success response</mark>

**Success response - `Success 200`**

| Name | Type       | Description           |
| ---- | ---------- | --------------------- |
| data | `Object[]` | profiles List of user |

### <mark style="background-color:yellow;">Success response example</mark>

**Success response example - `Success-Example`**

```
Status code: 200 OK
{
    "code": 1,
    "data": [
        {
            "id": "6481649c3bb6b407243d9fd3",
            "name": "Scarlet Henriette",
            "notes": "",
            "browserSource": "marco",
            "browserType": "chrome",
            "proxy": {
                "proxyEnabled": false,
                "autoProxyServer": "",
                "autoProxyUsername": "",
                "autoProxyPassword": "",
                "mode": "none",
                "port": 0,
                "autoProxyRegion": "us",
                "torProxyRegion": "us"
            }
        },
        {
            "id": "648159d23bb6b4072438989a",
            "name": "free 3",
            "notes": "",
            "browserSource": "ghosty",
            "browserType": "chrome",
            "proxy": {
                "proxyEnabled": true,
                "autoProxyServer": "",
                "autoProxyUsername": "",
                "autoProxyPassword": "",
                "mode": "free",
                "port": 0,
                "autoProxyRegion": "kr",
                "torProxyRegion": "us"
            }
        }
    ]
}

```

### <mark style="background-color:yellow;">Error response</mark>

**Error response - `Error 4xx`**

<table><thead><tr><th width="215.33333333333331">Name</th><th width="200">Type</th><th>Description</th></tr></thead><tbody><tr><td>402</td><td></td><td>API supported from Team plan</td></tr></tbody></table>

### <mark style="background-color:yellow;">Error response example</mark>

**Error response example - `Response (example):`**

```
Status code 402: Payment required
{
    "code": 0
}
```


# Folder List

### <mark style="background-color:yellow;">**Get User's Profile List**</mark>

```
GET http://127.0.0.1:2268/folders
```

### Example

* Curl example

```
curl GET localhost:2268/folders
```

* Javascript example

```
const hidemyacc = new Hidemyacc();
const response = await hidemyacc.folders();
```

### <mark style="background-color:yellow;">Success response</mark>

**Success response - `Success 200`**

| Name | Type       | Description          |
| ---- | ---------- | -------------------- |
| data | `Object[]` | folders List of user |

### <mark style="background-color:yellow;">Success response example</mark>

**Success response example - `Success-Example`**

```
Status code: 200 OK
{
    "code": 1,
    "data": [
        {
            "id": "63bfd88852d4f7546b26d7ae",
            "name": "Test 1"
        },
        {
            "id": "63d5656b52d4f7546b5d5037",
            "name": "Test 2"
        }
    ]
}

```

### <mark style="background-color:yellow;">Error response</mark>

**Error response - `Error 4xx`**

<table><thead><tr><th width="204.33333333333331">Name</th><th width="196">Type</th><th>Description</th></tr></thead><tbody><tr><td>402</td><td></td><td>API supported from Team plan</td></tr></tbody></table>

### <mark style="background-color:yellow;">Error response example</mark>

**Error response example - `Response (example):`**

```
Status code 402: Payment required
{
    "code": 0
}
```


# Create Marco Profile

### <mark style="background-color:yellow;">**Create Marco Profile**</mark>

```
POST http://127.0.0.1:2268/profiles
```

### <mark style="background-color:yellow;">Parameters -</mark> `Parameter`

<table><thead><tr><th width="225.33333333333331">Name</th><th width="125">Type</th><th>Description</th></tr></thead><tbody><tr><td>os</td><td><code>String</code></td><td>Operating system. List of supported operating systems: (win, mac, lin, ios)</td></tr><tr><td>isWin11</td><td><code>Boolean</code></td><td>default: true</td></tr><tr><td>model</td><td><code>String</code></td><td>Mobile device information (ipad)</td></tr><tr><td>name</td><td><code>String</code></td><td>Optional profile's name</td></tr><tr><td>notes</td><td><code>String</code></td><td>Optional Note</td></tr><tr><td>browserSource</td><td><code>String</code></td><td>Optional Browser. List of supported browsers source: (marco)</td></tr><tr><td>browserType</td><td><code>String</code></td><td>Optional Browser. List of supported browsers type: (chrome, brave, opera, edge, yandex)</td></tr><tr><td>browserDataSync</td><td><code>Boolean</code></td><td>default: true</td></tr><tr><td>majorVersion</td><td><code>Number</code></td><td>Chrome version</td></tr><tr><td>fakeCanvas</td><td><code>Boolean</code></td><td>default: true</td></tr><tr><td>fakeMediaDevices</td><td><code>Boolean</code></td><td>default: true</td></tr><tr><td>fakeWebGLImage</td><td><code>Boolean</code></td><td>default: true</td></tr><tr><td>fakeWebGLMetaData</td><td><code>Boolean</code></td><td>default: true</td></tr><tr><td>fakeAudio</td><td><code>Boolean</code></td><td>default: true</td></tr><tr><td>fakeClientRects</td><td><code>Boolean</code></td><td>default: false</td></tr><tr><td>clearCacheOnBrowserClose</td><td><code>Boolean</code></td><td>default: true</td></tr><tr><td>restoreLastSessionOnBrowserOpen</td><td><code>Boolean</code></td><td>default: true</td></tr><tr><td>language</td><td><code>String</code></td><td>browser language </td></tr><tr><td>resolution</td><td><code>String</code></td><td>screen resolution</td></tr><tr><td>proxy</td><td><code>String</code></td><td><p>Optional Proxy. Support http, socks4, socks5. Use in the following format:</p><pre class="language-json"><code class="lang-json">"{\"host\":\"127.0.0.1\",\"mode\":\"http\",\"password\":\"d92913ab\",\"port\":26951,\"username\":\"nguyenmanhtien.bh\"}"
</code></pre></td></tr><tr><td>folder</td><td><code>String</code></td><td>ID</td></tr><tr><td>startUrl</td><td><code>String</code></td><td>start URL</td></tr><tr><td>extensions</td><td><code>String</code></td><td><p>extension folder path <br></p><pre class="language-json"><code class="lang-json">"C:\\Extensions\\1,C:\\Extensions\\2"
</code></pre></td></tr><tr><td>webRTCMode</td><td><code>Boolean</code></td><td>default:true. Disable WebRTC: false</td></tr><tr><td>fakeCanvas</td><td><code>Boolean</code></td><td>default:true</td></tr><tr><td>majorVersion</td><td><code>String</code></td><td>Browser's version</td></tr></tbody></table>

### Example

* Link to Postman's API Hidemyacc version 3:

<https://drive.google.com/file/d/1th6bL94-crxaHUZ6-fyTUCfJJOnmT92k/view>

### <mark style="background-color:yellow;">Success response</mark>

**Success response - `Success 200`**

| Name | Type     | Description         |
| ---- | -------- | ------------------- |
| data | `Object` | Profile information |

### <mark style="background-color:yellow;">Success response example</mark>

**Success response example - `Success-Example`**

```
Status code: 200 OK 
{
    "code": 1,
    "data": {
        "id": "64816f8c3bb6b40724423ab3",
        "name": "test-auto-2",
        "os": "win",
        "platform": "Win32",
        "browserSource": "marco",
        "browserType": "brave",
        "proxy": {
            "proxyEnabled": false,
            "autoProxyServer": "",
            "autoProxyUsername": "",
            "autoProxyPassword": "",
            "changeIpUrl": "",
            "mode": "http",
            "port": 26951,
            "autoProxyRegion": "VN",
            "torProxyRegion": "us",
            "host": "127.0.0.1",
            "username": "nguyenmanhtien.bh",
            "password": "d92913ab"
        },
        "startUrl": "https://ipfighter.com",
        "folder": "6466014a8dc055a729880fa1"
    }
}

```

### <mark style="background-color:yellow;">Error response</mark>

**Error response - `Error 4xx`**

<table><thead><tr><th width="199">Name</th><th width="162.33333333333331">Type</th><th>Description</th></tr></thead><tbody><tr><td>402</td><td></td><td>API supported from Team plan</td></tr></tbody></table>

### <mark style="background-color:yellow;">Error response example</mark>

**Error response example - `Response (example):`**

```
Status code 402: Payment required
{
    "code": 0
}
```


# Create Ghosty Profile

### <mark style="background-color:yellow;">**Create Ghosty Profile**</mark>

```
POST http://127.0.0.1:2268/profiles
```

### <mark style="background-color:yellow;">Parameters -</mark> `Parameter`

<table><thead><tr><th width="225.33333333333331">Name</th><th width="125">Type</th><th>Description</th></tr></thead><tbody><tr><td>os</td><td><code>String</code></td><td>Operating system. List of supported operating systems: (win, mac, lin, android, ios)</td></tr><tr><td>name</td><td><code>String</code></td><td>Optional profile's name</td></tr><tr><td>notes</td><td><code>String</code></td><td>Optional Note</td></tr><tr><td>browserSource</td><td><code>String</code></td><td>Optional Browser. List of supported browsers source: (ghosty)</td></tr><tr><td>browserType</td><td><code>String</code></td><td>Optional Browser. List of supported browsers type: (chrome, opera, edge, firefox)</td></tr><tr><td>browserDataSync</td><td><code>Boolean</code></td><td>default: false</td></tr><tr><td>majorVersion</td><td><code>Number</code></td><td>Chrome version</td></tr><tr><td>fakeCanvas</td><td><code>Boolean</code></td><td>default: false</td></tr><tr><td>fakeMediaDevices</td><td><code>Boolean</code></td><td>default: true</td></tr><tr><td>fakeWebGLImage</td><td><code>Boolean</code></td><td>default: true</td></tr><tr><td>fakeWebGLMetaData</td><td><code>Boolean</code></td><td>default: true</td></tr><tr><td>fakeAudio</td><td><code>Boolean</code></td><td>default: true</td></tr><tr><td>fakeClientRects</td><td><code>Boolean</code></td><td>default: false</td></tr><tr><td>clearCacheOnBrowserClose</td><td><code>Boolean</code></td><td>default: true</td></tr><tr><td>restoreLastSessionOnBrowserOpen</td><td><code>Boolean</code></td><td>default: true</td></tr><tr><td>language</td><td><code>String</code></td><td>browser language </td></tr><tr><td>resolution</td><td><code>String</code></td><td>screen resolution</td></tr><tr><td>proxy</td><td><code>String</code></td><td><p>Optional Proxy. Support http, socks4, socks5. Use in the following format:</p><pre class="language-json"><code class="lang-json">"{\"host\":\"127.0.0.1\",\"mode\":\"http\",\"password\":\"d92913ab\",\"port\":26951,\"username\":\"nguyenmanhtien.bh\"}"
</code></pre></td></tr><tr><td>userAgent</td><td><code>String</code></td><td><p></p><pre class="language-json"><code class="lang-json">"Mozilla/5.0 (Windows NT 10.0; Win64; x64) AppleWebKit/537.36 (KHTML, like Gecko) Chrome/113.0.0.0 Safari/537.36",
</code></pre></td></tr><tr><td>folder</td><td><code>String</code></td><td>Folder ID</td></tr><tr><td>startUrl</td><td><code>String</code></td><td>start URL</td></tr><tr><td>extensions</td><td><code>String</code></td><td><p>extensions folder path<br></p><pre class="language-json"><code class="lang-json">"C:\\Extensions\\1,C:\\Extensions\\2"
</code></pre></td></tr></tbody></table>

### Example

* Link to Postman's API Hidemyacc version 3:

<https://drive.google.com/drive/folders/1PY9VSbRCFbRwhruOP3uv7w-ECB3erXS3?usp=sharing>

### <mark style="background-color:yellow;">Success response</mark>

**Success response - `Success 200`**

| Name | Type     | Description         |
| ---- | -------- | ------------------- |
| data | `Object` | Profile information |

### <mark style="background-color:yellow;">Success response example</mark>

**Success response example - `Success-Example`**

```
Status code: 200 OK 
{
    "code": 1,
    "data": {
        "id": "64817c6c3bb6b40724481bab",
        "name": "test-auto-3",
        "os": "win",
        "platform": "Win32",
        "browserSource": "ghosty",
        "browserType": "chrome",
        "proxy": {
            "proxyEnabled": false,
            "autoProxyServer": "",
            "autoProxyUsername": "",
            "autoProxyPassword": "",
            "changeIpUrl": "",
            "mode": "http",
            "port": 26951,
            "autoProxyRegion": "VN",
            "torProxyRegion": "us",
            "host": "127.0.0.1",
            "username": "nguyenmanhtien.bh",
            "password": "d92913ab"
        },
        "startUrl": "https://ipfighter.com",
        "folder": "6466014a8dc055a729880fa1"
    }
}

```

### <mark style="background-color:yellow;">Error response</mark>

**Error response - `Error 4xx`**

<table><thead><tr><th width="205.33333333333331">Name</th><th width="204">Type</th><th>Description</th></tr></thead><tbody><tr><td>402</td><td></td><td>API supported from Team plan</td></tr></tbody></table>

### <mark style="background-color:yellow;">Error response example</mark>

**Error response example - `Response (example):`**

```
Status code 402: Payment required
{
    "code": 0
}
```


# Update Marco Profile

### <mark style="background-color:yellow;">**Update Marco Profile**</mark>

```
PUT http://127.0.0.1:2268/profiles/:profileID
```

### <mark style="background-color:yellow;">Parameters -</mark> `Parameter`

<table><thead><tr><th width="225.33333333333331">Name</th><th width="125">Type</th><th>Description</th></tr></thead><tbody><tr><td>name</td><td><code>String</code></td><td>Optional profile's name</td></tr><tr><td>notes</td><td><code>String</code></td><td>Optional Note</td></tr><tr><td>browserSource</td><td><code>String</code></td><td>Optional Browser. List of supported browsers source: (marco)</td></tr><tr><td>fakeMediaDevices</td><td><code>Boolean</code></td><td>default: true</td></tr><tr><td>fakeWebGLImage</td><td><code>Boolean</code></td><td>default: true</td></tr><tr><td>fakeWebGLMetaData</td><td><code>Boolean</code></td><td>default: true</td></tr><tr><td>fakeAudio</td><td><code>Boolean</code></td><td>default: true</td></tr><tr><td>fakeClientRects</td><td><code>Boolean</code></td><td>default: false</td></tr><tr><td>language</td><td><code>String</code></td><td>browser language </td></tr><tr><td>resolution</td><td><code>String</code></td><td>screen resolution</td></tr><tr><td>proxy</td><td><code>String</code></td><td><p>Optional Proxy. Support http, socks4, socks5 Use in the following format:</p><pre class="language-json"><code class="lang-json">"{\"host\":\"127.0.0.1\",\"mode\":\"http\",\"password\":\"d92913ab\",\"port\":26951,\"username\":\"nguyenmanhtien.bh\"}"
</code></pre></td></tr><tr><td>folder</td><td><code>String</code></td><td>Folder ID</td></tr><tr><td>webRTCMode</td><td><code>Boolean</code></td><td>default: true. Disable WebRTC: false</td></tr><tr><td>fakeCanvas</td><td><code>Boolean</code></td><td>default: true</td></tr><tr><td>majorVersion</td><td><code>String</code></td><td>Browser's version</td></tr><tr><td>extension</td><td><code>String</code></td><td><p>extension folder path</p><pre class="language-json"><code class="lang-json">"C:\\Extensions\\1,C:\\Extensions\\2"
</code></pre></td></tr><tr><td>os</td><td><code>String</code></td><td>Operating system. List of supported operating systems: (win, mac, lin, ios)</td></tr><tr><td>browserType</td><td><code>String</code></td><td>Optional Browser. List of supported browsers type: (chrome, brave, opera, edge, yandex)</td></tr><tr><td>clearCacheOnBrowserClose</td><td><code>Boolean</code></td><td>default:true</td></tr><tr><td>restoreLastSessionOnBrowserOpen</td><td><code>Boolean</code></td><td>default:true</td></tr><tr><td>startURL</td><td><code>String</code></td><td>Start URL</td></tr></tbody></table>

### Example

Link to Postman's API Hidemyacc version 3:

<https://drive.google.com/file/d/15HowoZVj6rFe3yoAdgn6FsLj0_4oqZIi/view?usp=sharing>

### <mark style="background-color:yellow;">Success response</mark>

**Success response - `Success 200`**

| Name | Type     | Description         |
| ---- | -------- | ------------------- |
| data | `Object` | Profile information |

### <mark style="background-color:yellow;">Success response example</mark>

**Success response example - `Success-Example`**

```
Status code: 200 OK 
{
    "code": 1,
    "data": {
        "id": "64817d243bb6b407244878a9",
        "name": "test-auto-2-1",
        "os": "win",
        "platform": "Win32",
        "browserSource": "marco",
        "browserType": "chrome",
        "proxy": {
            "proxyEnabled": false,
            "autoProxyServer": "",
            "autoProxyUsername": "",
            "autoProxyPassword": "",
            "changeIpUrl": "",
            "mode": "http",
            "port": 26951,
            "autoProxyRegion": "VN",
            "torProxyRegion": "us",
            "host": "127.0.0.1",
            "username": "nguyenmanhtien.bh",
            "password": "d92913ab"
        },
        "startUrl": "https://ipfighter.com"
    }
}

```

### <mark style="background-color:yellow;">Error response</mark>

**Error response - `Error 4xx`**

<table><thead><tr><th width="204.33333333333331">Name</th><th width="212">Type</th><th>Description</th></tr></thead><tbody><tr><td>402</td><td></td><td>API supported from Team plan</td></tr></tbody></table>

### <mark style="background-color:yellow;">Error response example</mark>

**Error response example - `Response (example):`**

```
Status code 402: Payment required
{
    "code": 0
}
```


# Update Ghosty Profile

### <mark style="background-color:yellow;">**Update Ghosty Profile**</mark>

```
PUT http://127.0.0.1:2268/profiles/:profileID
```

### <mark style="background-color:yellow;">Parameters -</mark> `Parameter`

<table><thead><tr><th width="210.33333333333331">Name</th><th width="109">Type</th><th>Description</th></tr></thead><tbody><tr><td>name</td><td><code>String</code></td><td>Optional profile's name</td></tr><tr><td>notes</td><td><code>String</code></td><td>Optional Note</td></tr><tr><td>browserSource</td><td><code>String</code></td><td>Optional Browser. List of supported browsers source: (ghosty)</td></tr><tr><td>fakeMediaDevices</td><td><code>Boolean</code></td><td>default: true</td></tr><tr><td>fakeWebGLImage</td><td><code>Boolean</code></td><td>default: true</td></tr><tr><td>fakeWebGLMetaData</td><td><code>Boolean</code></td><td>default: true</td></tr><tr><td>fakeAudio</td><td><code>Boolean</code></td><td>default: true</td></tr><tr><td>fakeClientRects</td><td><code>Boolean</code></td><td>default: false</td></tr><tr><td>language</td><td><code>String</code></td><td>browser language </td></tr><tr><td>resolution</td><td><code>String</code></td><td>screen resolution</td></tr><tr><td>proxy</td><td><code>String</code></td><td><p>Optional Proxy. Support http, socks4, socks5. Use in the following format:</p><pre class="language-json"><code class="lang-json">"{\"host\":\"127.0.0.1\",\"mode\":\"http\",\"password\":\"d92913ab\",\"port\":26951,\"username\":\"nguyenmanhtien.bh\"}"
</code></pre></td></tr><tr><td>folder</td><td><code>String</code></td><td>Folder ID</td></tr><tr><td>userAgent</td><td><code>String</code></td><td><p></p><pre class="language-json"><code class="lang-json"> "Mozilla/5.0 (Windows NT 10.0; Win64; x64) AppleWebKit/537.36 (KHTML, like Gecko) Chrome/112.0.0.0 Safari/537.36"
</code></pre></td></tr></tbody></table>

### Example

* Link to Postman's API Hidemyacc version 3:

<https://drive.google.com/drive/folders/1PY9VSbRCFbRwhruOP3uv7w-ECB3erXS3?usp=sharing>

### <mark style="background-color:yellow;">Success response</mark>

**Success response - `Success 200`**

| Name | Type     | Description         |
| ---- | -------- | ------------------- |
| data | `Object` | Profile information |

### <mark style="background-color:yellow;">Success response example</mark>

**Success response example - `Success-Example`**

```
Status code: 200 OK
{
    "code": 1,
    "data": {
        "id": "648159d23bb6b4072438989a",
        "name": "test-auto-3-1",
        "os": "mac",
        "platform": "MacIntel",
        "browserSource": "ghosty",
        "browserType": "chrome",
        "proxy": {
            "proxyEnabled": false,
            "autoProxyServer": "",
            "autoProxyUsername": "",
            "autoProxyPassword": "",
            "changeIpUrl": "",
            "mode": "http",
            "port": 26951,
            "autoProxyRegion": "VN",
            "torProxyRegion": "us",
            "host": "127.0.0.1",
            "username": "nguyenmanhtien.bh",
            "password": "cvbh"
        },
        "startUrl": "https://ipfighter.com"
    }
}

```

### <mark style="background-color:yellow;">Error response</mark>

**Error response - `Error 4xx`**

<table><thead><tr><th width="200">Name</th><th width="193.33333333333331">Type</th><th>Description</th></tr></thead><tbody><tr><td>402</td><td></td><td>API supported from Team plan</td></tr></tbody></table>

### <mark style="background-color:yellow;">Error response example</mark>

**Error response example - `Response (example):`**

```
Status code 402: Payment required
{
    "code": 0
}
```


# Delete Profile

### <mark style="background-color:yellow;">**Delete Profile**</mark>

```
DELETE http://127.0.0.1:2268/profiles/:profileID
```

### Example

* Curl example

```
curl DELETE http://127.0.0.1:2268/profiles/:profileID
```

* Javascript example

```
const hidemyacc = new Hidemyacc();
const response = await hidemyacc.delete("615d6c4b2a151505fe6ba060");
```

### <mark style="background-color:yellow;">Success response</mark>

**Success response - `Success 200`**

| Name | Type     | Description         |
| ---- | -------- | ------------------- |
| data | `Object` | Profile information |

### <mark style="background-color:yellow;">Success response example</mark>

**Success response example - `Success-Example`**

```
Status code: 200 OK
{
    "code": 1
}

```

### <mark style="background-color:yellow;">Error response</mark>

**Error response - `Error 4xx`**

<table><thead><tr><th width="197.33333333333331">Name</th><th width="189">Type</th><th>Description</th></tr></thead><tbody><tr><td>402</td><td></td><td>API supported from Team plan</td></tr></tbody></table>

### <mark style="background-color:yellow;">Error response example</mark>

**Error response example - `Response (example):`**

```
Status code 402: Payment required
{
    "code": 0
}
```


# 12.2. User API

{% content-ref url="/pages/4wgweYV9goSbonStkPMH" %}
[Query account information](/12.-hidemyacc-3.0-api/12.2.-user-api/query-account-information)
{% endcontent-ref %}


# Query account information

### **Profile Information**

```
GET http://127.0.0.1:2268/me
```

### Example

* Curl example

```
curl -X GET http://127.0.0.1:2268/me
```

* Javascript example

```
const hidemyacc = new Hidemyacc();
const response = await hidemyacc.me();
```

### <mark style="background-color:yellow;">Success response</mark>

**Success response - `Success 200`**

| Name                | Type     | Description                                                       |
| ------------------- | -------- | ----------------------------------------------------------------- |
| data                | `Object` | User information                                                  |
| data.id             | `String` | Id Account                                                        |
| data.email          | `email`  | Email Address                                                     |
| data.profiles       | `Number` | Number of current profiles of the user                            |
| data.plan           | `Object` | Information about the subscription plan that the account is using |
| data.planexpireDate | `Date`   | Expiration date                                                   |
| data.coins          | `Number` | Number of coins                                                   |

### <mark style="background-color:yellow;">Success response example</mark>

**Success response example - `Success-Example`**

```
Status code: 200 OK
{
    "code": 1,
    "data": {
        "id": "45670ff0cc42f1cb4a717d28",
        "email": "hidemyacc@gmail.com",
        "profiles": 128,
        "plan": "Business",
        "planExpireDate": "2024-06-28T08:20:46.402Z",
        "coins": 0
    }
}

```

### <mark style="background-color:yellow;">Error response</mark>

**Error response - `Error 4xx`**

<table><thead><tr><th width="200.33333333333331">Name</th><th width="199">Type</th><th>Description</th></tr></thead><tbody><tr><td>402</td><td></td><td>API supported from Team plan</td></tr></tbody></table>

### <mark style="background-color:yellow;">Error response example</mark>

**Error response example - `Response (example):`**

```
Status code 402: Payment required
{
    "code": 0
}
```


# 12.3. Example

Hidemyacc API Examples for Puppeteer/Nodejs, Selenium (C#, Python)

{% embed url="<https://github.com/hidemyacc/hidemyacc>" %}
Hidemyacc API Examples
{% endembed %}


# 13.1. Customer Support

{% hint style="info" %}
We value user experience and long-term goals, so our experienced customer care team always responding instantaneously. Along with that, the technical team is always on hand to assist you as soon as possible!
{% endhint %}

* **Support Service**: <mark style="color:blue;">**<support@hidemyacc.com>**</mark>
* **Telegram Support:** [**t.me/hidemyacc**](https://t.me/hidemyacc)
* **Facebook Support:**[ **facebook.com/hidemyacc**](https://www.messenger.com/t/hidemyacc)
* **Skype Support:**  [<mark style="color:blue;">**Hidemyacc Skype**</mark>](skype:live:.cid.45a22372eccc087c?chat)


# 13.2. FAQ

#### 1. I accidentally deleted a profile — can I recover it?

Yes. You can restore a deleted profile. However, Hidemyacc's system automatically updates at 24:00 (midnight) each day, so you can only restore a profile within 24 hours after it was deleted. You can refer back to section 3.8. Restoring a Profile to learn how to use this feature.

#### 2. How long / how many sessions can Profile History store at most?

Each profile stores up to 10 of the most recent working sessions (including cookies, browsing history, and bookmarks). Once this limit is exceeded, the oldest session is automatically deleted. This data is stored on the device you're currently using and is not synced to Hidemyacc's server. It can only be viewed when the profile is in the Ready state (not viewable while running or syncing). Important note: restoring a session cannot be undone — the current session will be completely replaced; and if the profile is deleted, all of its session history is also lost.

#### 3. Can a sub-account upgrade/renew its own package independently, or does it have to go through the main account?

A sub-account renews along with the main account and does not have its own independent package while it remains a sub-account. If the main account is not renewed on time, the sub-account will be locked and will require a renewal payment (through the main account) to unlock. If additional sub-accounts are needed beyond the free allotment included in the package, the main account can create additional ones and pay based on the number of days remaining on the main account. A sub-account can only have an independent package if it is converted into a Share account, in which case it is required to register for its own separate package.

#### 4. Can Automation run when the computer's screen is off / the app is closed?

For an automation script to run, your computer must be powered on. The system will not be able to run the script if you close the Hidemyacc application.

#### 5. Is Hidemyacc's free proxy stable enough for long-term use?

Hidemyacc's free proxy is a datacenter proxy shared among multiple users. You can use the free proxy to spoof your IP address and access websites quickly. If you want to spoof your IP for warming up accounts, you should use your own proxy.